Nestjs 튜토리얼 따라하기 7편
15 Aug 2021 | BackendNestjs 튜토리얼 따라하기 7편
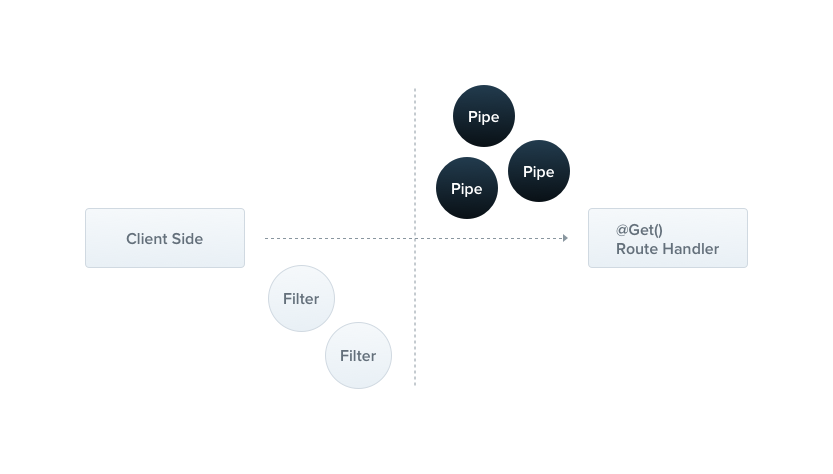
Pipes
-
Pipe 는 @Injectable() 데코레이터를 쓰는 클래스로서
PipeTransform인터페이스를 구현한 클래스 -
Pipe에는 두가지 일반적인 사용법이 있다.
- 입력 데이터를 원하는 형식으로 변환
- 입력 데이터가 유효한지 확인
이 두 경우 모두 Pipe는 Controller route handler 에서 작동한다.
Nest에는 내장 Pipe가 구현되어 있다. 또한 Custom Pipe도 구현할 수 있다.
내장 Pipe
- ValidationPipe
- ParseIntPipe
- ParseFloatPipe
- ParseBoolPipe
- ParseArrayPipe
- ParseUUIDPipe
- ParseEnumPipe
- DefaultValuePipe
모든 내장 Pipe들은 @nestjs/common 패키지에서 import 된다.
Pipe 활용
Pipe를 사용하기 위해서 다음과 같이 사용된다.
@Get(':id')
async findOne(@Param('id', ParseIntPipe) id: number) {
  return this.catsService.findOne(id);
}
findOne() 함수에서 id를 ParseIntPipe로 변환하여 사용한다. 만약 id가 number 타입이 아니라면 아래와 같은 에러를 발생시킨다.
{
  "statusCode": 400,
  "message": "Validation failed (numeric string is expected)",
  "error": "Bad Request"
}
아래와 같이 statusCode를 변경하는것도 가능하다.
@Get(':id')
async findOne(
  @Param('id', new ParseIntPipe({ errorHttpStatusCode: HttpStatus.NOT_ACCEPTABLE }))
  id: number,
) {
  return this.catsService.findOne(id);
}
Custom Pipe
위에서 언급했듯이 Custom Pipe를 생성할 수 있다.
import { PipeTransform, Injectable, ArgumentMetadata } from '@nestjs/common';

@Injectable()
export class ValidationPipe implements PipeTransform {
  transform(value: any, metadata: ArgumentMetadata) {
    return value;
  }
}
모든 Pipe는 transform() 메소드를 구현해야 한다. 이를 위해서 2개의 파라미터가 필요하다
- value
- metadata
value는 현재 처리되고 있는 파라미터이며 metadata는 value의 메타데이터 이다.
export interface ArgumentMetadata {
  type: 'body' | 'query' | 'param' | 'custom';
  metatype?: Type<unknown>;
  data?: string;
}
Schema 기반의 유효성 검사
@Post()
async create(@Body() createCatDto: CreateCatDto) {
  this.catsService.create(createCatDto);
}
export class CreateCatDto {
  name: string;
  age: number;
  breed: string;
}
위와 같은 create() 메소드와 CreateCatDto가 있을 때 유효성을 검사할 수 있도록 Pipe를 수정해 보도록 하겠다.
오브젝트 Schema 유효성 검사
여기서는 joi를 기반의 스키마를 사용하는 유효성 검사 Pipe를 구현한다.
먼저 아래의 패키지를 설치한다
$ npm install --save joi
$ npm install --save-dev @types/joi
import { PipeTransform, Injectable, ArgumentMetadata, BadRequestException } from '@nestjs/common';
import { ObjectSchema } from 'joi';

@Injectable()
export class JoiValidationPipe implements PipeTransform {
  constructor(private schema: ObjectSchema) {}

  transform(value: any, metadata: ArgumentMetadata) {
    const { error } = this.schema.validate(value);
    if (error) {
      throw new BadRequestException('Validation failed');
    }
    return value;
  }
}
Validation Pipe 적용
위에서 만든 JoiValidationPipe를 적용하기 위해서 아래와 같은 과정을 따른다.
JoiValidationPipe인스턴스를 생성한다.- joi schema를 생성자의 파라미터로 넣는다.
- 메소드에 해당 pipe를 바인딩한다.
이를 수행하면 아래와 같은 method처럼 구성된다.
@Post()
@UsePipes(new JoiValidationPipe(createCatSchema))
async create(@Body() createCatDto: CreateCatDto) {
  this.catsService.create(createCatDto);
}
Class validator
Class validator를 사용하기 위하여 아래의 패키지를 설치한다.
$ npm i --save class-validator class-transformer
위 패키지가 설치되면 CreateCatDto 클래스에 몇가지 데코레이터를 추가할 수 있다.
import { IsString, IsInt } from 'class-validator';

export class CreateCatDto {
  @IsString()
  name: string;

  @IsInt()
  age: number;

  @IsString()
  breed: string;
}
이를 사용하게 되면 별도의 유효성 검사를 위한 클래스를 만들 필요가 없다.
Global scoped pipes
ValidationPipe를 일반화 시켜 만들고 이를 전역으로 선언하고 싶다면 아래와 같이 구성한다.
async function bootstrap() {
  const app = await NestFactory.create(AppModule);
  app.useGlobalPipes(new ValidationPipe());
  await app.listen(3000);
}
bootstrap();
import { Module } from '@nestjs/common';
import { APP_PIPE } from '@nestjs/core';

@Module({
  providers: [
    {
      provide: APP_PIPE,
      useClass: ValidationPipe,
    },
  ],
})
export class AppModule {}