17 Mar 2025 |
Blockchain
안녕하세요! 지난 포스팅에서 Diamond 패턴의 기본 개념과 구조에 대해 설명드렸는데요. 오늘은 제가 직접 구현한 Diamond 패턴 보일러플레이트를 통해 실제 구현 방법과 사용 예시를 자세히 살펴보도록 하겠습니다.
 ERC-2535 Diamond 패턴의 구조
1. 보일러플레이트 소개
이번 포스팅에서 사용하는 보일러플레이트 전체 소스 코드는 GitHub에서 확인하실 수 있습니다.
이 보일러플레이트는 ERC-2535 Diamond 패턴을 구현하는데 필요한 모든 기본 구성요소를 포함하고 있습니다. 주요 특징은 다음과 같습니다:
- 기본 Diamond 컨트랙트 구현
- 다양한 Facet 예제 (ERC20, Counter, Calculator 등)
- Diamond Cut/Loupe 기능 구현
- 업그레이드 가능한 스마트 컨트랙트 구조
- 테스트 코드 포함
2. 프로젝트 구조
 Diamond 패턴 보일러플레이트 프로젝트 구조
3. 핵심 구현 설명
3.1 Diamond 컨트랙트
Diamond 컨트랙트는 모든 함수 호출의 진입점 역할을 합니다. 전체 구현은 다음과 같습니다:
// SPDX-License-Identifier: MIT
pragma solidity ^0.8.0;

/******************************************************************************\
* Author: Nick Mudge <nick@perfectabstractions.com> (https://twitter.com/mudgen)
* EIP-2535 Diamonds: https://eips.ethereum.org/EIPS/eip-2535
*
* Implementation of a diamond.
/******************************************************************************/

import {LibDiamond} from "./libraries/LibDiamond.sol";
import {IDiamondCut} from "./interfaces/IDiamondCut.sol";

contract Diamond {
    constructor(address _contractOwner, address _diamondCutFacet) payable {
        LibDiamond.setContractOwner(_contractOwner);

        // Add the diamondCut external function from the diamondCutFacet
        IDiamondCut.FacetCut[] memory cut = new IDiamondCut.FacetCut[](1);
        bytes4[] memory functionSelectors = new bytes4[](1);
        functionSelectors[0] = IDiamondCut.diamondCut.selector;
        cut[0] = IDiamondCut.FacetCut({
            facetAddress: _diamondCutFacet,
            action: IDiamondCut.FacetCutAction.Add,
            functionSelectors: functionSelectors
        });
        LibDiamond.diamondCut(cut, address(0), "");
    }

    // Find facet for function that is called and execute the
    // function if a facet is found and return any value.
    fallback() external payable {
        LibDiamond.DiamondStorage storage ds;
        bytes32 position = LibDiamond.DIAMOND_STORAGE_POSITION;
        // get diamond storage
        assembly {
            ds.slot := position
        }
        // get facet from function selector
        address facet = ds.selectorToFacetAndPosition[msg.sig].facetAddress;
        require(facet != address(0), "Diamond: Function does not exist");
        // Execute external function from facet using delegatecall and return any value.
        assembly {
            // copy function selector and any arguments
            calldatacopy(0, 0, calldatasize())
            // execute function call using the facet
            let result := delegatecall(gas(), facet, 0, calldatasize(), 0, 0)
            // get any return value
            returndatacopy(0, 0, returndatasize())
            // return any return value or error back to the caller
            switch result
            case 0 {
                revert(0, returndatasize())
            }
            default {
                return(0, returndatasize())
            }
        }
    }

    receive() external payable {}
}
3.2 Facet 업그레이드 실습: Counter Facet
이 보일러플레이트에서는 Counter Facet의 세 가지 버전을 통해 다이아몬드 패턴에서의 업그레이드 과정을 실습할 수 있습니다.
 CounterFacet 버전별 업그레이드 과정
3.2.1 CounterFacet (V1)
기본 Counter Facet 구현은 다음과 같습니다:
// SPDX-License-Identifier: MIT
pragma solidity ^0.8.0;

import "../libraries/LibDiamond.sol";
import "../libraries/LibCounter.sol";

contract CounterFacet {
    // Access to counter storage
    function getCounterStorage() internal pure returns (LibCounter.CounterStorage storage) {
        return LibCounter.counterStorage();
    }

    // Get the current counter value
    function getCount() external view returns (uint256) {
        return getCounterStorage().count;
    }

    // Increment the counter
    function increment() external {
        getCounterStorage().count += 1;
    }

    // Decrement the counter
    function decrement() external {
        LibCounter.CounterStorage storage cs = getCounterStorage();
        require(cs.count > 0, "Count cannot be negative");
        cs.count -= 1;
    }

    // Set the counter to a specific value
    function setCount(uint256 _count) external {
        LibDiamond.enforceIsContractOwner(); // Only owner can set count
        getCounterStorage().count = _count;
    }
}
스토리지는 LibCounter.sol에 정의되어 있습니다:
// SPDX-License-Identifier: MIT
pragma solidity ^0.8.0;

/**
 * @title LibCounter
 * @dev Storage library for Counter facet
 */
library LibCounter {
    struct CounterStorage {
        uint256 count;
    }

    // Position in storage is determined by keccak256 of a unique string
    bytes32 constant COUNTER_STORAGE_POSITION = keccak256("diamond.counter.storage");

    // Returns the struct from a specified position in contract storage
    function counterStorage() internal pure returns (CounterStorage storage cs) {
        bytes32 position = COUNTER_STORAGE_POSITION;
        assembly {
            cs.slot := position
        }
    }
}
3.2.2 CounterFacetV2 (기능 추가)
V2에서는 새로운 기능과 이벤트를 추가하였습니다:
// SPDX-License-Identifier: MIT
pragma solidity ^0.8.0;

import "../libraries/LibDiamond.sol";
import "../libraries/LibCounter.sol";

/**
 * @title CounterFacetV2
 * @dev Upgraded version of CounterFacet with additional functionality
 */
contract CounterFacetV2 {
    // Access to counter storage
    function getCounterStorage() internal pure returns (LibCounter.CounterStorage storage) {
        return LibCounter.counterStorage();
    }

    // Get the current counter value
    function getCount() external view returns (uint256) {
        return getCounterStorage().count;
    }

    // Increment the counter
    function increment() external {
        getCounterStorage().count += 2;

        // Added in V2: Emit event when counter is incremented
        emit CounterIncremented(getCounterStorage().count);
    }

    // Decrement the counter
    function decrement() external {
        LibCounter.CounterStorage storage cs = getCounterStorage();
        require(cs.count > 0, "Count cannot be negative");
        cs.count -= 2;

        // Added in V2: Emit event when counter is decremented
        emit CounterDecremented(cs.count);
    }

    // Set the counter to a specific value
    function setCount(uint256 _count) external {
        LibDiamond.enforceIsContractOwner(); // Only owner can set count
        uint256 oldCount = getCounterStorage().count;
        getCounterStorage().count = _count;

        // Added in V2: Emit event when counter value is changed
        emit CounterSet(oldCount, _count);
    }

    // Added in V2: New function to increment counter by 2
    function doubleIncrement() external {
        getCounterStorage().count += 2;
        emit CounterIncremented(getCounterStorage().count);
    }

    // Added in V2: Function to check if counter is a multiple of a given number
    function isMultipleOf(uint256 _number) external view returns (bool) {
        require(_number != 0, "Cannot divide by zero");
        return getCounterStorage().count % _number == 0;
    }

    // Events added in V2
    event CounterIncremented(uint256 newCount);
    event CounterDecremented(uint256 newCount);
    event CounterSet(uint256 oldCount, uint256 newCount);
}
V2에서는 다음 내용이 추가되었습니다:
- increment/decrement 함수가 2씩 증가/감소하도록 수정
- 이벤트 추가 (CounterIncremented, CounterDecremented, CounterSet)
- 새로운 함수 추가 (doubleIncrement, isMultipleOf)
3.2.3 CounterFacetV3 (스토리지 확장)
V3에서는 스토리지 구조를 확장했습니다. 이를 위해 새로운 라이브러리(LibCounterV2.sol)를 사용합니다:
 V3 업그레이드에서 스토리지 확장 과정
// SPDX-License-Identifier: MIT
pragma solidity ^0.8.0;

/**
 * @title LibCounterV2
 * @dev Storage library for CounterFacet with extended functionality
 */
library LibCounterV2 {
    struct CounterStorage {
        uint256 count;
        uint256 lastIncremented; // Last increment timestamp
        uint256 lastDecremented; // Last decrement timestamp
        uint256 totalIncrements; // Total number of increments
        uint256 totalDecrements; // Total number of decrements
        address lastModifier; // Address of the last modifier
    }

    // Position in storage is determined by keccak256 of a unique string - Keep the same key as original
    bytes32 constant COUNTER_STORAGE_POSITION = keccak256("diamond.counter.storage");

    // Returns the struct from a specified position in contract storage
    function counterStorage() internal pure returns (CounterStorage storage cs) {
        bytes32 position = COUNTER_STORAGE_POSITION;
        assembly {
            cs.slot := position
        }
    }

    // Storage migration function
    function migrateStorage() internal {
        CounterStorage storage cs = counterStorage();

        // Initialize data if not already initialized
        if (cs.lastModifier == address(0)) {
            cs.lastIncremented = block.timestamp;
            cs.lastDecremented = block.timestamp;
            cs.totalIncrements = 0;
            cs.totalDecrements = 0;
            cs.lastModifier = msg.sender;
        }
    }
}
CounterFacetV3 구현:
// SPDX-License-Identifier: MIT
pragma solidity ^0.8.0;

import "../libraries/LibDiamond.sol";
import "../libraries/LibCounterV2.sol";

/**
 * @title CounterFacetV3
 * @dev Version of CounterFacet that uses extended storage structure
 */
contract CounterFacetV3 {
    // Access to counter storage
    function getCounterStorage() internal pure returns (LibCounterV2.CounterStorage storage) {
        return LibCounterV2.counterStorage();
    }

    // Function for initial migration
    function initializeV3() external {
        LibDiamond.enforceIsContractOwner(); // Only owner can initialize
        LibCounterV2.migrateStorage();
    }

    // Get the current counter value
    function getCount() external view returns (uint256) {
        return getCounterStorage().count;
    }

    // Increment the counter with extended functionality
    function increment() external {
        LibCounterV2.CounterStorage storage cs = getCounterStorage();
        cs.count += 3;
        cs.lastIncremented = block.timestamp;
        cs.totalIncrements += 1; // Single operation
        cs.lastModifier = msg.sender;

        emit CounterIncremented(cs.count, cs.totalIncrements, msg.sender);
    }

    // ... 그 외 다양한 함수들 ...

    // Added in V3: Function to get extended counter information
    function getCounterInfo()
        external
        view
        returns (
            uint256 count,
            uint256 lastIncremented,
            uint256 lastDecremented,
            uint256 totalIncrements,
            uint256 totalDecrements,
            address lastModifier
        )
    {
        LibCounterV2.CounterStorage storage cs = getCounterStorage();
        return (
            cs.count,
            cs.lastIncremented,
            cs.lastDecremented,
            cs.totalIncrements,
            cs.totalDecrements,
            cs.lastModifier
        );
    }

    // Events added in V3
    event CounterIncremented(uint256 newCount, uint256 totalIncrements, address modifierAddress);
    event CounterDecremented(uint256 newCount, uint256 totalDecrements, address modifierAddress);
    event CounterSet(uint256 oldCount, uint256 newCount, address modifierAddress);
}
V3의 주요 변경점:
- 확장된 스토리지 구조 사용 (카운터 값 + 추가 메타데이터)
- 스토리지 마이그레이션 함수 (initializeV3)
- 새로운 함수들 추가 (getCounterInfo, getLastIncrementTime, 등)
- 이벤트에 더 많은 정보 포함
3.3 Facet 업그레이드 프로세스
업그레이드 과정은 스크립트를 통해 자동화되어 있습니다. 주요 과정은 다음과 같습니다:
 Diamond Cut 과정을 통한 Facet 업그레이드 메커니즘
V1 → V2 업그레이드 (기능 업그레이드)
// upgrade-counter-v2-facet.ts
async function main() {
    // 새 Facet 배포
    const CounterFacetV2 = await ethers.getContractFactory("CounterFacetV2");
    const counterFacetV2 = await CounterFacetV2.deploy();

    // Diamond Cut Facet 인스턴스화
    const diamondCutFacet = await ethers.getContractAt("IDiamondCut", diamondAddress);

    // 기존 함수 셀렉터 가져오기
    const selectors = getSelectors(counterFacet);

    // 새 함수 셀렉터 가져오기
    const selectorsV2 = getSelectors(counterFacetV2);

    // 1단계: 기존 CounterFacet 기능 제거
    const cutRemove = {
        facetAddress: ethers.ZeroAddress,
        action: FacetCutAction.Remove,
        functionSelectors: selectors,
    };

    // 2단계: 새 CounterFacetV2 기능 추가
    const cutAdd = {
        facetAddress: counterFacetV2Address,
        action: FacetCutAction.Add,
        functionSelectors: selectorsV2,
    };

    // 업그레이드 실행 (제거 후 추가)
    await diamondCutFacet.diamondCut([cutRemove], ethers.ZeroAddress, "0x");
    await diamondCutFacet.diamondCut([cutAdd], ethers.ZeroAddress, "0x");
}
V2 → V3 업그레이드 (스토리지 업그레이드)
// upgrade-counter-v3-facet.ts
async function main() {
    // 현재 카운터 값 확인
    const currentCount = await counterFacetV2.getCount();

    // 새 Facet 배포
    const CounterFacetV3 = await ethers.getContractFactory("CounterFacetV3");
    const counterFacetV3 = await CounterFacetV3.deploy();

    // 기존 V2 함수 셀렉터 가져오기
    const selectorsV2 = getSelectors(CounterFacetV2);

    // 새 V3 함수 셀렉터 가져오기
    const selectorsV3 = getSelectors(counterFacetV3);

    // 1단계: 기존 CounterFacetV2 기능 제거
    const cutRemove = {
        facetAddress: ethers.ZeroAddress,
        action: FacetCutAction.Remove,
        functionSelectors: selectorsV2,
    };

    // 2단계: 새 CounterFacetV3 기능 추가
    const cutAdd = {
        facetAddress: counterFacetV3Address,
        action: FacetCutAction.Add,
        functionSelectors: selectorsV3,
    };

    // 업그레이드 실행 (제거 후 추가)
    await diamondCutFacet.diamondCut([cutRemove], ethers.ZeroAddress, "0x");
    await diamondCutFacet.diamondCut([cutAdd], ethers.ZeroAddress, "0x");

    // 스토리지 마이그레이션 실행
    const counterFacetV3Proxy = await ethers.getContractAt("CounterFacetV3", diamondAddress);
    await counterFacetV3Proxy.initializeV3();

    // 업그레이드 확인
    const count = await counterFacetV3Proxy.getCount();
    console.log("업그레이드 후 카운터 값 (보존되어야 함):", count.toString());
}
4. 보일러플레이트 사용 방법
- 저장소 클론
git clone https://github.com/sweatpotato13/solidity-contract-boilerplate.git
- 의존성 설치
- 테스트 실행
- 로컬 네트워크에 배포
pnpm node
pnpm deploy:local
- Facet 업그레이드 테스트
# V1 → V2 업그레이드
npx hardhat run scripts/upgrade-counter-v2-facet.ts --network localhost

# V2 → V3 업그레이드 (스토리지 확장)
npx hardhat run scripts/upgrade-counter-v3-facet.ts --network localhost
 Diamond 패턴 개발 및 업그레이드 워크플로우
마무리
이번 포스팅에서는 Diamond 패턴의 실제 구현과 보일러플레이트 사용 방법에 대해 알아보았습니다. 특히 Facet 업그레이드와 스토리지 확장 과정을 통해 다이아몬드 패턴의 강력한 유연성을 확인할 수 있었습니다.
이 보일러플레이트를 활용하면 기능 추가, 버그 수정, 스토리지 확장 등 다양한 업그레이드 시나리오를 쉽게 구현할 수 있습니다. 이는 복잡한 스마트 컨트랙트 시스템을 개발하고 유지보수하는 데 큰 도움이 될 것입니다.
14 Mar 2025 |
Blockchain
Overview
이더리움 블록체인의 스마트 컨트랙트를 개발할 때 가장 큰 제약 중 하나는 컨트랙트 크기 제한(24KB)과 업그레이드 가능성입니다. 이러한 문제를 해결하기 위해 등장한 것이 ERC-2535 다이아몬드 패턴입니다. 이 표준은 모듈식 스마트 컨트랙트 시스템을 구현하기 위한 구조와 방법을 정의합니다.
이 포스팅에서는 ERC-2535 다이아몬드 패턴의 개념, 구성 요소, 이점 및 구현 방법에 대해 알아보겠습니다.
다이아몬드 패턴이란?
다이아몬드 패턴은 2020년 Nick Mudge에 의해 제안된 EIP(Ethereum Improvement Proposal)로, 스마트 컨트랙트를 더 모듈화하고 확장 가능하게 만드는 아키텍처입니다. 전통적인 스마트 컨트랙트와 달리, 다이아몬드 패턴은 컨트랙트를 여러 개의 작은 조각(facet)으로 나누어 관리합니다.
주요 구성 요소
다이아몬드 패턴의 주요 구성 요소는 다음과 같습니다:
- 다이아몬드 컨트랙트: 중앙 허브 역할을 하는 코어 컨트랙트로, 함수 호출을 적절한 facet으로 위임(delegate)합니다.
- Facet 컨트랙트: 특정 기능을 포함하는 모듈식 컨트랙트입니다. 하나의 다이아몬드는 여러 facet을 가질 수 있으며, 각 facet은 전체 로직의 다른 부분을 담당합니다.
- Selector: 함수 선택자는 호출을 올바른 facet으로 라우팅하는 데 사용됩니다. 다이아몬드 컨트랙트는 함수 선택자에서 해당 facet 주소로의 조회 테이블을 유지합니다.
- Loupe 함수: 다이아몬드에 대한 정보를 쿼리할 수 있는 내부 검사 함수들로, facet과 그들이 제공하는 함수에 대한 정보를 제공합니다.
ERC-2535의 이점
다이아몬드 패턴을 사용하면 다음과 같은 이점이 있습니다:
- 모듈성: 스마트 컨트랙트를 작은 facet으로 나누면 전체 시스템에 영향을 주지 않고 특정 부분을 관리하고 업데이트할 수 있습니다.
- 확장성: 다이아몬드는 유기적으로 성장할 수 있는 대규모 복잡한 시스템의 개발을 가능하게 합니다. 새로운 기능은 새로운 facet을 배포하여 추가할 수 있습니다.
- 업그레이드 가능성: 개별 facet은 독립적으로 업그레이드될 수 있어 전체 계약을 다시 배포하지 않고도 유연하고 원활한 업데이트가 가능합니다.
- 가스 비용 절감: 업데이트되는 facet만 재배포하면 되므로 계약 업그레이드에 대한 전체 가스 비용이 크게 낮아질 수 있습니다.
- 조직화: 코드를 facet으로 구성함으로써 개발자는 코드베이스를 깔끔하게 유지하고 탐색하기 쉽게 만들어 유지보수성을 향상시킬 수 있습니다.
- 무제한 크기: 다이아몬드는 최대 계약 크기 제한이 없어, 시간이 지남에 따라 추가할 수 있는 기능의 양에 제한이 없습니다.
다이아몬드 패턴 구현하기
1. 개발 환경 설정
먼저 Hardhat을 이용하여 환경을 설정합니다:
npm install --save-dev hardhat
2. 다이아몬드 컨트랙트 생성
다이아몬드 컨트랙트는 중앙 허브 역할을 하며, 함수 호출을 적절한 facet으로 위임하는 로직을 포함합니다:
// Diamond.sol
pragma solidity ^0.8.0;

import "./IDiamondCut.sol";

contract Diamond {
    // 다이아몬드 저장소
    struct Facet {
        address facetAddress;
        bytes4[] selectors;
    }

    mapping(bytes4 => address) public selectorToFacet;

    constructor(IDiamondCut.FacetCut[] memory _diamondCut) {
        // 다이아몬드 컷 구현
    }

    fallback() external payable {
        address facet = selectorToFacet[msg.sig];
        require(facet != address(0), "Function does not exist");
        assembly {
            calldatacopy(0, 0, calldatasize())
            let result := delegatecall(gas(), facet, 0, calldatasize(), 0, 0)
            returndatacopy(0, 0, returndatasize())
            switch result
            case 0 {revert(0, returndatasize())}
            default {return(0, returndatasize())}
        }
    }
}
3. Facet 정의
특정 기능을 포함하는 facet 컨트랙트를 생성합니다. 예를 들어, Counter facet을 만들 수 있습니다:
// CounterFacet.sol
// SPDX-License-Identifier: MIT
pragma solidity ^0.8.0;

import "../libraries/LibDiamond.sol";
import "../libraries/LibCounter.sol";

contract CounterFacet {
    // Access to counter storage
    function getCounterStorage() internal pure returns (LibCounter.CounterStorage storage) {
        return LibCounter.counterStorage();
    }

    // Get the current counter value
    function getCount() external view returns (uint256) {
        return getCounterStorage().count;
    }

    // Increment the counter
    function increment() external {
        getCounterStorage().count += 1;
    }

    // Decrement the counter
    function decrement() external {
        LibCounter.CounterStorage storage cs = getCounterStorage();
        require(cs.count > 0, "Count cannot be negative");
        cs.count -= 1;
    }

    // Set the counter to a specific value
    function setCount(uint256 _count) external {
        LibDiamond.enforceIsContractOwner(); // Only owner can set count
        getCounterStorage().count = _count;
    }
}
4. 다이아몬드와 Facet 배포
다이아몬드 컨트랙트와 facet 컨트랙트를 배포한 후, Diamond Cut 메커니즘을 사용하여 facet을 다이아몬드에 연결합니다:
async function main() {
    const diamondCutFacet = await deploy("DiamondCutFacet", {
        from: deployer,
        log: true,
    });

    // Deploy Diamond
    const diamond = await deploy("Diamond", {
        from: deployer,
        args: [deployer, diamondCutFacet.address],
        log: true,
    });

    // Deploy DiamondInit
    const diamondInit = await deploy("DiamondInit", {
        from: deployer,
        log: true,
    });
    // Deploy facets
    console.log("");
    console.log("Deploying facets");
    const FacetNames = ["DiamondLoupeFacet", "OwnershipFacet", "CounterFacet", "ERC20Facet"];

    const cut: FacetCut[] = [];
    for (const FacetName of FacetNames) {
        const facetDeployment = await deploy(FacetName, {
            from: deployer,
            log: true,
        });

        console.log(`${FacetName} deployed: ${facetDeployment.address}`);

        const facetContract = await ethers.getContractAt(FacetName, facetDeployment.address);

        cut.push({
            facetAddress: facetDeployment.address,
            action: FacetCutAction.Add,
            functionSelectors: getSelectors(facetContract) || [],
        });
    }

    const diamondCutContract = await ethers.getContractAt("IDiamondCut", diamond.address);
    const diamondInitContract = await ethers.getContractAt("DiamondInit", diamondInit.address);

    // Call to init function
    let functionCall = diamondInitContract.interface.encodeFunctionData("init");
    const tx = await diamondCutContract.diamondCut(cut, diamondInit.address, functionCall);
}
5. 다이아몬드와 상호작용
배포 후, 다이아몬드 컨트랙트와 상호작용할 수 있습니다. 다이아몬드에 대한 호출은 적절한 facet으로 라우팅됩니다:
    const diamondAddress = "0xe7f1725E7734CE288F8367e1Bb143E90bb3F0512";

    const counterFacet = await ethers.getContractAt(
        "CounterFacet",
        diamondAddress,
    );

    const count = await counterFacet.getCount();
    console.log("Initial count:", count.toString());

    console.log("Incrementing counter...");
    const incrementTx = await counterFacet.increment();
    await incrementTx.wait();

    const newCount = await counterFacet.getCount();
    console.log("New count:", newCount.toString());
결론
ERC-2535 다이아몬드 패턴은 이더리움에서 모듈식, 확장 가능하고 업그레이드 가능한 스마트 컨트랙트를 구축하기 위한 강력한 프레임워크를 제공합니다. 스마트 컨트랙트를 facet으로 나눔으로써 개발자는 복잡한 시스템을 더 효과적으로 관리하고, 가스 비용을 줄이며, 원활한 업그레이드를 보장할 수 있습니다.
참고 자료
10 Feb 2025 |
Blockchain
LayerZero
Overview
이전 포스팅에서 LayerZero를 사용하여 ONFT(Omnichain Non-Fungible Tokens)를 배포하고 실행하는 과정을 다뤄보았습니다.
이번 포스팅에선 OFTAdapter(Omnichain Fungible Tokens Adapter)를 배포하고 실행하는 과정을 다뤄보겠습니다.
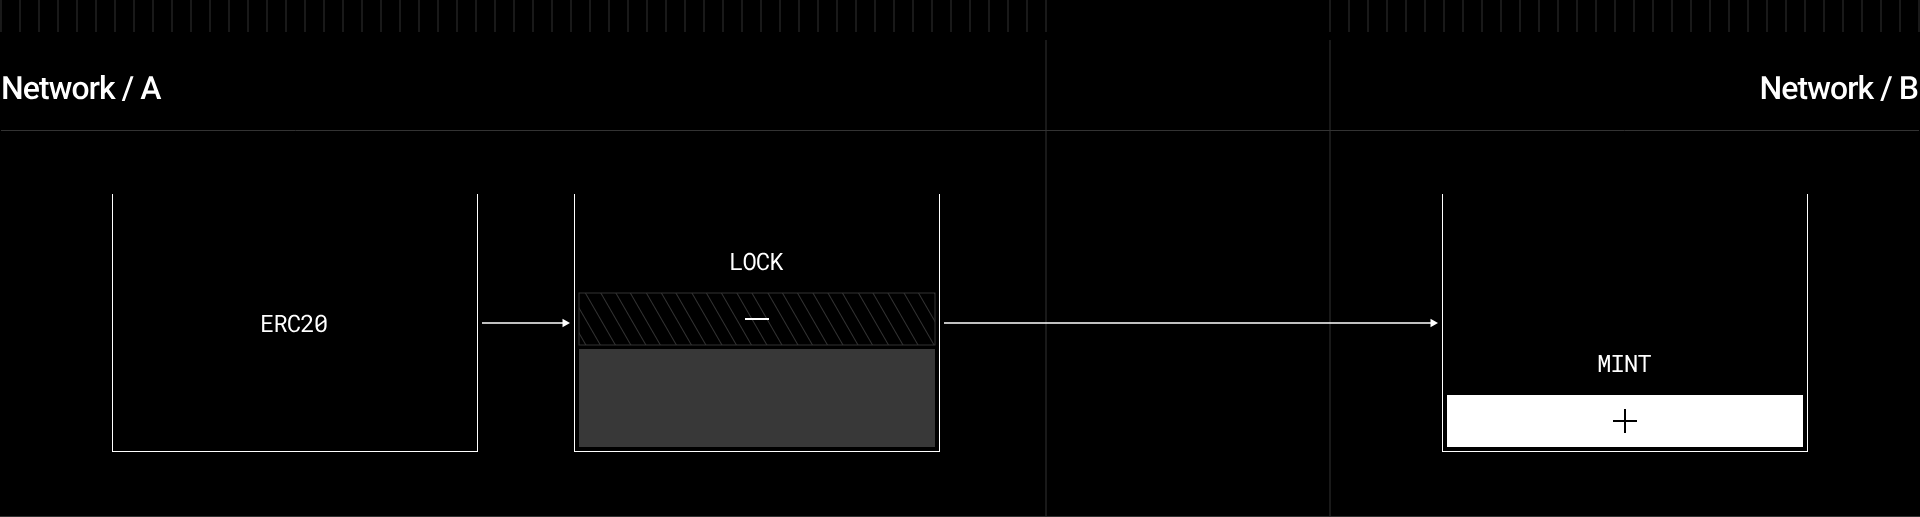
LayerZero V2 OFTAdapter
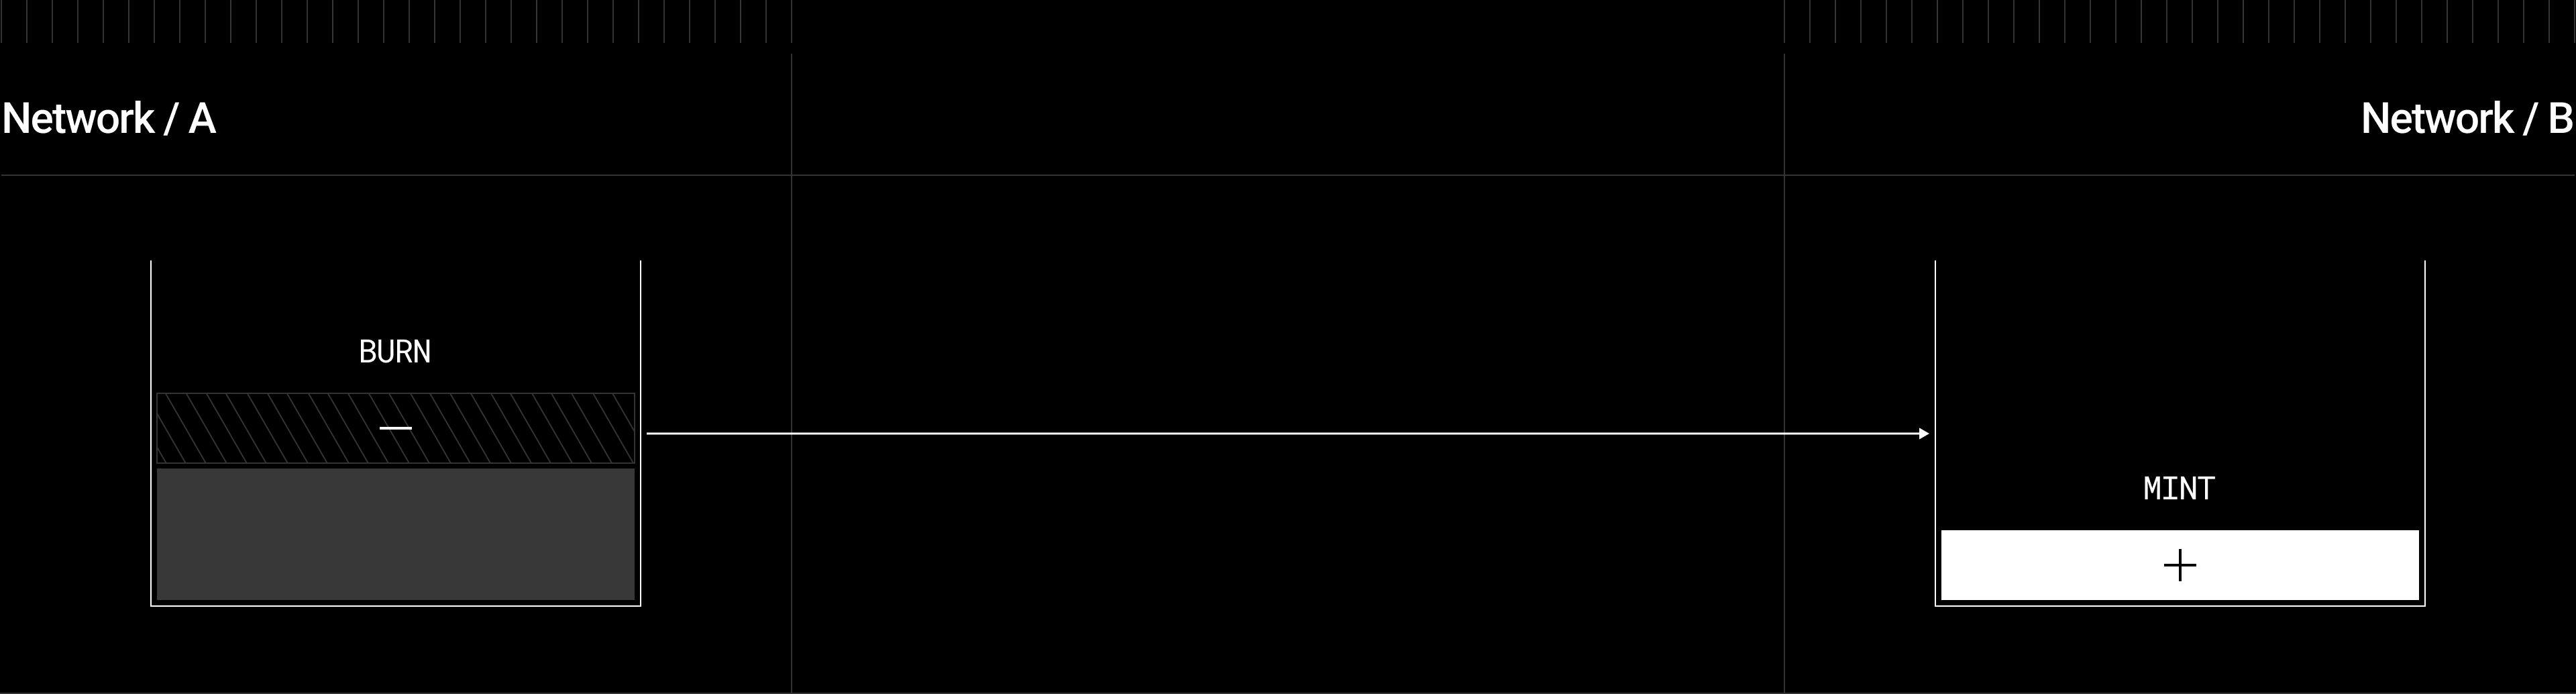
ERC20의 safeTransferFrom을 사용하여 spender로부터 OFT Adapter 컨트랙트로 토큰을 전송하면, 페어링된 OFT 컨트랙트를 통해 선택한 대상 체인(Chain B)에서 동일한 수량의 토큰이 _mint 됩니다.
소스 체인의 OFT Adapter에 있는 토큰을 lock하려면 OFT.send(Chain B)를 호출해야 하며, 이로 인해 토큰이 _burn되고 프로토콜을 통해 메시지가 전송되어 Adapter에서 수신 주소(Chain A)로 ERC20.safeTransfer가 실행됩니다.
Installation
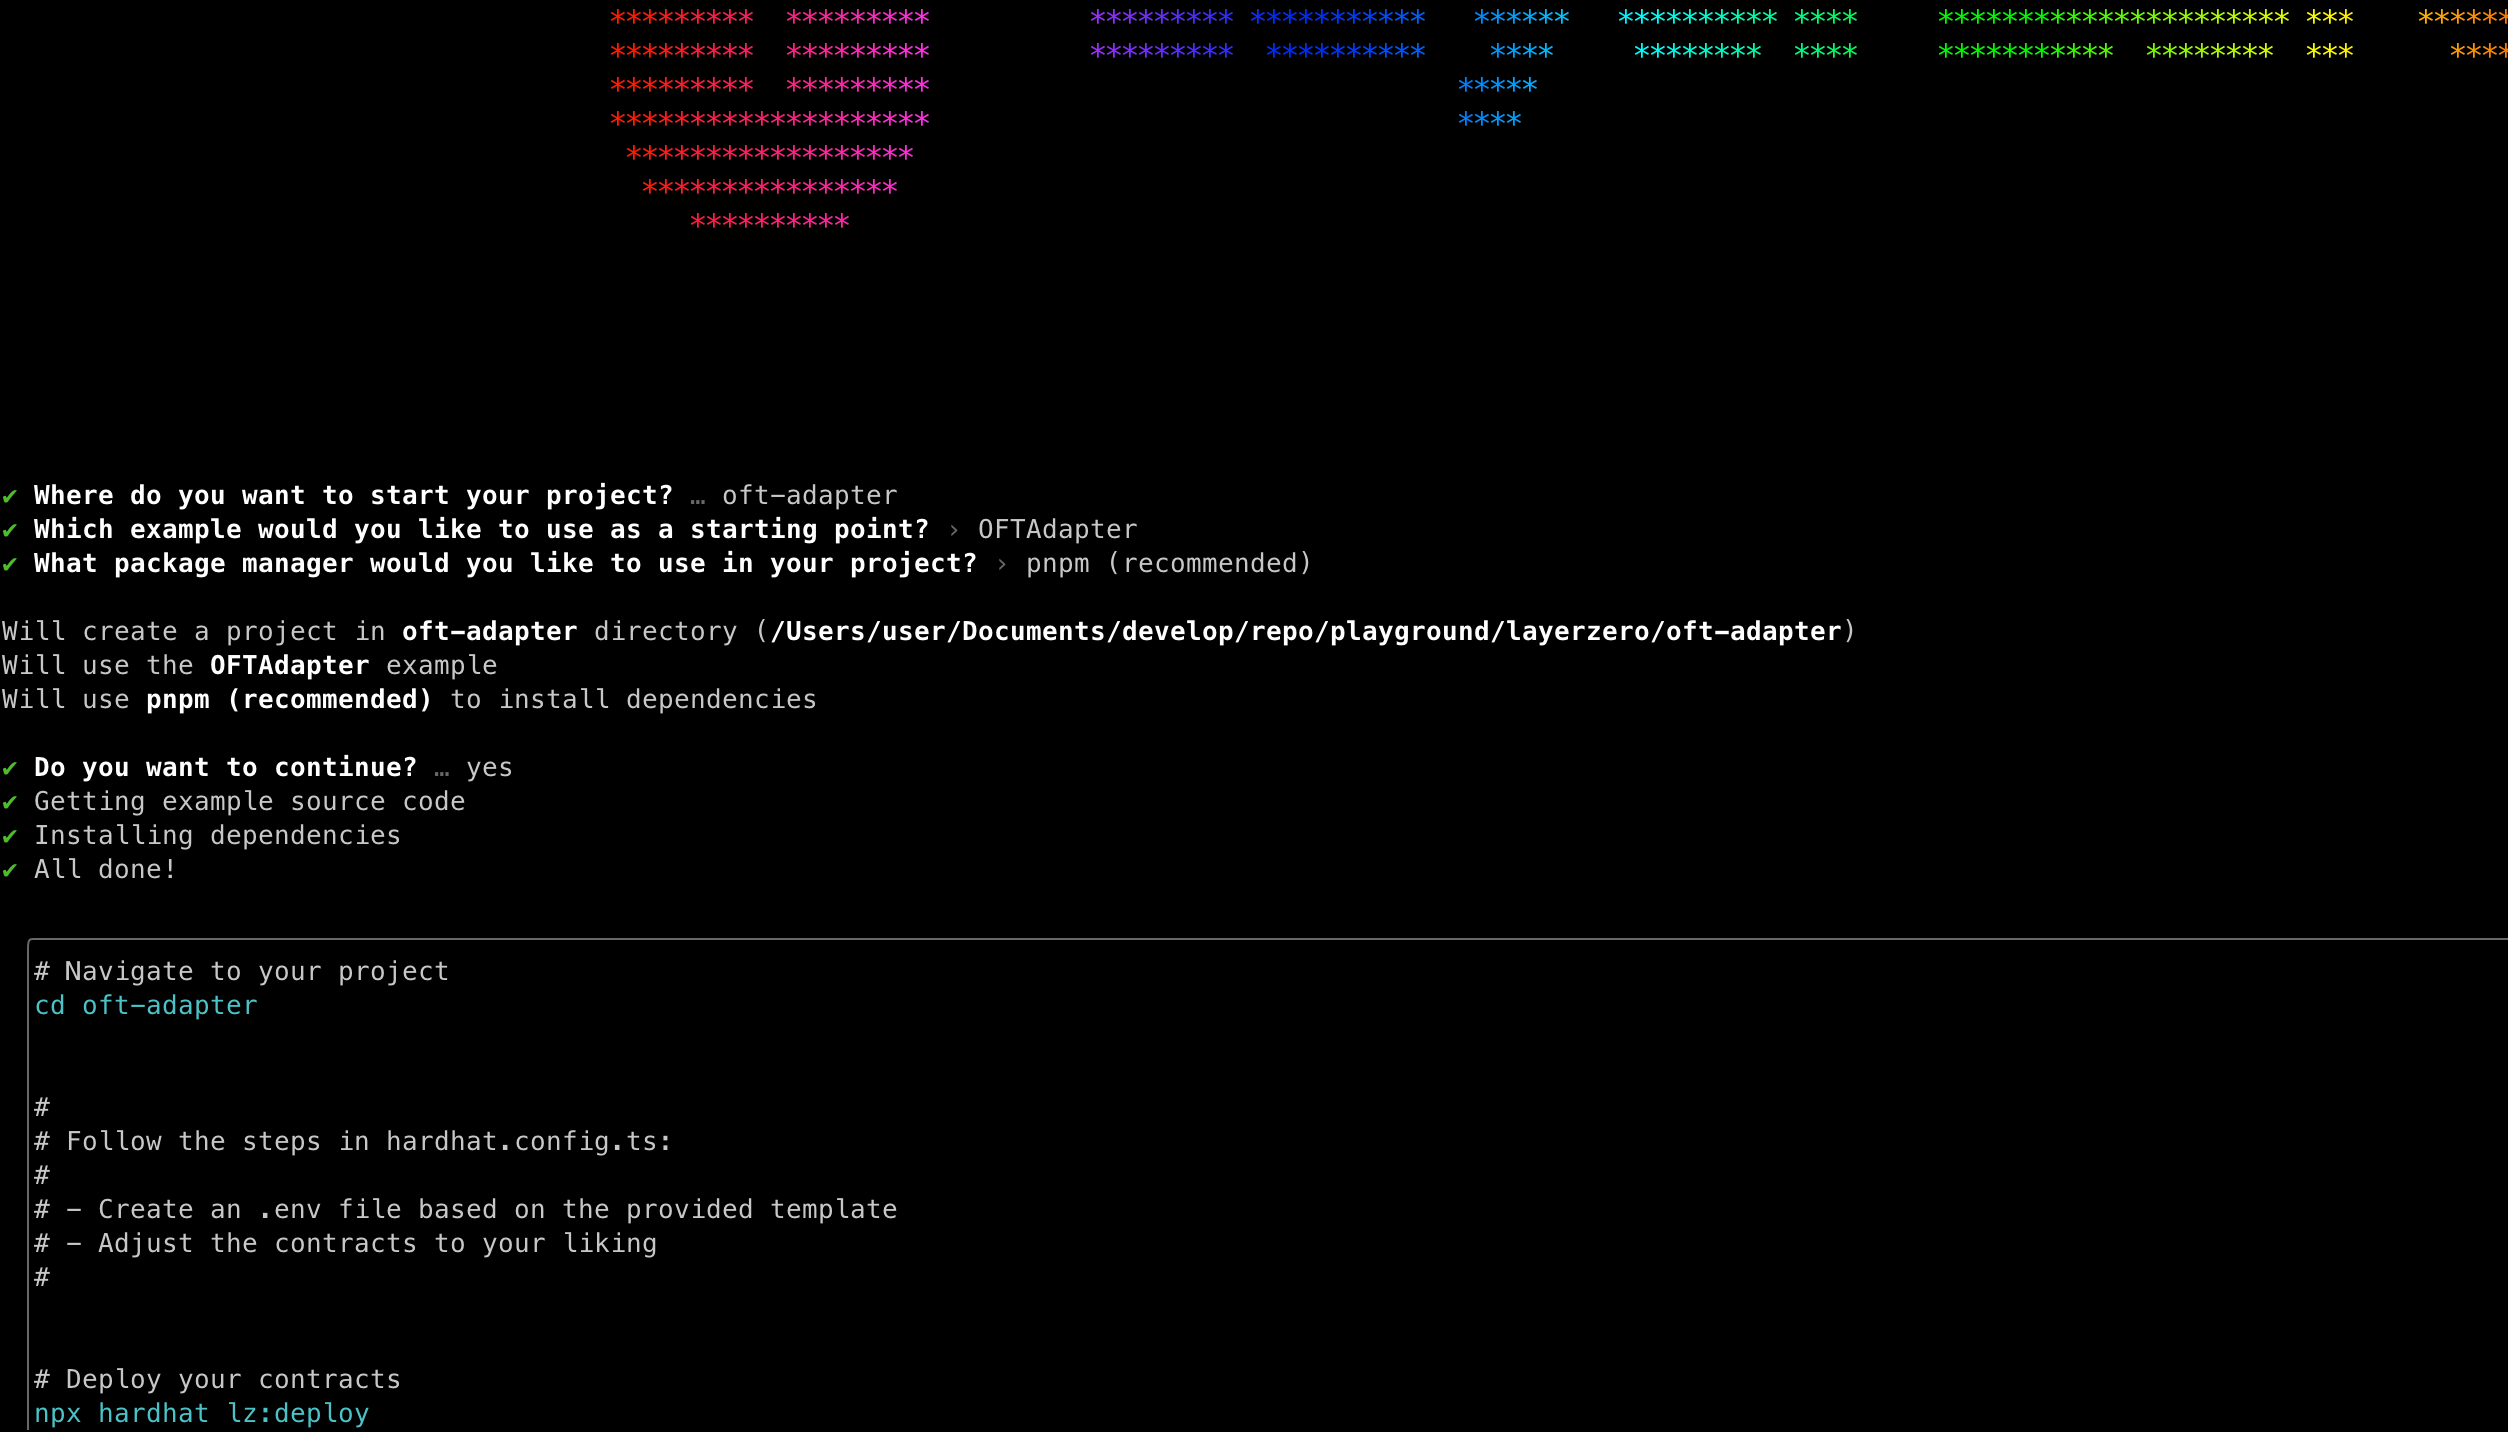
아래 명령어로 OFTAdapter가 포함된 프로젝트를 생성할 수 있습니다.
OFTAdapter 를 선택하면 해당 프로젝트에 OFT가 포함되어 있습니다.
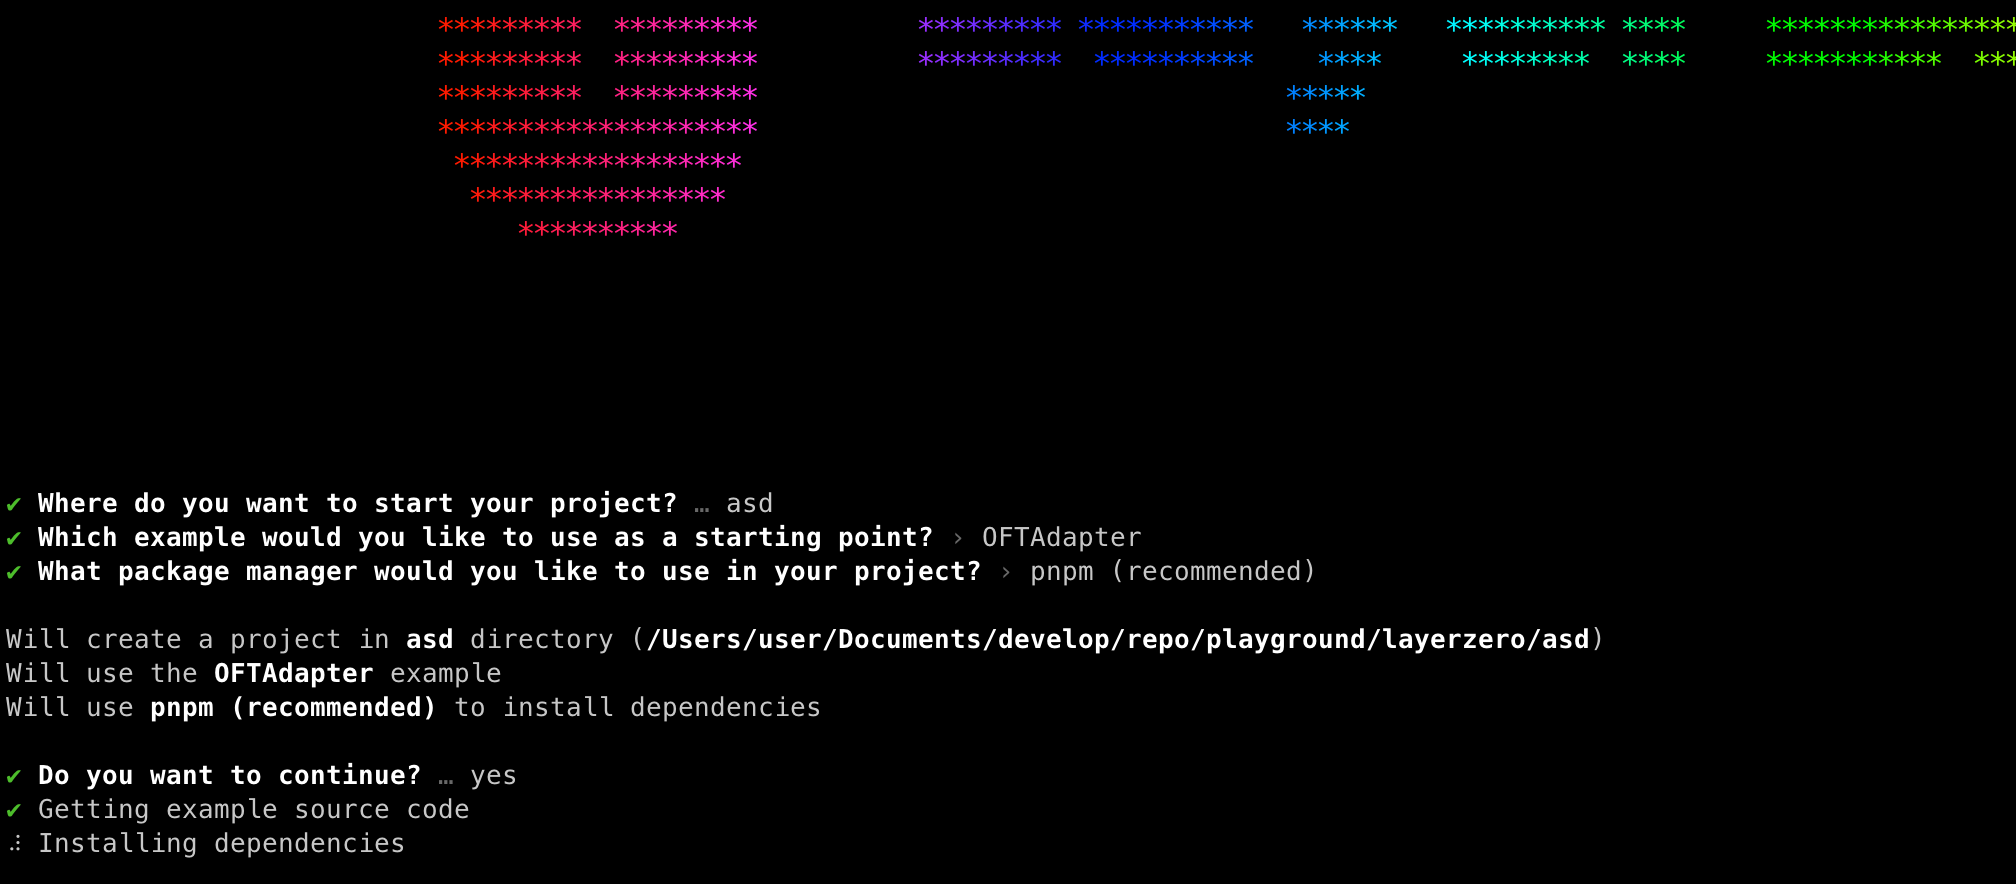
이후 아래 명령어를 사용하여 패키지를 추가 설치 해줍니다.
pnpm add @layerzerolabs/oft-evm
Deploy
-
ERC20 Token 컨트랙트 배포
OFTAdapter를 사용하기 위해선 기존 배포되어 있는 ERC20 Token 컨트랙트가 필요합니다.
테스트 환경이기 때문에 직접 배포하여 사용합니다.
-
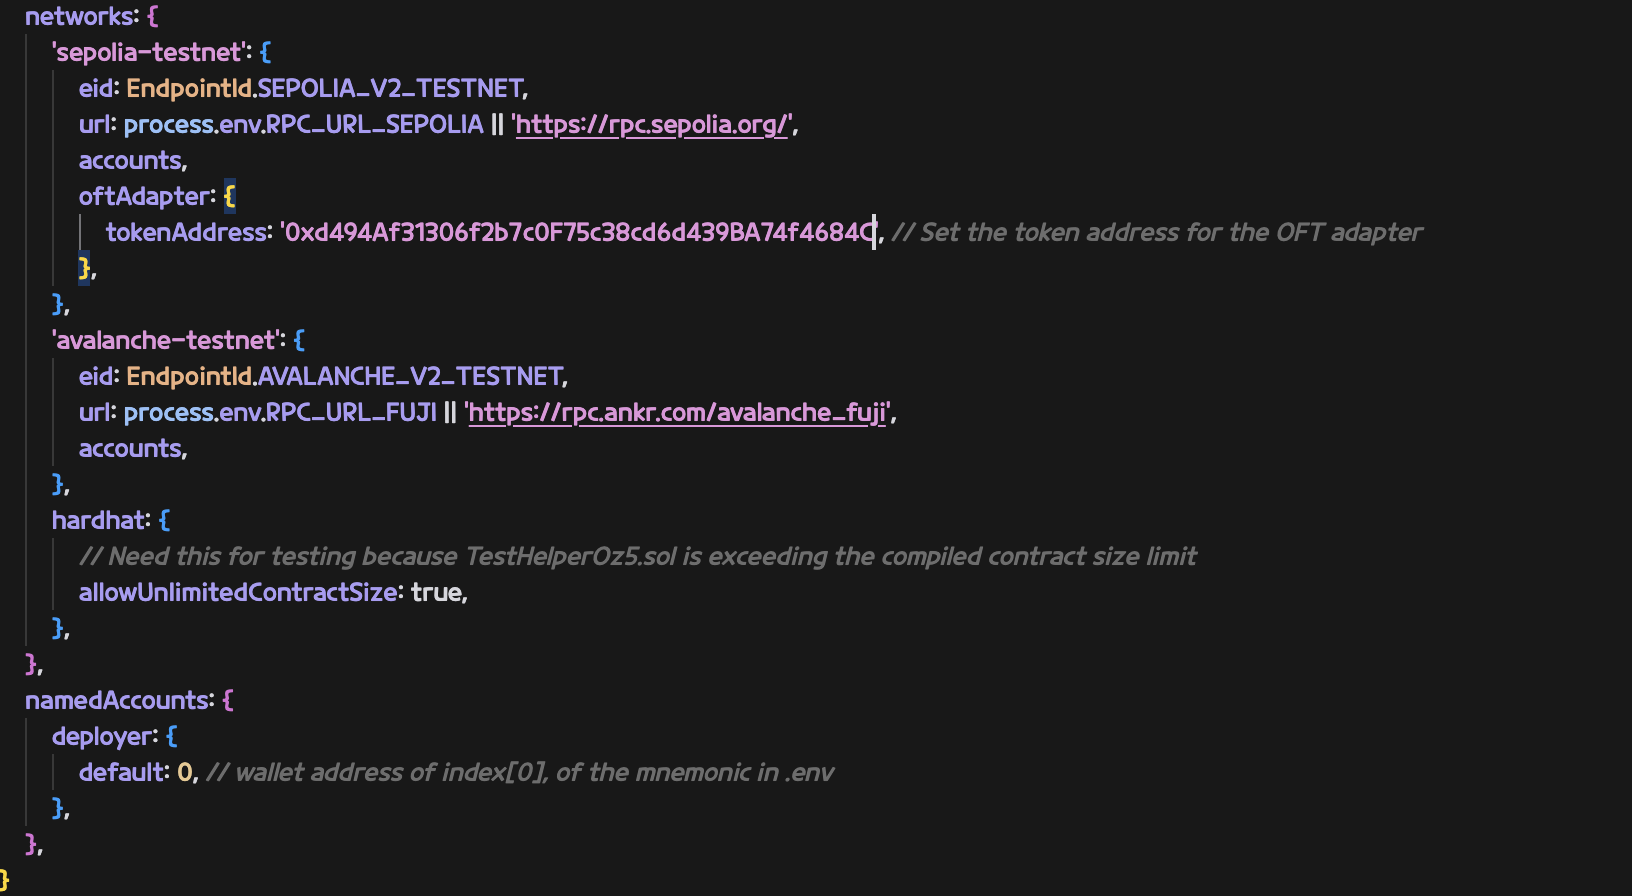
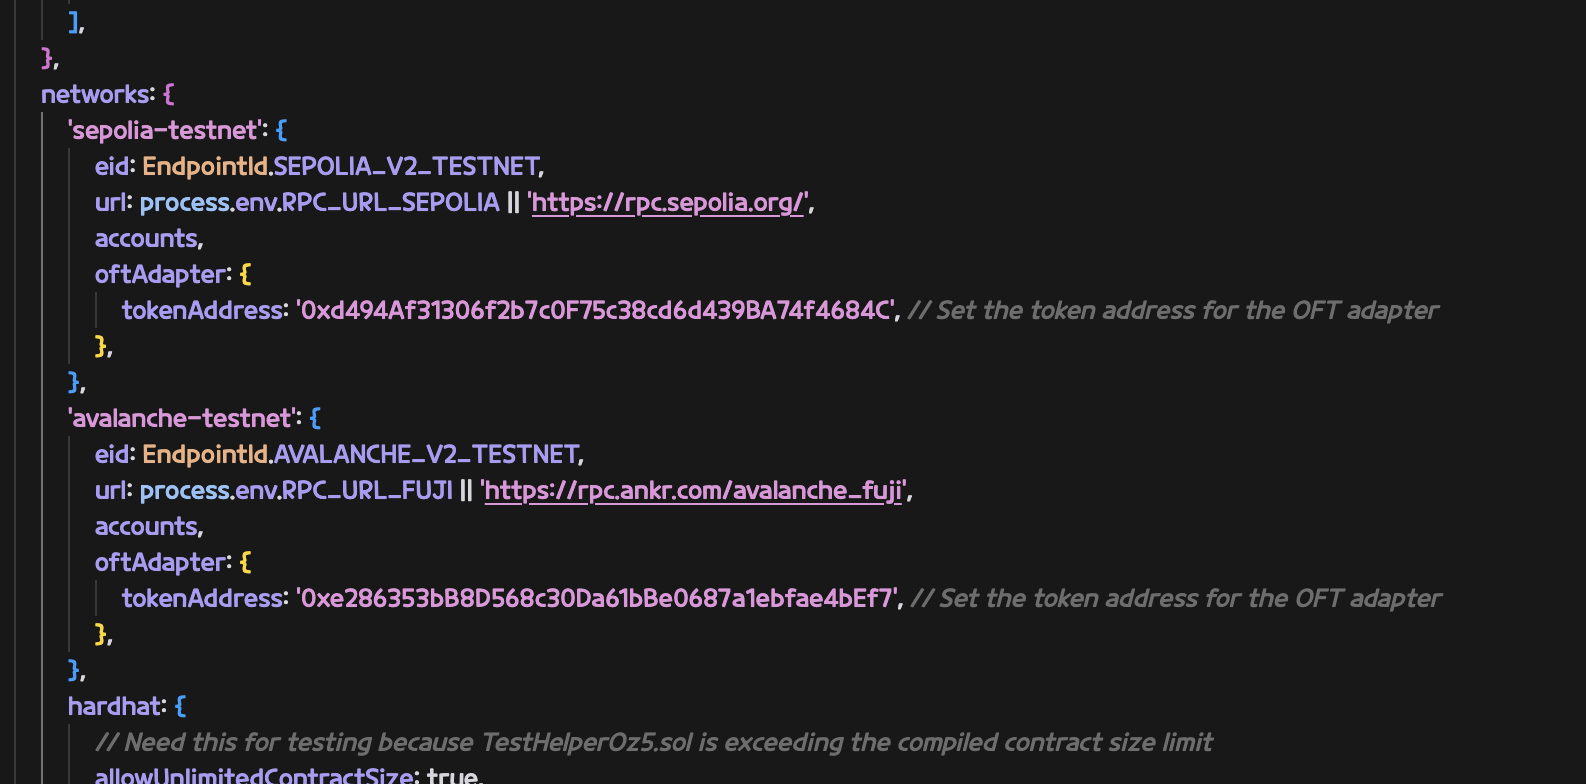
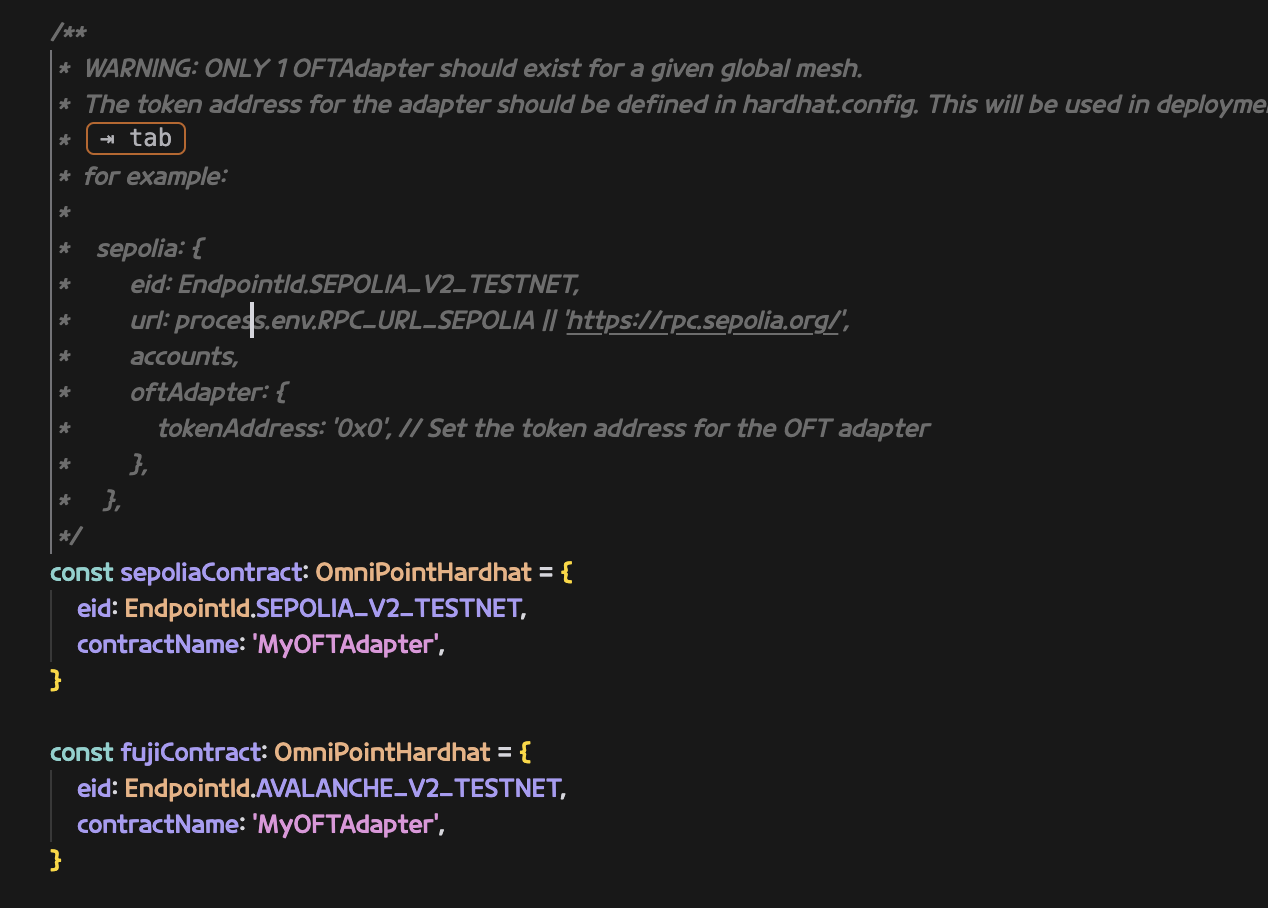
hardhat.config.ts 구성
본문에서는 amoy를 사용하지 않을거라 제거했음
oftAdapter 부분에 0번 과정에서 배포한 tokenAddress를 입력 해 주었음
-
빌드
 pnpm install # Install dependencies
 pnpm compile # Compile contract
.env 구성
- Rename
.env.example -> .env
- Choose your preferred means of setting up your deployer wallet/account:
 MNEMONIC="test test test test test test test test test test test junk"
 or...
 PRIVATE_KEY="0xabc...def"
-
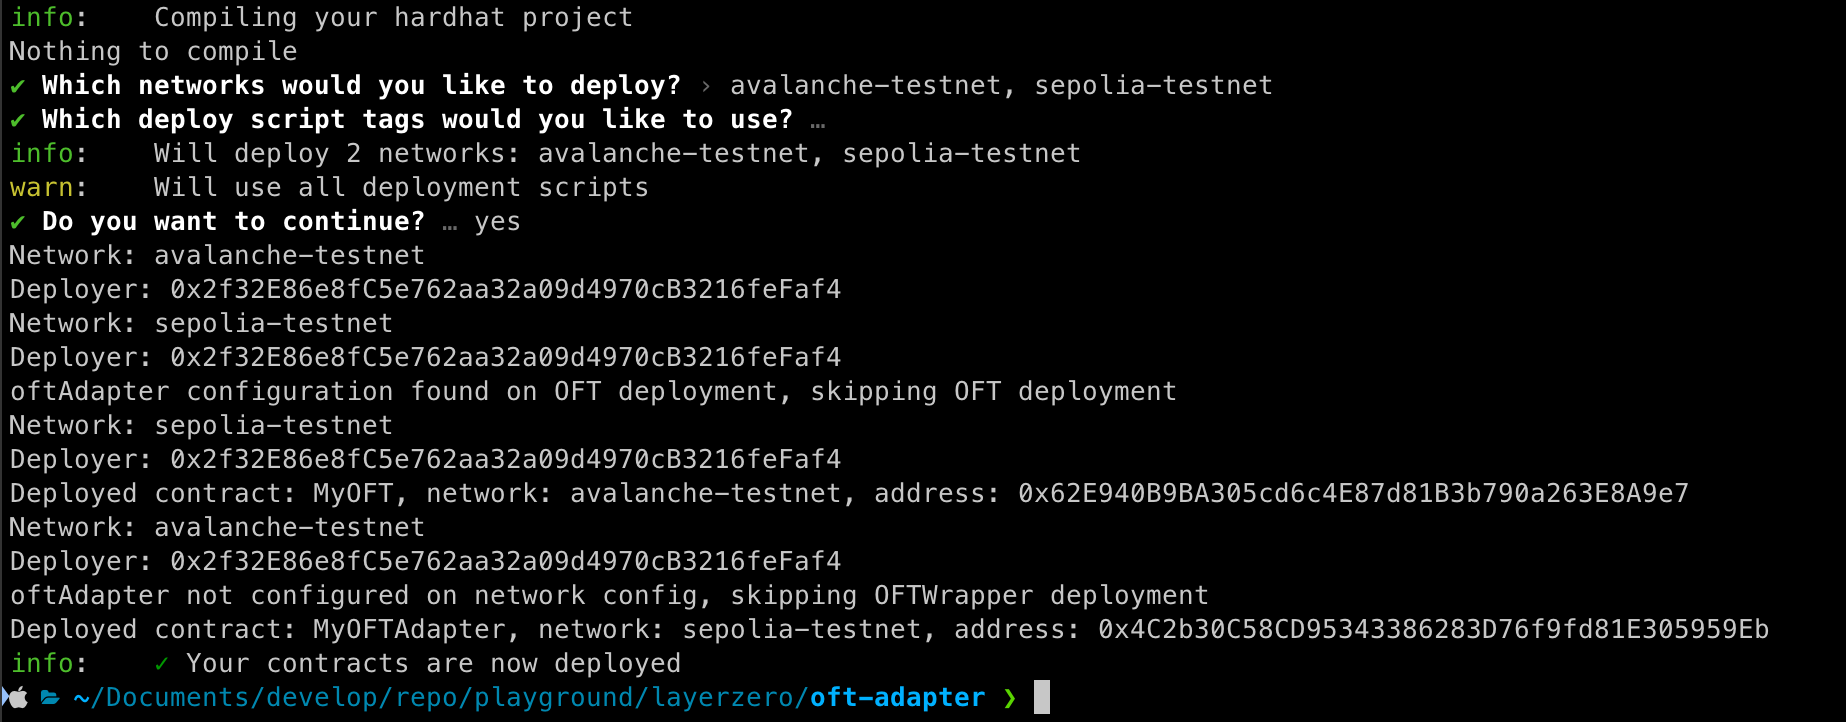
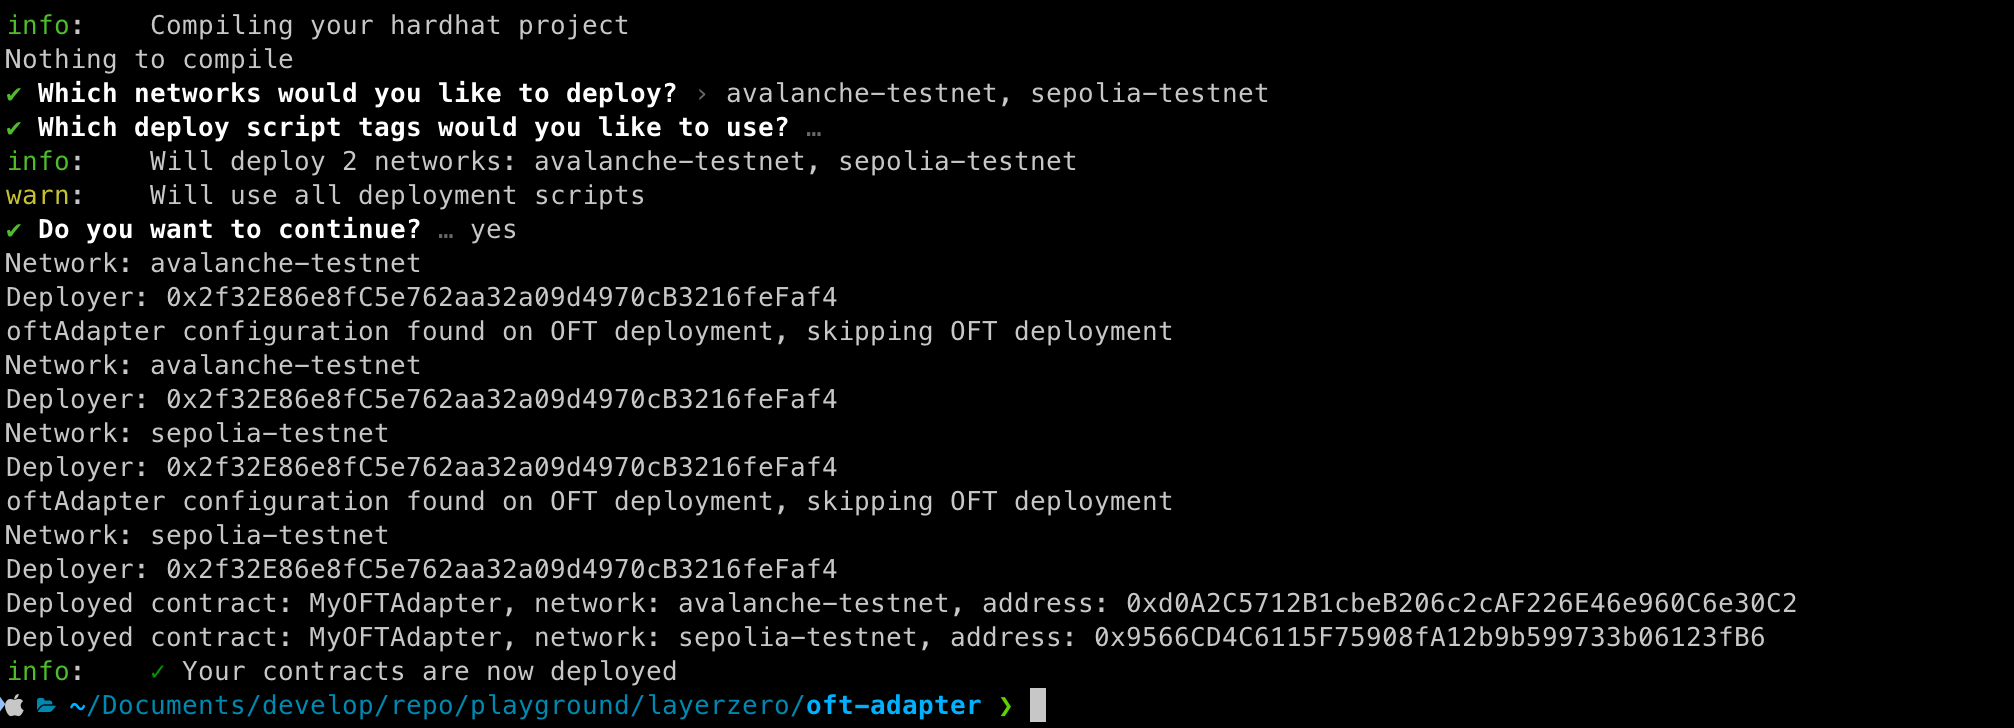
배포
OFTAdapter 설정을 추가해주었기 때문에 sepolia에는 OFTAdapter만 배포 되었습니다.
-
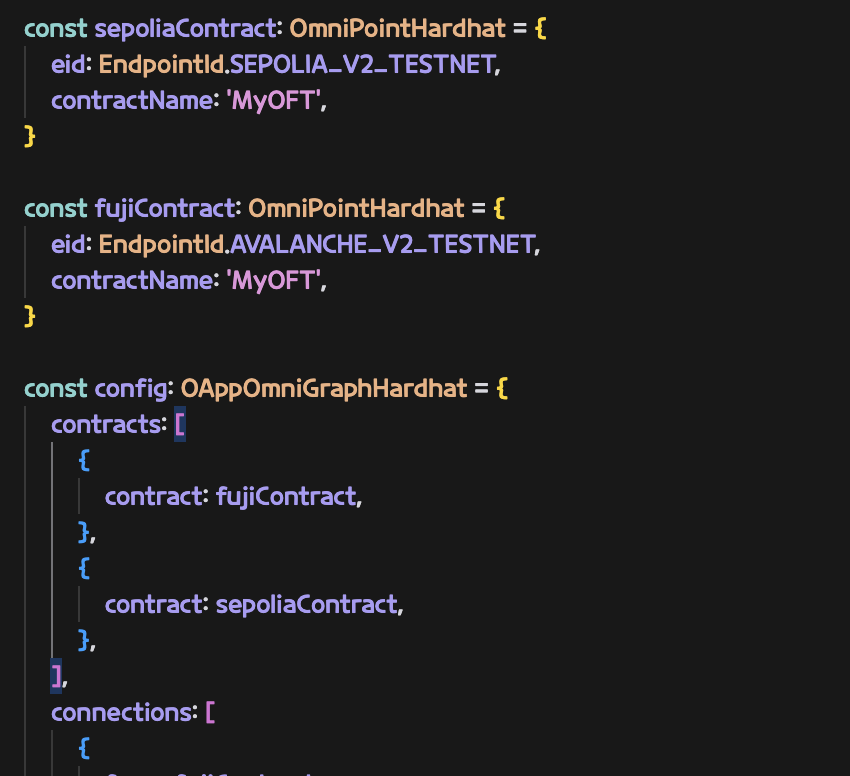
layerzero.config.ts 구성
실제 컨트랙트를 연결할 체인들을 구성
본문에서는 amoy를 사용하지 않아 제거했음
-
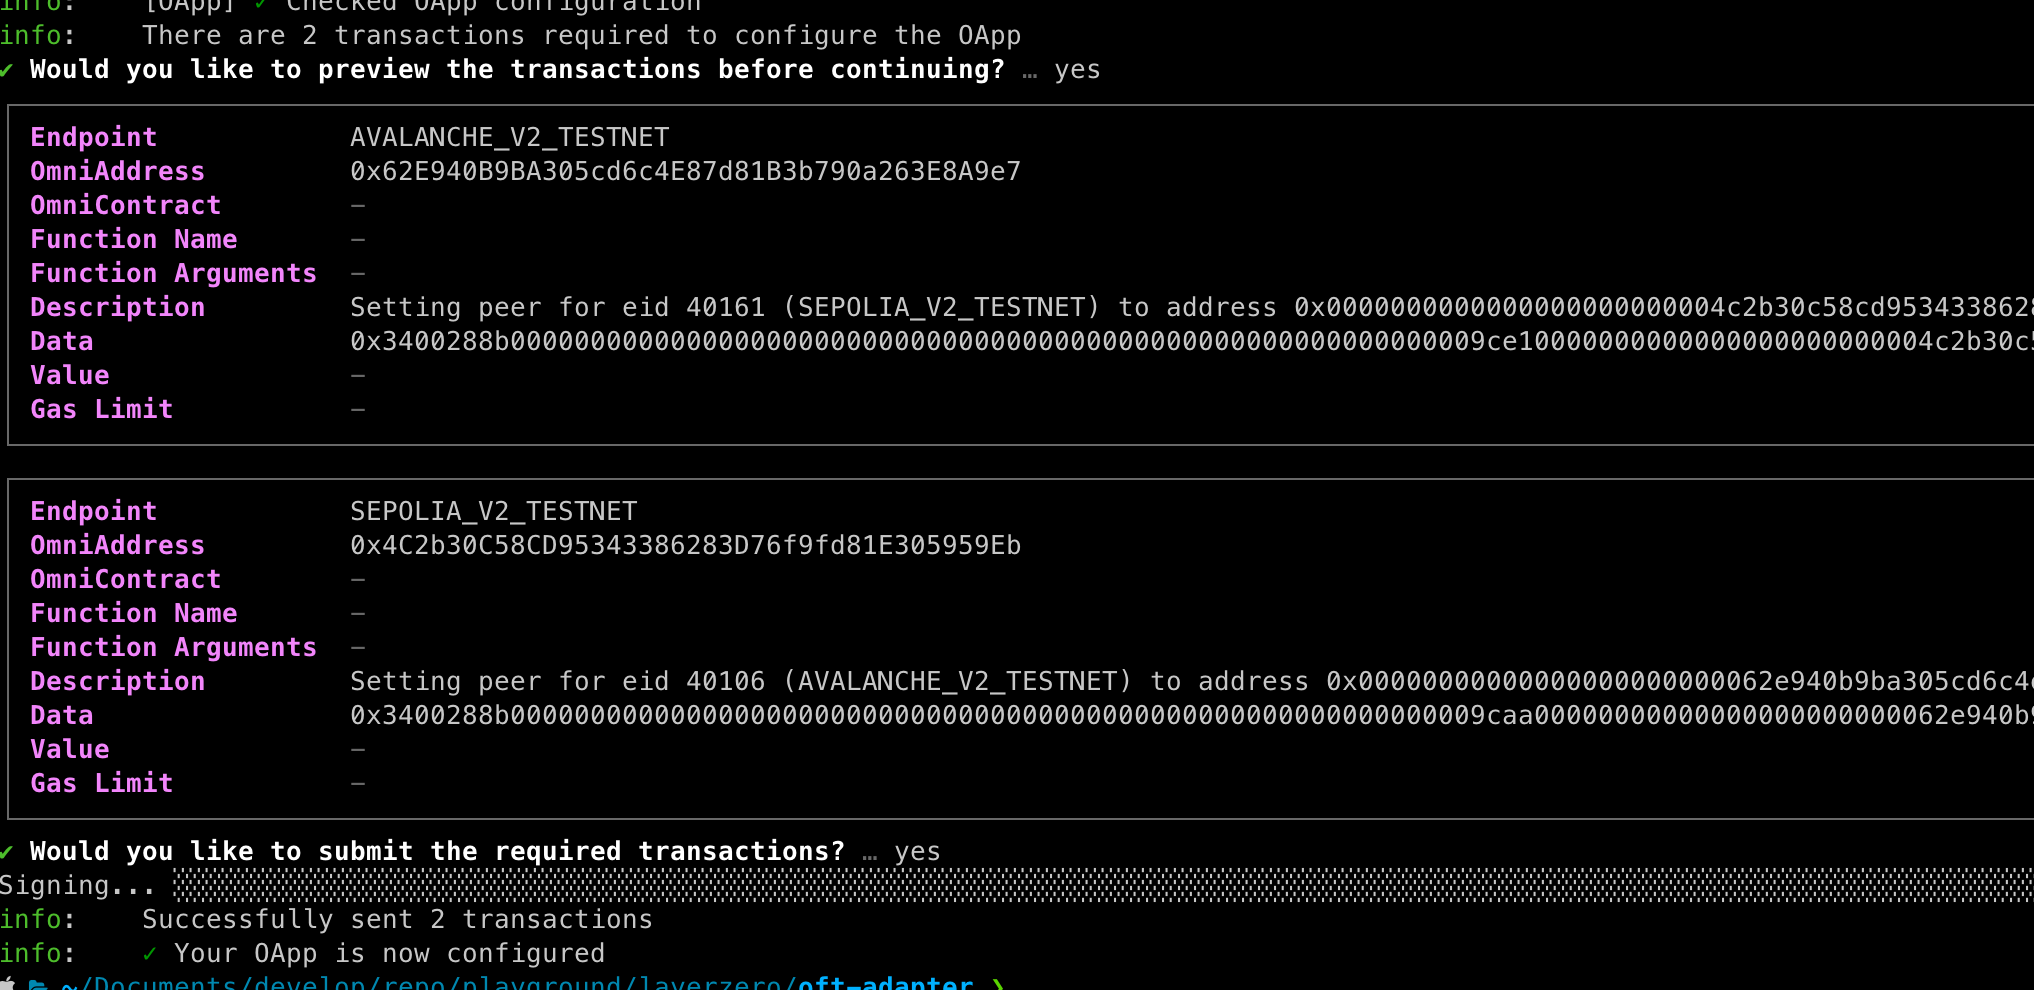
Contract wire
npx hardhat lz:oapp:wire --oapp-config layerzero.config.ts
- ERC20.approve 수행
- ERC20 토큰에 대해서 OFTAdapter가 컨트롤 할 수 있도록 approve를 수행해줍니다.
- spender는 OFTAdapter 입니다.
-
sendToken 생성 후 실행
// tasks/sendToken.ts
import { task } from 'hardhat/config';
import { HardhatRuntimeEnvironment } from 'hardhat/types';
import { Options } from '@layerzerolabs/lz-v2-utilities';
export default task('sendToken', 'Send a token to the destination chain')
.addParam('dstNetwork', 'The destination network name (from hardhat.config.ts)')
.addParam('amount', 'The amount of tokens to send')
.setAction(async (taskArgs, hre: HardhatRuntimeEnvironment) => {
const { amount, dstNetwork } = taskArgs;
const [signer] = await hre.ethers.getSigners();
const addressAsBytes32 = "0x0000000000000000000000002f32e86e8fc5e762aa32a09d4970cb3216fefaf4";
// Get destination network's EID
const dstNetworkConfig = hre.config.networks[dstNetwork];
const dstEid = dstNetworkConfig.eid;
// Get current network's EID
const srcNetworkConfig = hre.config.networks[hre.network.name];
const srcEid = srcNetworkConfig?.eid;
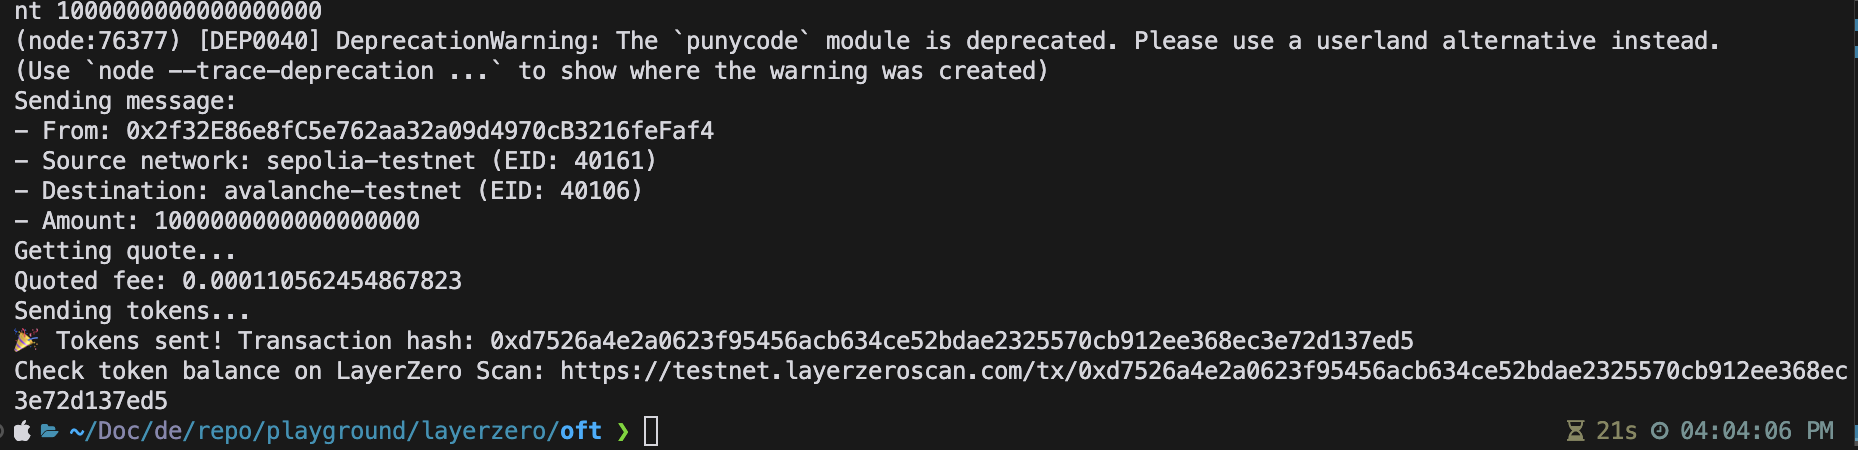
console.log('Sending message:');
console.log('- From:', signer.address);
console.log('- Source network:', hre.network.name, srcEid ? `(EID: ${srcEid})` : '');
console.log('- Destination:', dstNetwork || 'unknown network', `(EID: ${dstEid})`);
console.log('- Amount:', amount);
const myOFTAdapter = await hre.deployments.get('MyOFTAdapter');
const contract = await hre.ethers.getContractAt('MyOFTAdapter', myOFTAdapter.address, signer);
// Add executor options with gas limit
const options = Options.newOptions().addExecutorLzReceiveOption(200000, 0).toBytes();
// Get quote for the message
console.log('Getting quote...');
const sendParam = {
dstEid: dstEid,
to: addressAsBytes32,
amountLD: amount,
minAmountLD: amount,
extraOptions: options,
composeMsg: "0x00",
oftCmd: "0x00"
}
const quotedFee = await contract.quoteSend(sendParam, false);
console.log('Quoted fee:', hre.ethers.utils.formatEther(quotedFee.nativeFee));
// Send the message
console.log('Sending tokens...');
const tx = await contract.send(sendParam, quotedFee, signer.address, {value: quotedFee.nativeFee});
const receipt = await tx.wait();
console.log('🎉 Tokens sent! Transaction hash:', receipt.transactionHash);
console.log(
'Check token balance on LayerZero Scan: https://testnet.layerzeroscan.com/tx/' +
receipt.transactionHash,
);
});
 import { EndpointId } from '@layerzerolabs/lz-definitions'

 import "./tasks/sendToken" // 추가
npx hardhat sendToken --network sepolia-testnet --dst-network avalanche-testnet --amount 100000000000000000

OFTAdapter Setup for Both Chains
위에서는 한쪽은 OFTAdapter, 한쪽은 OFT 컨트랙트를 사용한 예시를 보여드렸습니다.
지금부터는 양쪽에 모두 OFTAdpter를 사용하여 배포한 뒤 실제 전송을 처리해봅니다.
위 과정과 일부 겹치는 부분이 있기 때문에 일부 내용이 생략되었습니다.
Deploy
-
hardhat.config.ts 설정
양쪽 체인 모두 oftAdapter 설정
-
빌드
 pnpm install # Install dependencies
 pnpm compile # Compile contract
-
배포
-
Contract wiring
layerzero.config.ts 에 contractName 확인
npx hardhat lz:oapp:wire --oapp-config layerzero.config.ts
- ERC20.approve 수행
- ERC20 토큰에 대해서 OFTAdapter가 컨트롤 할 수 있도록 approve를 수행해줍니다.
- spender는 OFTAdapter 입니다.
-
sendToken 생성 후 실행
 // tasks/sendToken.ts

 import { task } from 'hardhat/config';
 import { HardhatRuntimeEnvironment } from 'hardhat/types';

 import { Options } from '@layerzerolabs/lz-v2-utilities';

 export default task('sendToken', 'Send a token to the destination chain')
     .addParam('dstNetwork', 'The destination network name (from hardhat.config.ts)')
     .addParam('amount', 'The amount of tokens to send')
     .setAction(async (taskArgs, hre: HardhatRuntimeEnvironment) => {
         const { amount, dstNetwork } = taskArgs;
         const [signer] = await hre.ethers.getSigners();

         const addressAsBytes32 = "0x0000000000000000000000002f32e86e8fc5e762aa32a09d4970cb3216fefaf4";

         // Get destination network's EID
         const dstNetworkConfig = hre.config.networks[dstNetwork];
         const dstEid = dstNetworkConfig.eid;

         // Get current network's EID
         const srcNetworkConfig = hre.config.networks[hre.network.name];
         const srcEid = srcNetworkConfig?.eid;

         console.log('Sending message:');
         console.log('- From:', signer.address);
         console.log('- Source network:', hre.network.name, srcEid ? `(EID: ${srcEid})` : '');
         console.log('- Destination:', dstNetwork || 'unknown network', `(EID: ${dstEid})`);
         console.log('- Amount:', amount);

         const myOFTAdapter = await hre.deployments.get('MyOFTAdapter');
         const contract = await hre.ethers.getContractAt('MyOFTAdapter', myOFTAdapter.address, signer);

         // Add executor options with gas limit
         const options = Options.newOptions().addExecutorLzReceiveOption(200000, 0).toBytes();

         // Get quote for the message
         console.log('Getting quote...');
         const sendParam = {
             dstEid: dstEid,
             to: addressAsBytes32,
             amountLD: amount,
             minAmountLD: amount,
             extraOptions: options,
             composeMsg: "0x00",
             oftCmd: "0x00"
         }
         const quotedFee = await contract.quoteSend(sendParam, false);
         console.log('Quoted fee:', hre.ethers.utils.formatEther(quotedFee.nativeFee));

         // Send the message
         console.log('Sending tokens...');
         const tx = await contract.send(sendParam, quotedFee, signer.address, {value: quotedFee.nativeFee});

         const receipt = await tx.wait();
         console.log('🎉 Tokens sent! Transaction hash:', receipt.transactionHash);
         console.log(
             'Check token balance on LayerZero Scan: https://testnet.layerzeroscan.com/tx/' +
             receipt.transactionHash,
         );
     });
 import { EndpointId } from '@layerzerolabs/lz-definitions'

 import "./tasks/sendToken" // 추가
npx hardhat sendToken --network sepolia-testnet --dst-network avalanche-testnet --amount 1000000000000000000

06 Feb 2025 |
Blockchain
LayerZero
Overview
이전 포스팅에서 LayerZero를 사용하여 OApp(Omnichain Applications)과 OFT(Omnichain Fungible Tokens)를 배포하고 실행하는 과정을 다뤄보았습니다.
이번 포스팅에선 ONFT(Omnichain Non-Fungible Tokens)를 배포하고 실행하는 과정을 다뤄보겠습니다.
LayerZero V2 ONFT
ONFT도 OFT와 같이 사용하려는 모든 체인에 ONFT 컨트랙트가 배포 되어 있어야 합니다.
이후 OFT와 동일하게 토큰 전송시 bufn & mint 로직을 사용하고 있습니다.
Installation
아래 명령어로 ONFT가 포함된 프로젝트를 생성할 수 있습니다.
ONFT721 를 선택하면 해당 프로젝트에 OFT가 포함되어 있습니다.
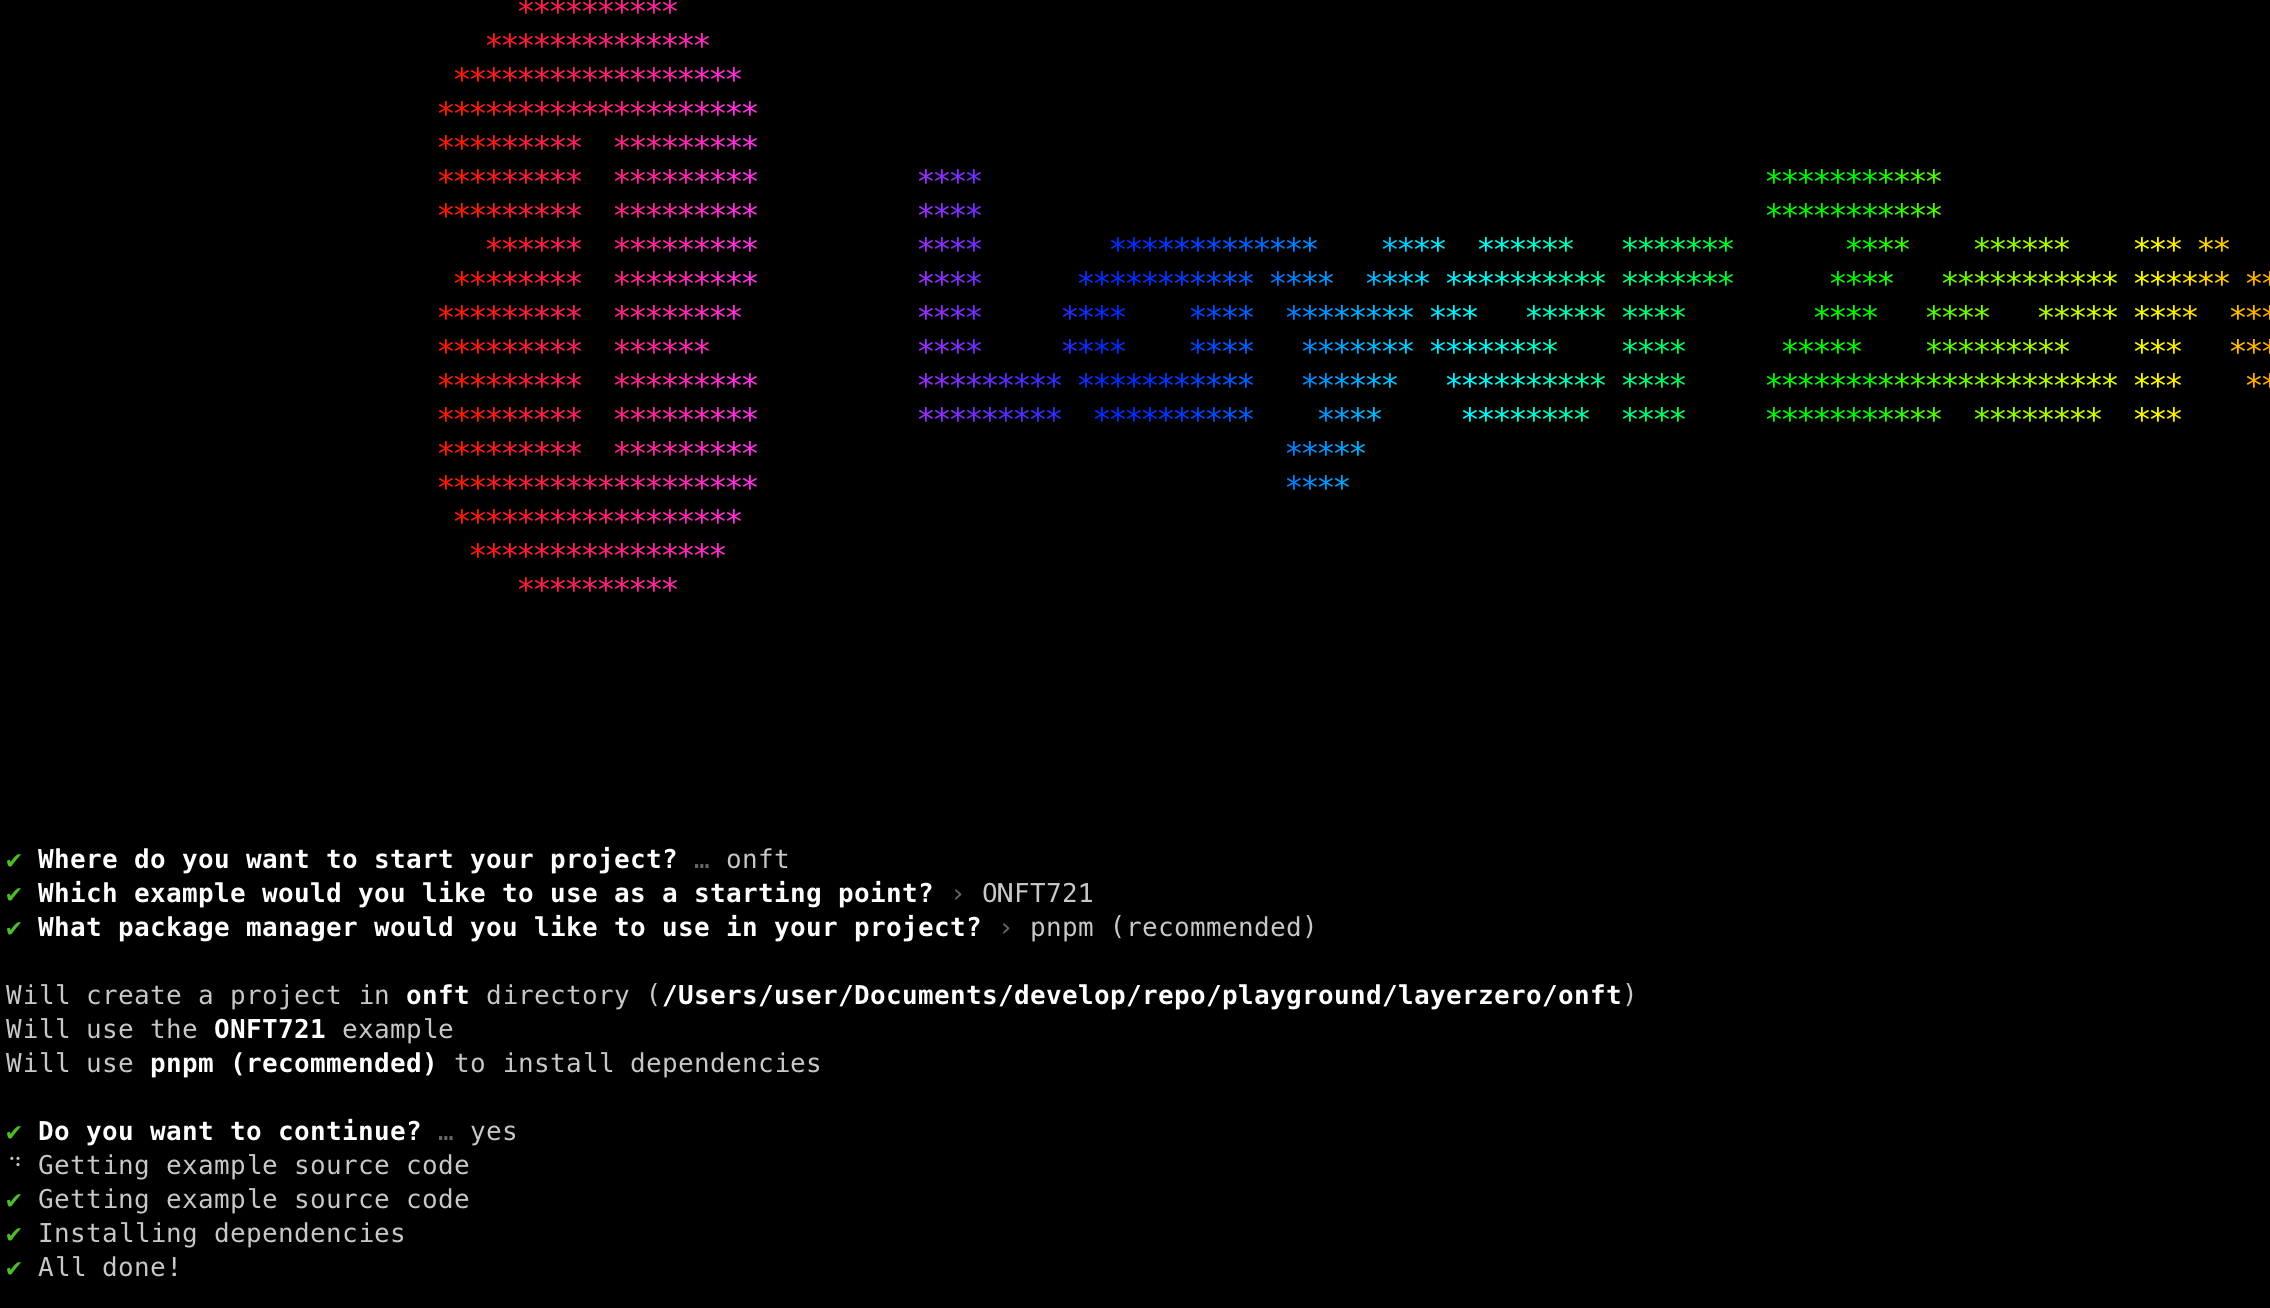
이후 아래 명령어를 사용하여 패키지를 추가 설치 해줍니다.
pnpm add @layerzerolabs/onft-evm
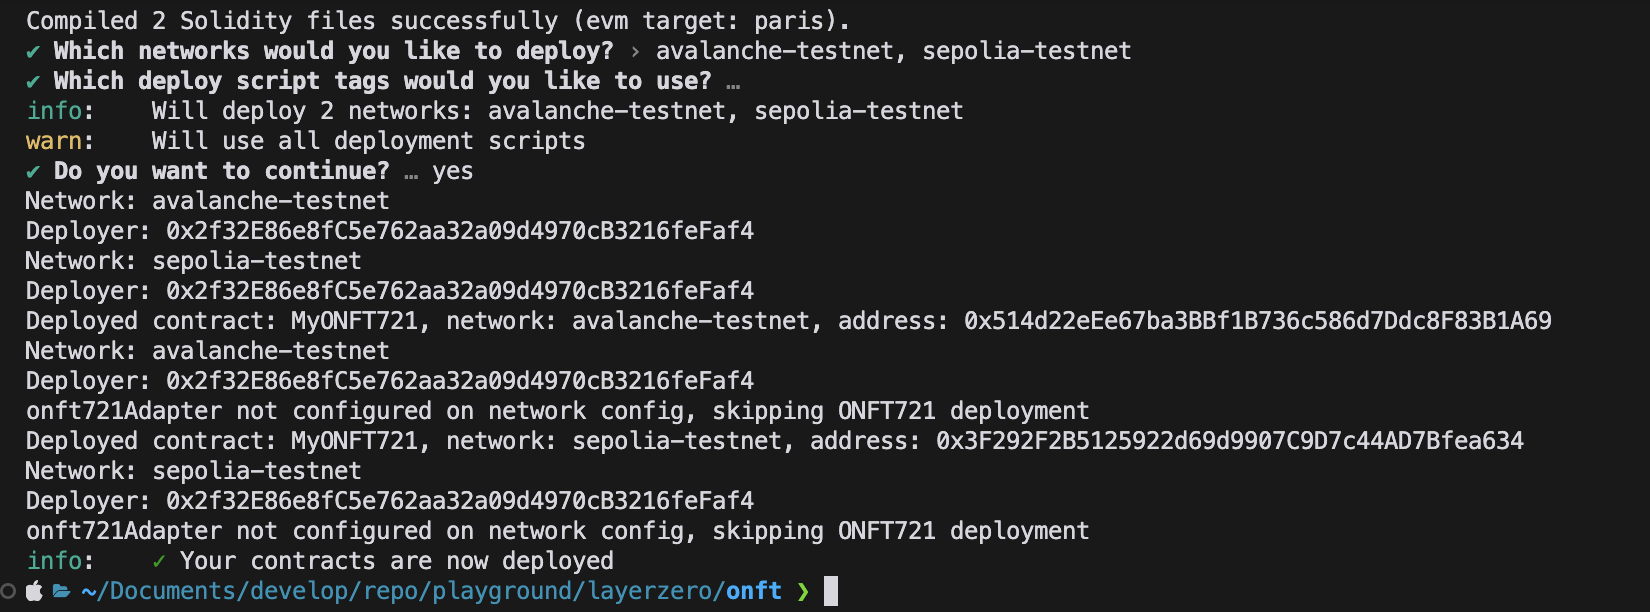
Deploy
-
hardhat.config.ts 구성
본문에서는 amoy를 사용하지 않을거라 제거했음

- Mint function 추가
- 템플릿엔 mint가 별도로 없기 때문에 추가해 주어야 합니다.
- 프로덕션에서 사용하려면
onlyOwner 같은 modifier 를 반드시 넣어주세요
  // SPDX-License-Identifier: UNLICENSED
  pragma solidity ^0.8.22;

  import { ONFT721 } from "@layerzerolabs/onft-evm/contracts/onft721/ONFT721.sol";

  contract MyONFT721 is ONFT721 {
      constructor(
          string memory _name,
          string memory _symbol,
          address _lzEndpoint,
          address _delegate
      ) ONFT721(_name, _symbol, _lzEndpoint, _delegate) {}

      function mint(address to, uint256 tokenId) external virtual {
          _mint(to, tokenId);
      }
  }
-
빌드
 pnpm install # Install dependencies
 pnpm compile # Compile contract

.env 구성
- Rename
.env.example -> .env
- Choose your preferred means of setting up your deployer wallet/account:
 MNEMONIC="test test test test test test test test test test test junk"
 or...
 PRIVATE_KEY="0xabc...def"
-
배포
-
layerzero.config.ts 구성
실제 컨트랙트를 연결할 체인들을 구성
본문에서는 amoy를 사용하지 않아 제거했음

-
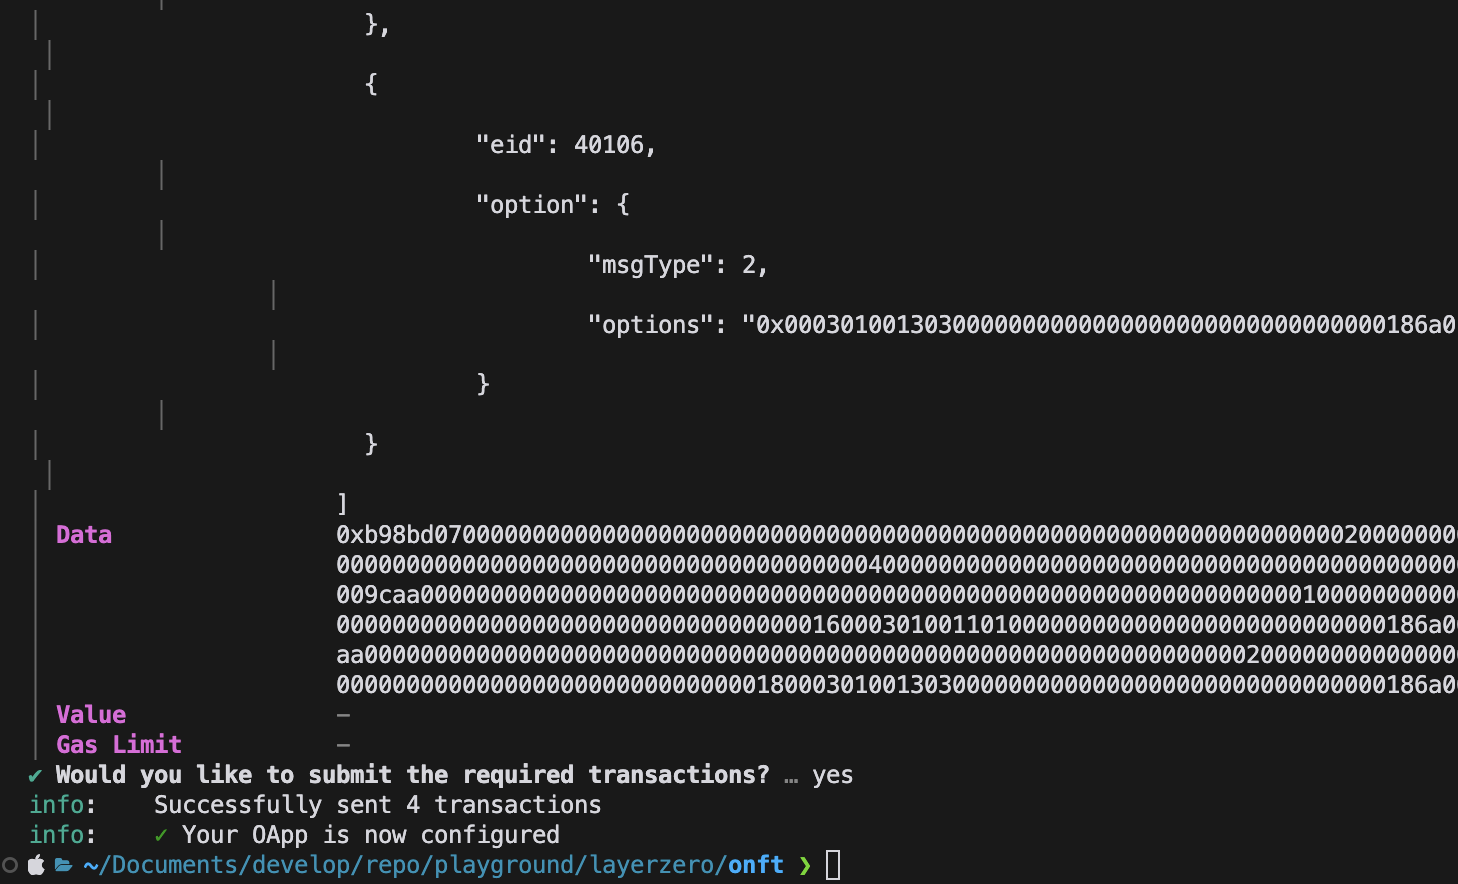
Contract wire
npx hardhat lz:oapp:wire --oapp-config layerzero.config.ts
- Mint Task 생성 후 실행
-
tasks/mint.ts
  // tasks/mint.ts

  import { task } from 'hardhat/config';
  import { HardhatRuntimeEnvironment } from 'hardhat/types';

  export default task('mint', 'Mint a token to the destination chain')
    .addParam('id', 'The token id to mint')
    .setAction(async (taskArgs, hre: HardhatRuntimeEnvironment) => {
      const { id } = taskArgs;
      const [signer] = await hre.ethers.getSigners();

      console.log('Minting tokens:');
      console.log('- From:', signer.address);
      console.log('- Token ID:', id);

      const myONFT721 = await hre.deployments.get('MyONFT721');
      const contract = await hre.ethers.getContractAt('MyONFT721', myONFT721.address, signer);

      // Send the message
      console.log('Sending message...');
      const tx = await contract.mint(signer.address, id);

      const receipt = await tx.wait();
      console.log('🎉 Tokens minted! Transaction hash:', receipt.transactionHash);
    });
-
hardhat.config.ts 에 추가
  import { EndpointId } from '@layerzerolabs/lz-definitions'
  import "./tasks/mint" // 추가

  // Set your preferred authentication method
-
실행
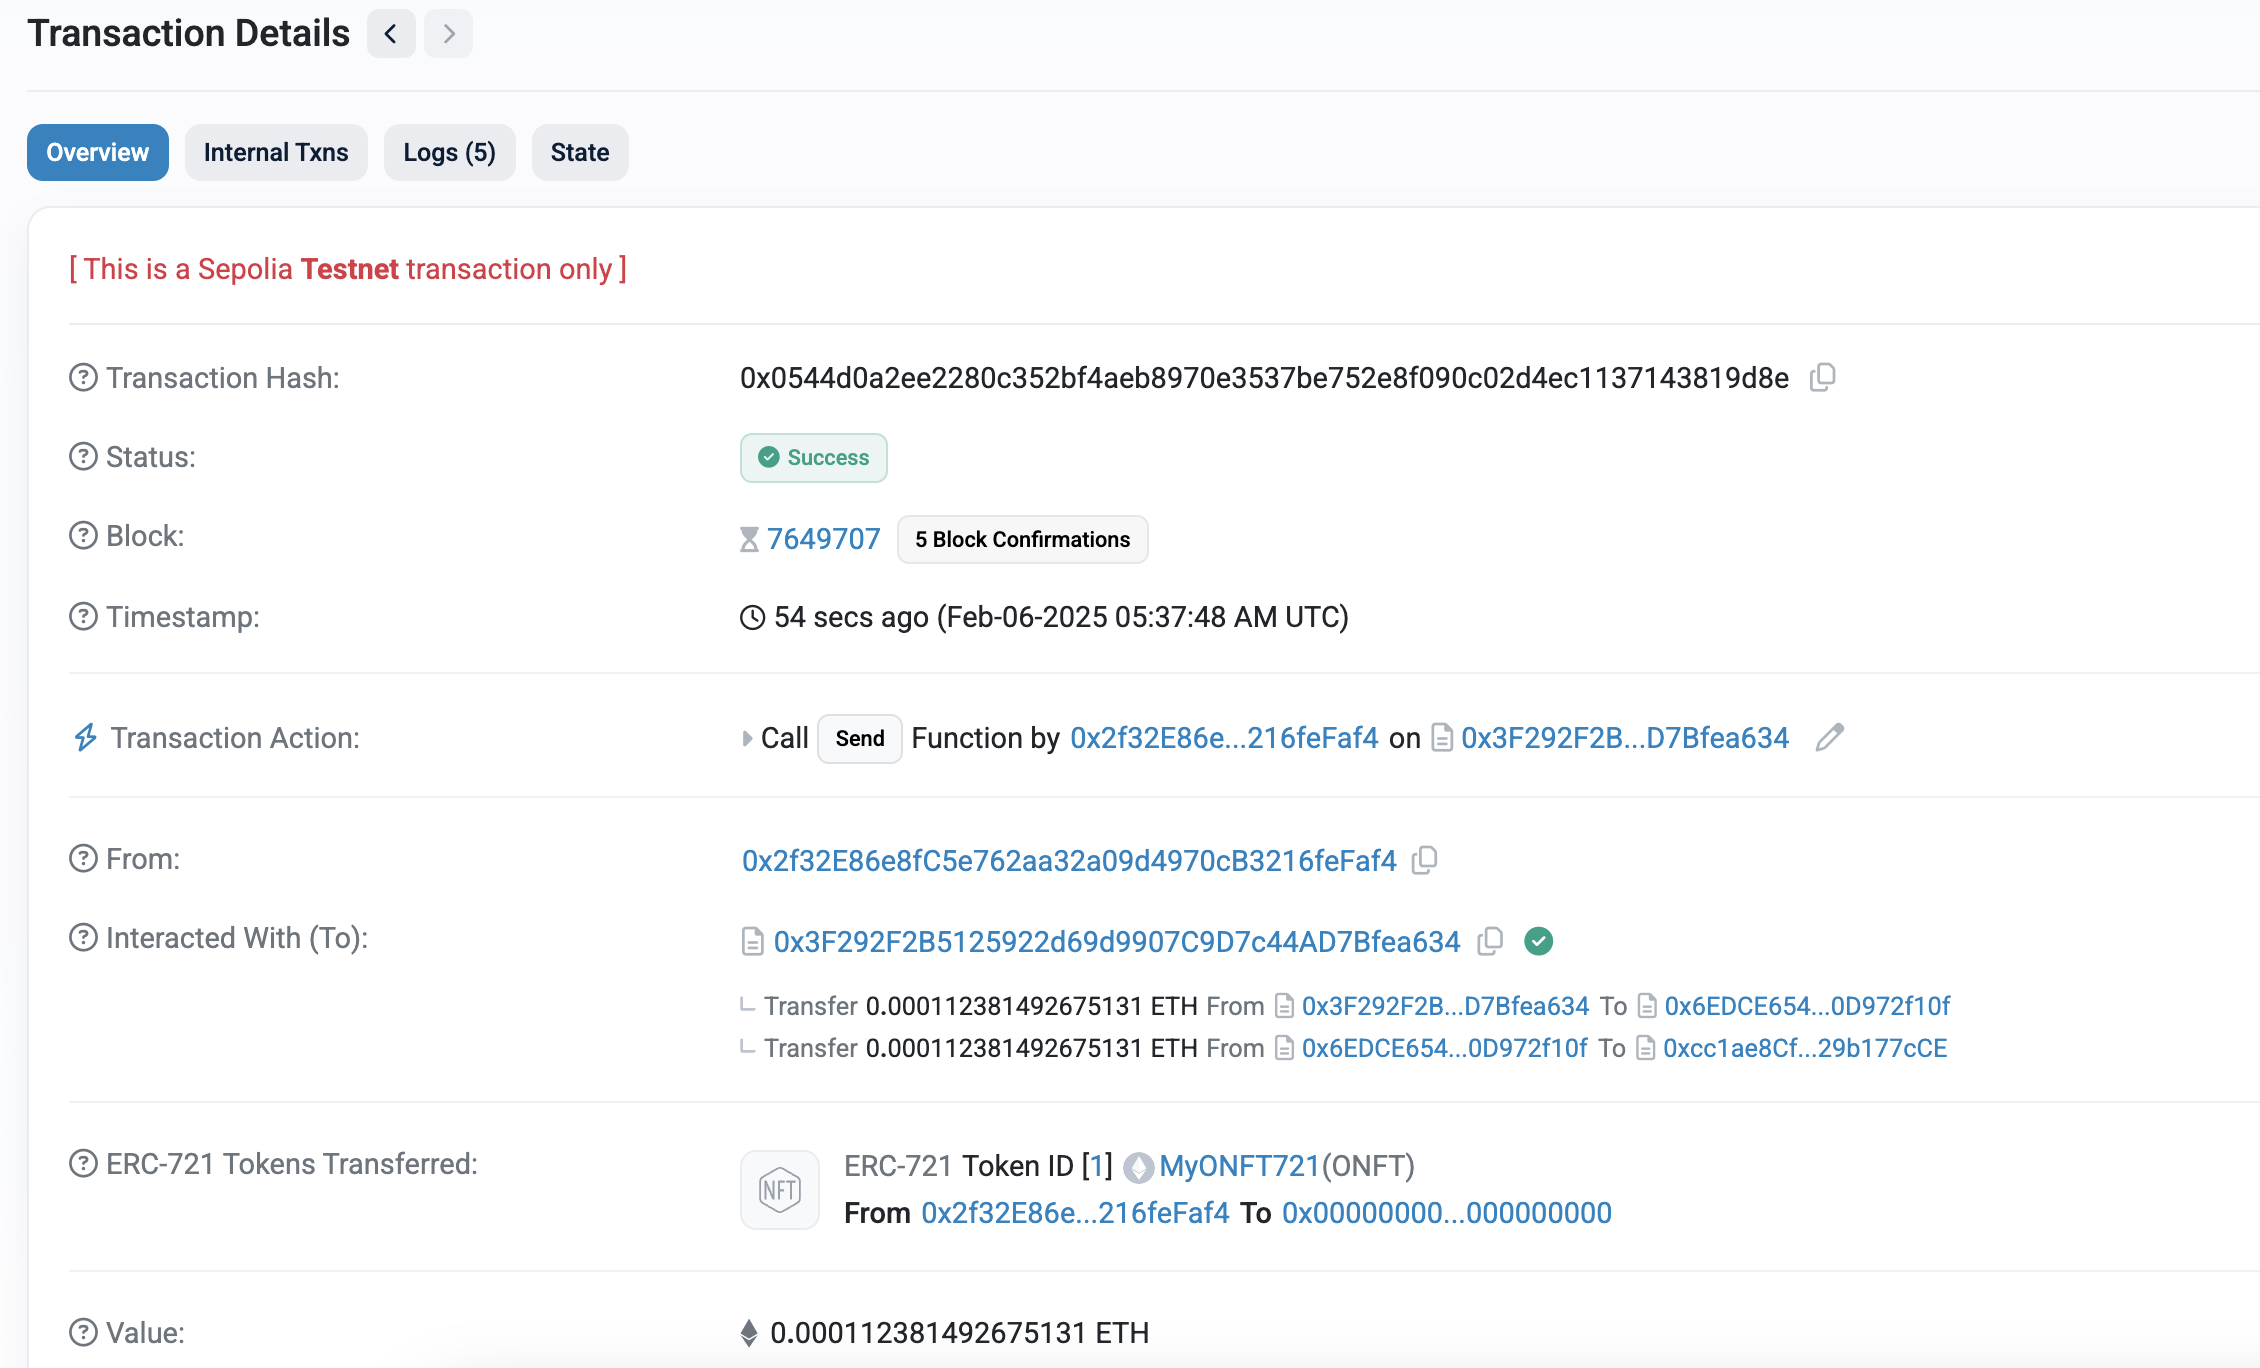
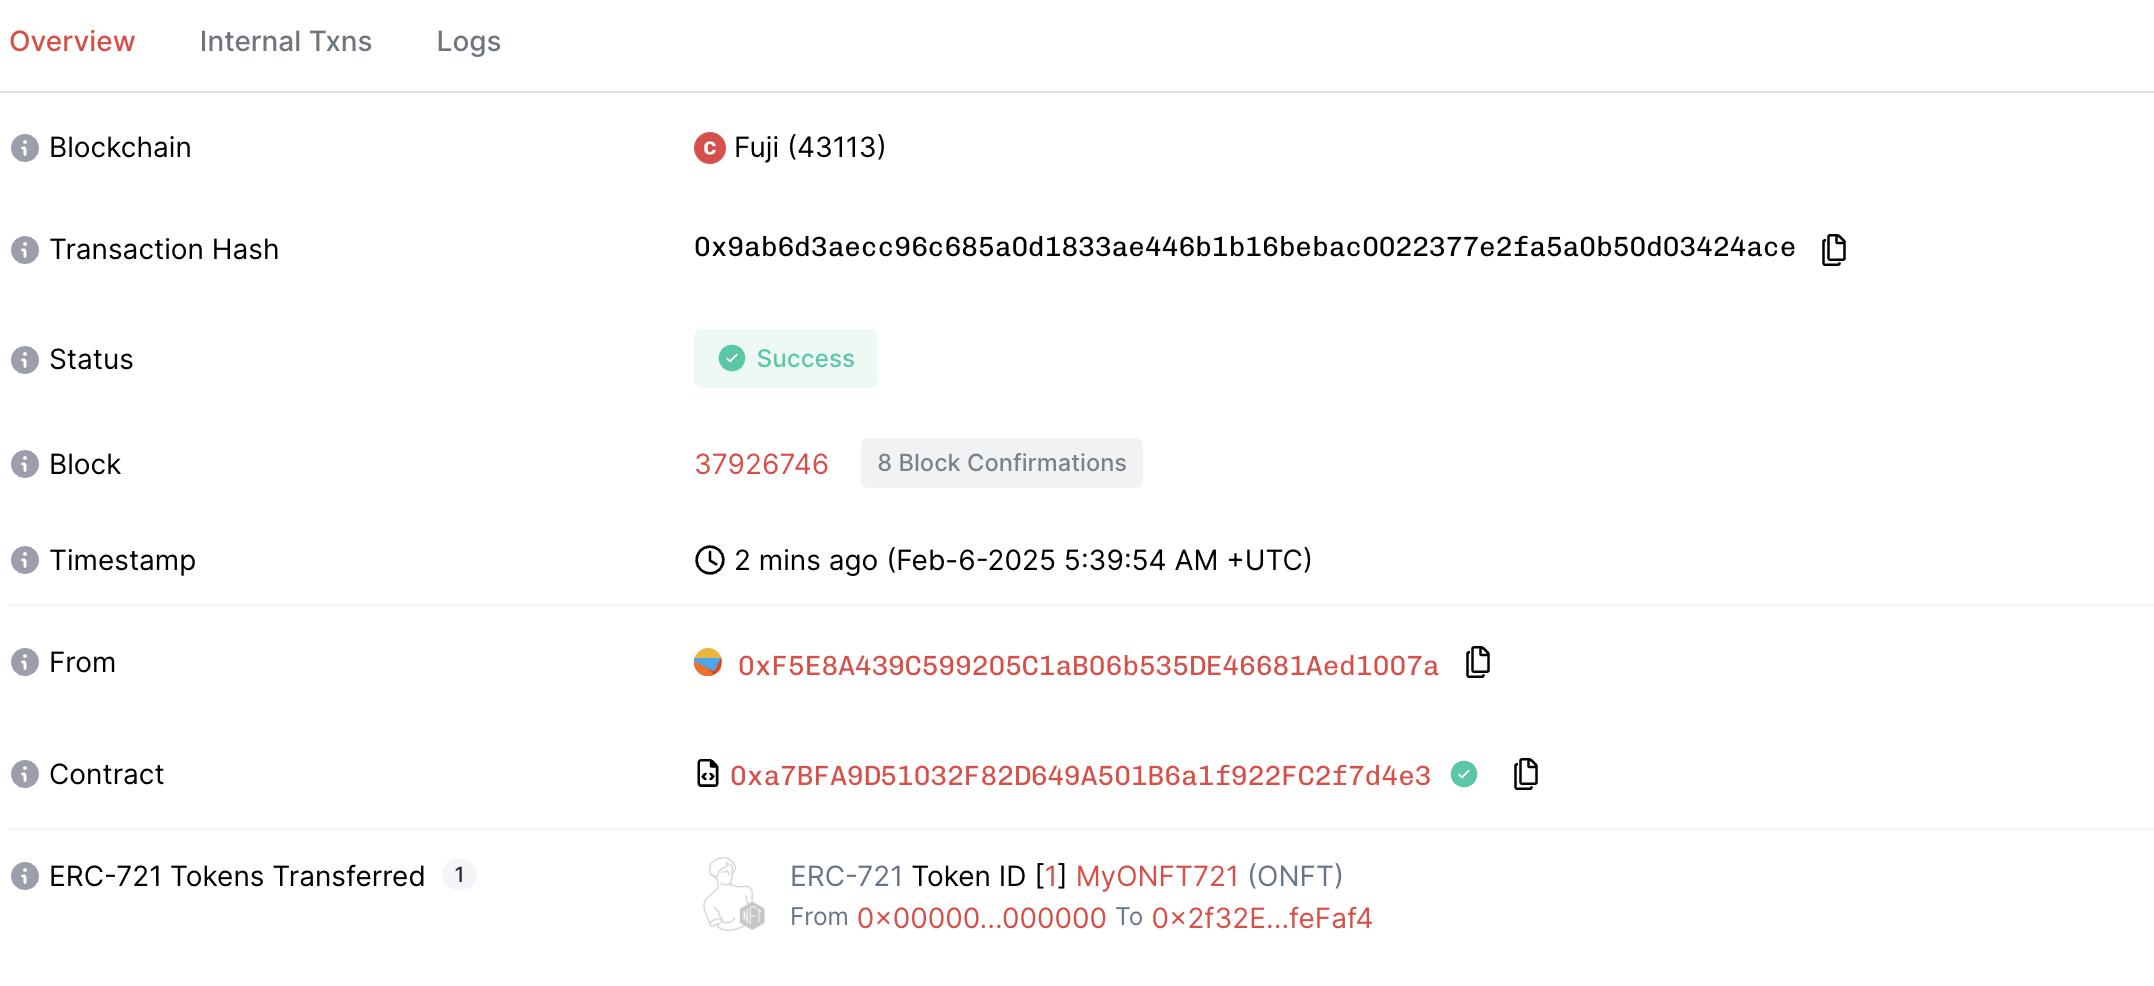
npx hardhat mint --network sepolia-testnet --id 1

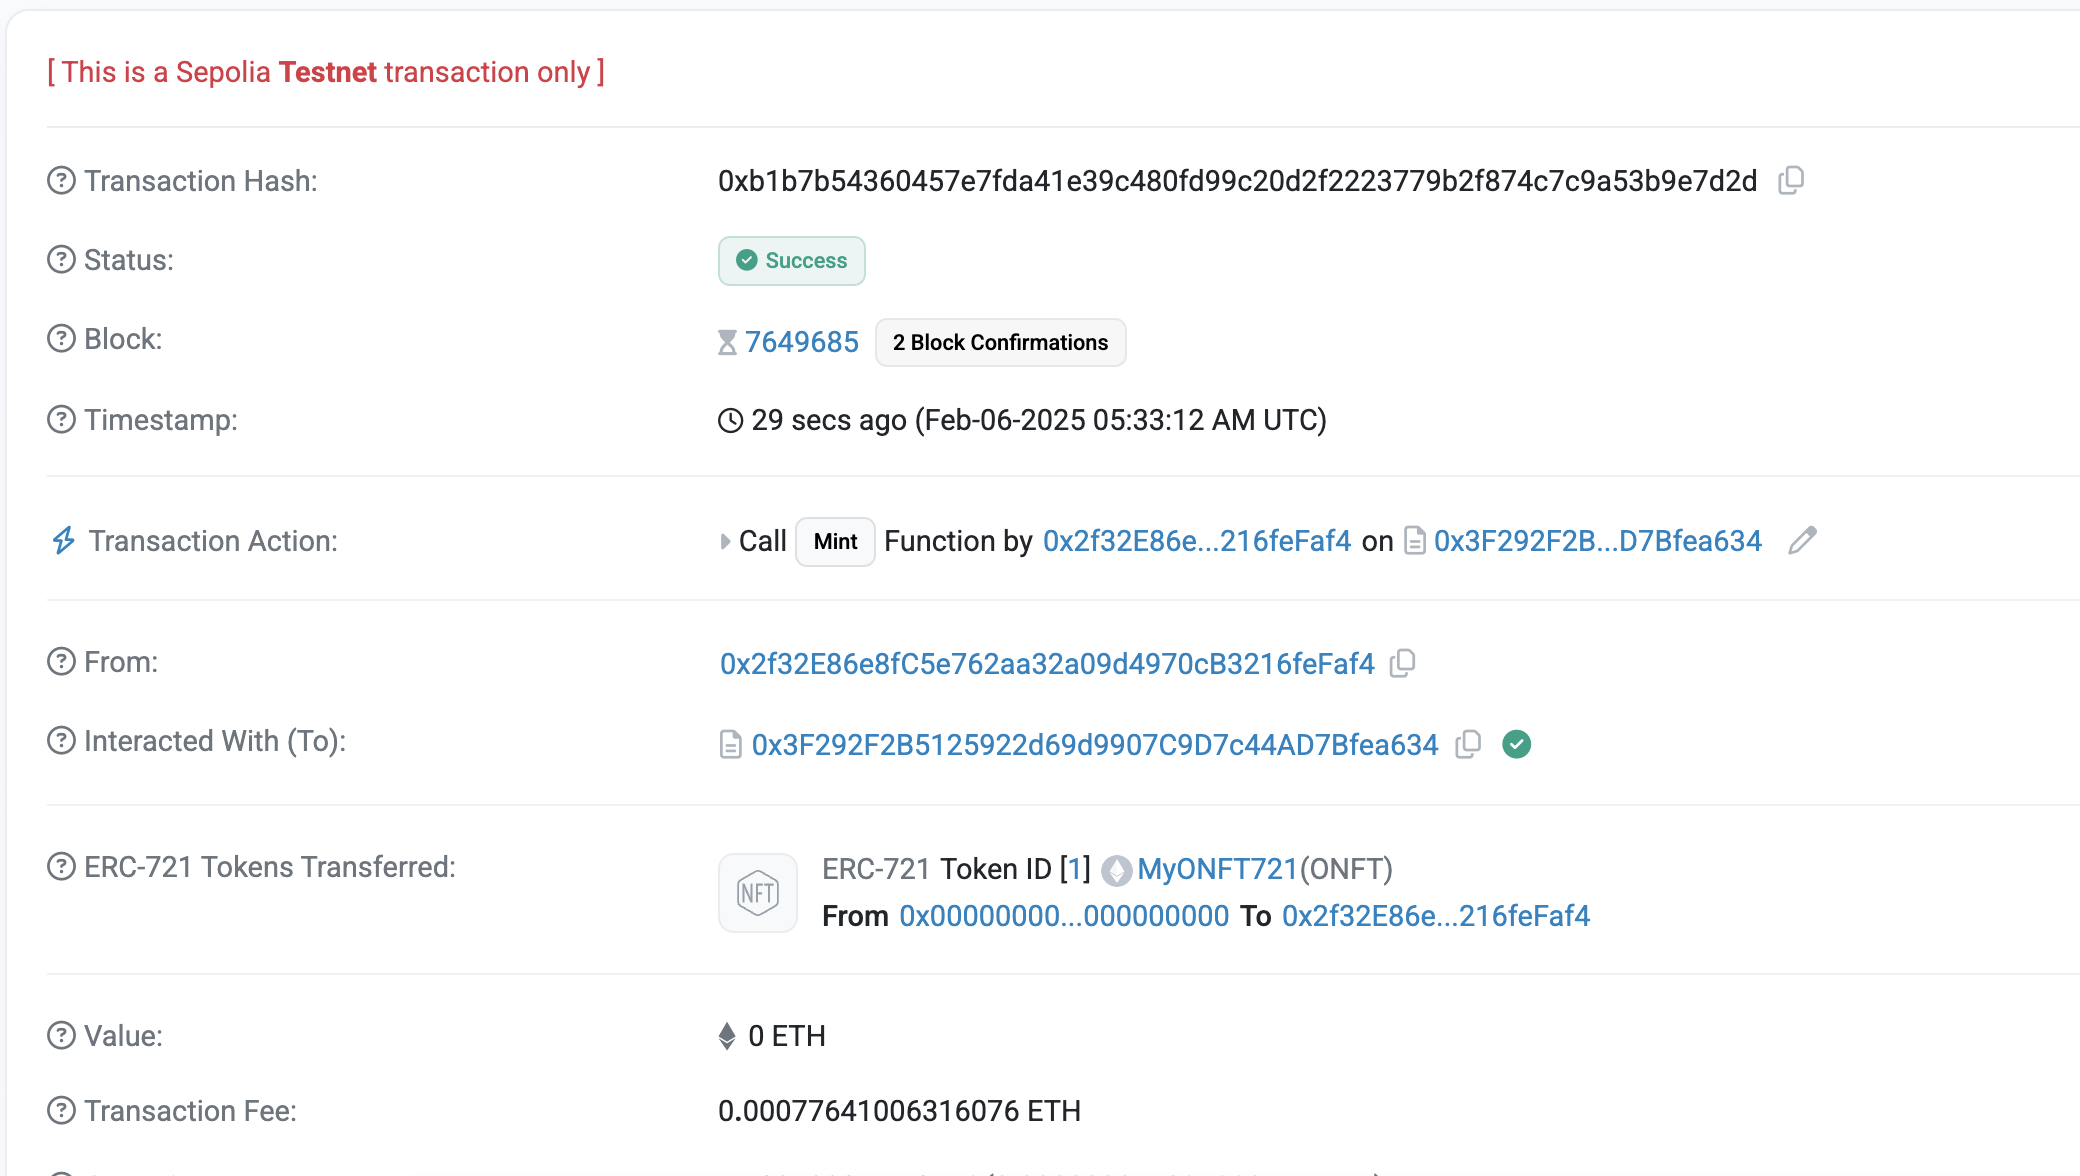
-
sendToken 생성 후 실행
 // tasks/sendToken.ts

 import { task } from 'hardhat/config';
 import { HardhatRuntimeEnvironment } from 'hardhat/types';

 import { Options } from '@layerzerolabs/lz-v2-utilities';

 export default task('sendToken', 'Send a token to the destination chain')
     .addParam('dstNetwork', 'The destination network name (from hardhat.config.ts)')
     .addParam('id', 'The token id to send')
     .setAction(async (taskArgs, hre: HardhatRuntimeEnvironment) => {
         const { id, dstNetwork } = taskArgs;
         const [signer] = await hre.ethers.getSigners();

         const addressAsBytes32 = "0x0000000000000000000000002f32e86e8fc5e762aa32a09d4970cb3216fefaf4";

         // Get destination network's EID
         const dstNetworkConfig = hre.config.networks[dstNetwork];
         const dstEid = dstNetworkConfig.eid;

         // Get current network's EID
         const srcNetworkConfig = hre.config.networks[hre.network.name];
         const srcEid = srcNetworkConfig?.eid;

         console.log('Sending message:');
         console.log('- From:', signer.address);
         console.log('- Source network:', hre.network.name, srcEid ? `(EID: ${srcEid})` : '');
         console.log('- Destination:', dstNetwork || 'unknown network', `(EID: ${dstEid})`);
         console.log('- Token ID:', id);

         const myONFT721 = await hre.deployments.get('MyONFT721');
         const contract = await hre.ethers.getContractAt('MyONFT721', myONFT721.address, signer);

         // Add executor options with gas limit
         const options = Options.newOptions().addExecutorLzReceiveOption(200000, 0).toBytes();

         // Get quote for the message
         console.log('Getting quote...');
         const sendParam = {
             dstEid: dstEid,
             to: addressAsBytes32,
             tokenId: id,
             extraOptions: options,
             composeMsg: "0x00",
             onftCmd: "0x00"
         }
         const quotedFee = await contract.quoteSend(sendParam, false);
         console.log('Quoted fee:', hre.ethers.utils.formatEther(quotedFee.nativeFee));

         // Send the message
         console.log('Sending tokens...');
         const tx = await contract.send(sendParam, quotedFee, signer.address, {value: quotedFee.nativeFee});

         const receipt = await tx.wait();
         console.log('🎉 Tokens sent! Transaction hash:', receipt.transactionHash);
         console.log(
             'Check token balance on LayerZero Scan: https://testnet.layerzeroscan.com/tx/' +
             receipt.transactionHash,
         );
     });
 import { EndpointId } from '@layerzerolabs/lz-definitions'
 import "./tasks/mint"
 import "./tasks/sendToken" // 추가
npx hardhat sendToken --network sepolia-testnet --dst-network avalanche-testnet --id 1

04 Feb 2025 |
Blockchain
LayerZero
Overview
이번 포스팅에서는 LayerZero를 사용하여 OApp(Omnichain Applications)과 OFT(Omnichain Fungible Tokens)를 배포하고 실행하는 과정을 설명합니다.
Getting Started with Contract Standards
LayerZero의 Contract Standards 를 사용하여 임의의 데이터, 토큰 등을 해당 프로토콜을 사용하여 전송할 수 있습니다.
이 표준들은 LayerZero Endpoint contract를 통해 omnichain 메시지를 보내고, 받고, 구성하기 위한 공통 기능을 구현하고 있습니다.
OAppSender._lzSend: EndpointV2.send 를 호출하여 byte 메시지를 보내는 Internal functionOAppReceiver._lzReceive :EndpointV2.lzReceive 를 호출한 뒤 encoded message를 byte로 전달하는 internal function
Quickstart - Create Your First Omnichain App
Creating an OApp
아래 명령어를 사용하여 새 프로젝트를 생성합니다.
npx create-lz-oapp@latest
OApp Smart Contract
프로젝트를 생성하면 MyOApp.sol 컨트랙트가 있습니다.
// contracts/MyOApp.sol

// SPDX-License-Identifier: MIT

pragma solidity ^0.8.22;

import { Ownable } from "@openzeppelin/contracts/access/Ownable.sol";
import { OApp, MessagingFee, Origin } from "@layerzerolabs/oapp-evm/contracts/oapp/OApp.sol";
import { MessagingReceipt } from "@layerzerolabs/oapp-evm/contracts/oapp/OAppSender.sol";

contract MyOApp is OApp {
    constructor(address _endpoint, address _delegate) OApp(_endpoint, _delegate) Ownable(_delegate) {}

    // This is where the message will be stored after it is received on the destination chain
    string public data = "Nothing received yet.";

    /**
     * @notice Sends a message from the source chain to a destination chain.
     * @param _dstEid The endpoint ID of the destination chain.
     * @param _message The message string to be sent.
     * @param _options Additional options for message execution.
     * @dev Encodes the message as bytes and sends it using the `_lzSend` internal function.
     * @return receipt A `MessagingReceipt` struct containing details of the message sent.
     */
    function send(
        uint32 _dstEid,
        // The message to be sent to the destination chain
        string memory _message,
        bytes calldata _options
    ) external payable returns (MessagingReceipt memory receipt) {
        bytes memory _payload = abi.encode(_message);
        receipt = _lzSend(_dstEid, _payload, _options, MessagingFee(msg.value, 0), payable(msg.sender));
    }

    /**
     * @notice Quotes the gas needed to pay for the full omnichain transaction in native gas or ZRO token.
     * @param _dstEid Destination chain's endpoint ID.
     * @param _message The message.
     * @param _options Message execution options (e.g., for sending gas to destination).
     * @param _payInLzToken Whether to return fee in ZRO token.
     * @return fee A `MessagingFee` struct containing the calculated gas fee in either the native token or ZRO token.
     */
    function quote(
        uint32 _dstEid,
        string memory _message,
        bytes memory _options,
        bool _payInLzToken
    ) public view returns (MessagingFee memory fee) {
        bytes memory payload = abi.encode(_message);
        fee = _quote(_dstEid, payload, _options, _payInLzToken);
    }

    /**
     * @dev Internal function override to handle incoming messages from another chain.
     * @dev _origin A struct containing information about the message sender.
     * @dev _guid A unique global packet identifier for the message.
     * @param payload The encoded message payload being received.
     *
     * @dev The following params are unused in the current implementation of the OApp.
     * @dev _executor The address of the Executor responsible for processing the message.
     * @dev _extraData Arbitrary data appended by the Executor to the message.
     *
     * Decodes the received payload and processes it as per the business logic defined in the function.
     */
    function _lzReceive(
        Origin calldata /*_origin*/,
        bytes32 /*_guid*/,
        bytes calldata payload,
        address /*_executor*/,
        bytes calldata /*_extraData*/
    ) internal override {
        data = abi.decode(payload, (string));
    }
}
Configuration
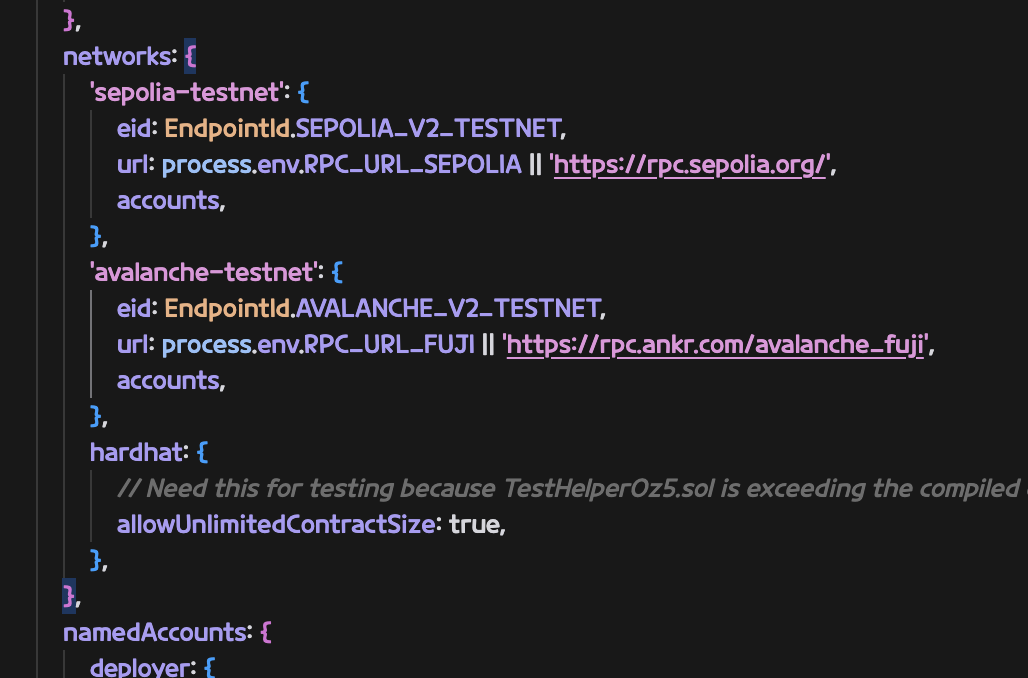
hardhat.config.ts 에 배포할 네트워크에 대한 정보를 입력합니다.
networks: {
    'avalanche-testnet': {
        eid: EndpointId.AVALANCHE_V2_TESTNET,
        url: process.env.RPC_URL_FUJI || 'https://rpc.ankr.com/avalanche_fuji',
        accounts,
    },
    'amoy-testnet': {
        eid: EndpointId.AMOY_V2_TESTNET,
        url: process.env.RPC_URL_AMOY || 'https://polygon-amoy-bor-rpc.publicnode.com',
        accounts,
    },
}
.env.example 를 복사해 .env 를 만들고 .env를 수정합니다.
PRIVATE_KEY = your_private_key; // Required
RPC_URL_FUJI = your_fuji_rpc; // Optional but recommended
RPC_URL_AMOY = your_amoy_rpc; // Optional but recommended
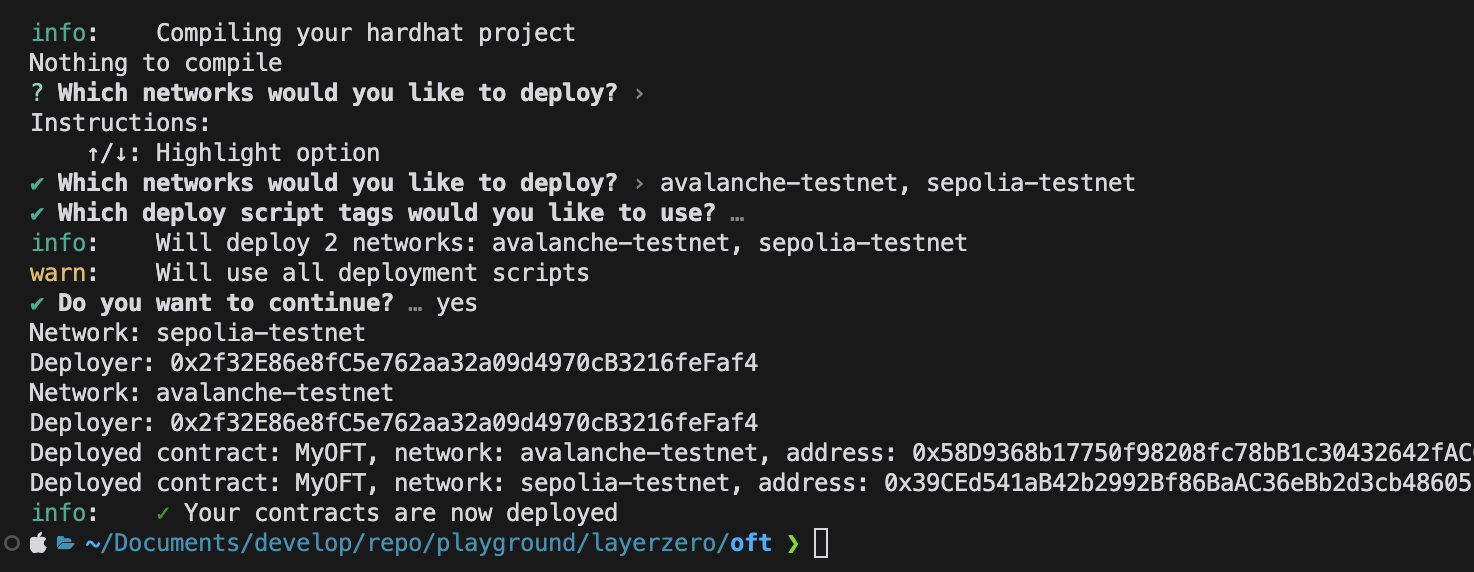
Deploying Contracts
아래 명렁어를 이용하여 배포합니다.
Configuration and wiring
이제 Chain간 Contract를 연결할 수 있는 준비가 되었습니다. 이를 위해 설정을 구성해야합니다. 해당 설정은 layerzero.config.ts 에 구성합니다.
// layerzero.config.ts
import {EndpointId} from '@layerzerolabs/lz-definitions';

import type {OAppOmniGraphHardhat, OmniPointHardhat} from '@layerzerolabs/toolbox-hardhat';

const fujiContract: OmniPointHardhat = {
  eid: EndpointId.AVALANCHE_V2_TESTNET,
  contractName: 'MyOApp',
};

const amoyContract: OmniPointHardhat = {
  eid: EndpointId.AMOY_V2_TESTNET,
  contractName: 'MyOApp',
};

const config: OAppOmniGraphHardhat = {
  contracts: [
    {
      contract: fujiContract,
    },
    {
      contract: amoyContract,
    },
  ],
  connections: [
    {
      from: fujiContract,
      to: amoyContract,
    },
    {
      from: amoyContract,
      to: fujiContract,
    },
  ],
};

export default config;
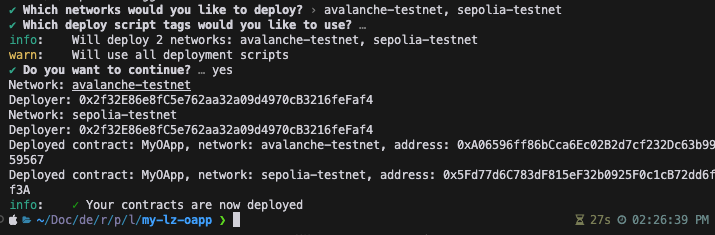
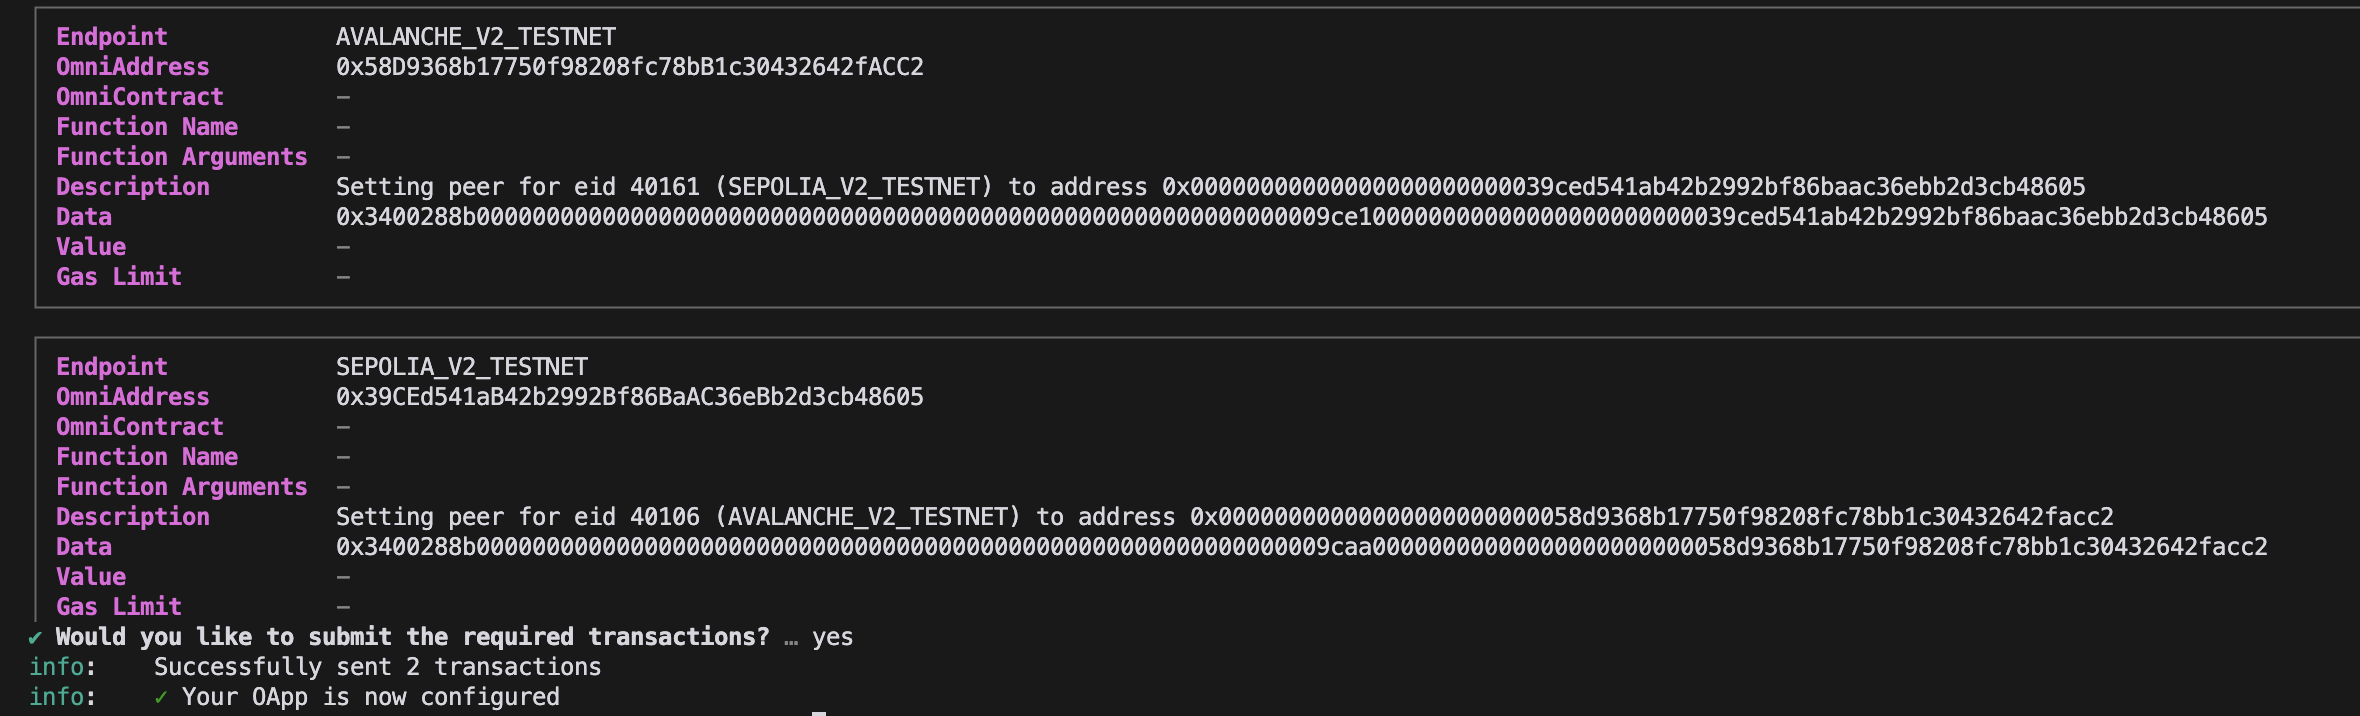
설정을 다 구성 했다면 아래 명령어를 이용하여 contract들을 연결할 수 있습니다.
npx hardhat lz:oapp:wire --oapp-config layerzero.config.ts
결과적으로 아래와 같이 출력 됩니다.
Sending Your First Message
이제 실제 메시지를 보내기 위해 ts파일로 script를 구성합니다.
tasks/sendMessage.ts 로 새 파일을 만들고 아래 코드를 입력합니다.
// tasks/sendMessage.ts

import {task} from 'hardhat/config';
import {HardhatRuntimeEnvironment} from 'hardhat/types';

import {Options} from '@layerzerolabs/lz-v2-utilities';

export default task('sendMessage', 'Send a message to the destination chain')
  .addParam('dstNetwork', 'The destination network name (from hardhat.config.ts)')
  .addParam('message', 'The message to send')
  .setAction(async (taskArgs, hre: HardhatRuntimeEnvironment) => {
    const {message, dstNetwork} = taskArgs;
    const [signer] = await hre.ethers.getSigners();

    // Get destination network's EID
    const dstNetworkConfig = hre.config.networks[dstNetwork];
    const dstEid = dstNetworkConfig.eid;

    // Get current network's EID
    const srcNetworkConfig = hre.config.networks[hre.network.name];
    const srcEid = srcNetworkConfig?.eid;

    console.log('Sending message:');
    console.log('- From:', signer.address);
    console.log('- Source network:', hre.network.name, srcEid ? `(EID: ${srcEid})` : '');
    console.log('- Destination:', dstNetwork || 'unknown network', `(EID: ${dstEid})`);
    console.log('- Message:', message);

    const myOApp = await hre.deployments.get('MyOApp');
    const contract = await hre.ethers.getContractAt('MyOApp', myOApp.address, signer);

    // Add executor options with gas limit
    const options = Options.newOptions().addExecutorLzReceiveOption(200000, 0).toBytes();

    // Get quote for the message
    console.log('Getting quote...');
    const quotedFee = await contract.quote(dstEid, message, options, false);
    console.log('Quoted fee:', hre.ethers.utils.formatEther(quotedFee.nativeFee));

    // Send the message
    console.log('Sending message...');
    const tx = await contract.send(dstEid, message, options, {value: quotedFee.nativeFee});

    const receipt = await tx.wait();
    console.log('🎉 Message sent! Transaction hash:', receipt.transactionHash);
    console.log(
      'Check message status on LayerZero Scan: https://testnet.layerzeroscan.com/tx/' +
        receipt.transactionHash,
    );
  });
또한 hardhat.config.ts 에도 위에서 만든 파일을 Import 합니다.
// hardhat.config.ts
// (...)
import {EndpointId} from '@layerzerolabs/lz-definitions';
import './tasks/sendMessage'; // Import the task
이후 아래 명령어로 cross-chain message를 보낼 수 있습니다.
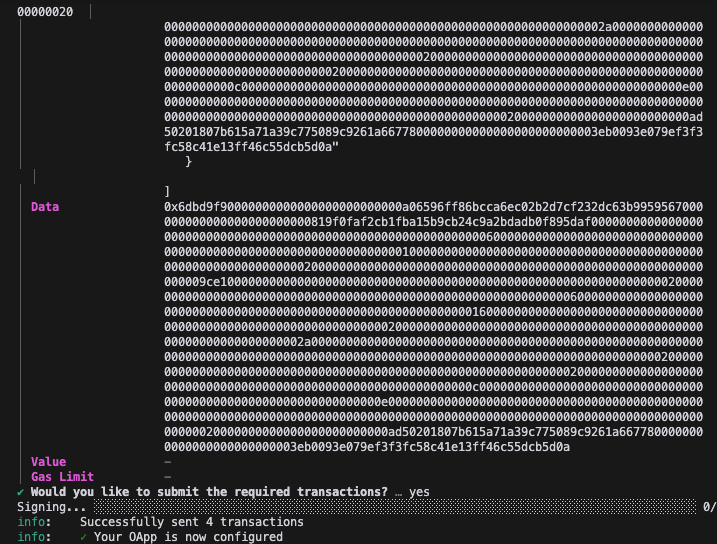
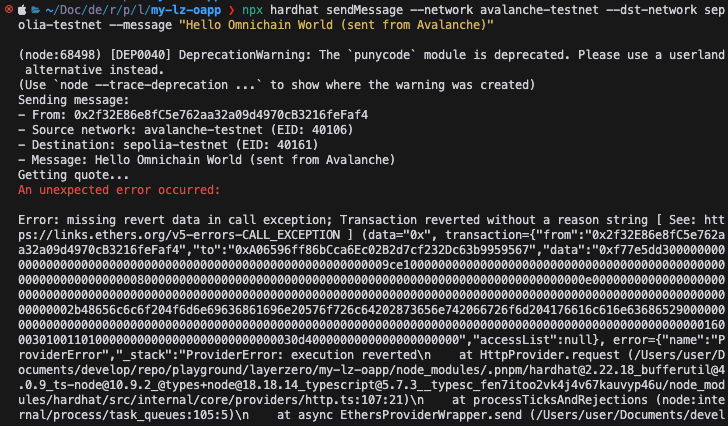
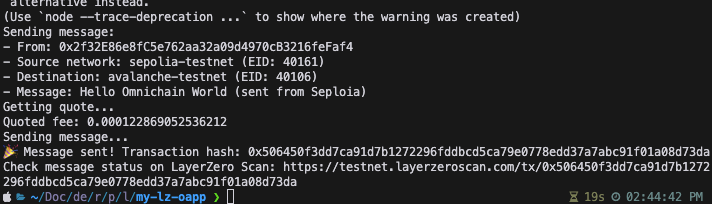
npx hardhat sendMessage --network avalanche-testnet --dst-network amoy-testnet --message "Hello Omnichain World (sent from Avalanche)"

# 실제로는 amoy를 사용하지 않고 sepolia를 사용했음 (Gas fee 없어서)
npx hardhat sendMessage --network sepolia-testnet --dst-network avalanche-testnet --message "Hello Omnichain World (sent from Seploia)"
결과는 아래와 같습니다.
Sending message:
- From: 0x498098ca1b7447fC5035f95B80be97eE16F82597
- Source network: avalanche-testnet (EID: 40106)
- Destination: amoy-testnet (EID: 40267)
- Message: Hello Omnichain World (sent from Avalanche)
Getting quote...
Quoted fee: 0.004605311339306711
Sending message...
🎉 Message sent! Transaction hash: 0x47bd60f2710c2ec5a496c55c9763bd87fd4c599b541ad1287540fce9852ede65
Check message status on LayerzeRo Scan: https://testnet.layerzeroscan.com/tx/0x47bd60f2710c2ec5a496c55c9763bd87fd4c599b541ad1287540fce9852ede65
-
실패 ( avax → sepolia )

LayerZero V2 OFT

OFT는 모든 체인에 배포되어야 하며, 각 체인에서 토큰을 발행하고 전송할 수 있습니다.
각 체인간 전송하는 과정에서 기본적으로 Burn & Mint 처리가 됩니다.

만약 이미 존재하는 ERC20을 사용하여 OFTAdapter를 구성한 경우 Lock & Mint 처리가 됩니다.
Installation
아래 명령어로 OFT가 포함된 프로젝트를 생성할 수 있습니다.
추가로 아래 명령어로 npm 패키지를 설치합니다.
pnpm add @layerzerolabs/oft-evm
OFT를 생성하려면, 토큰을 존재시키고자 하는 모든 체인에 OFT Contract를 배포해야 합니다.
이미 해당 체인에 토큰이 존재하는 경우, 해당 토큰의 중개 역할을 하는 Lock Box로서 OFT Adapter Contract를 배포할 수 있습니다.
기본적으로 OFT는 ERC20 규칙을 따르며, decimals 값을 18로 설정합니다. 다른 값을 사용하려면 컨트랙트에서 decimals() 함수를 오버라이드해야 합니다.
Deployment Workflow
-
OFT를 연결하려는 모든 체인에 배포
OFT를 생성하려면, 토큰을 존재시키고자 하는 모든 체인에 OFT 컨트랙트를 배포해야 합니다.
-
setPeer를 사용하여 체인 간 연결
OFT는 OApp을 확장하므로, OFT.setPeer를 호출하여 각 대상 체인의 컨트랙트를 허용 목록(whitelist)에 추가해야 합니다.
-
DVN(Decentralized Verification Network) 설정
블록 확인(block confirmations), 보안 임계값(security threshold), 실행자(Executor), 최대 메시지 크기(max message size), 송·수신 라이브러리(send/receive libraries) 등의 설정을 구성해야 합니다.
-
보안 및 실행자(Executor) 설정 스크립트 참고
보안 및 실행자 설정과 관련된 예제 스크립트는 “Security and Executor Configuration” 섹션에서 확인할 수 있습니다.
-
가스 설정 (권장 옵션)
OFT는 OAppOptionsType3을 상속받으므로, 사용자가 aOFT.send를 호출할 때 특정 가스 설정을 강제할 수 있습니다.
-
OFTAdapter를 사용하는 경우 (필수 설정)
OFTAdapter를 사용할 경우, 전송할 토큰의 양만큼 ERC20.approve를 호출하여 OFTAdapter가 ERC20 토큰을 사용할 수 있도록 승인해야 합니다.
Deploy
-
hardhat.config.ts 구성
본문에서는 amoy를 사용하지 않을거라 제거했음
- Mint function 추가
- 템플릿엔 mint가 별도로 없기 때문에 추가해 주어야 합니다.
- 프로덕션에서 사용하려면
onlyOwner 같은 modifier 를 반드시 넣어주세요
  // SPDX-License-Identifier: UNLICENSED
  pragma solidity ^0.8.22;

  import { Ownable } from "@openzeppelin/contracts/access/Ownable.sol";
  import { OFT } from "@layerzerolabs/oft-evm/contracts/OFT.sol";

  contract MyOFT is OFT {
      constructor(
          string memory _name,
          string memory _symbol,
          address _lzEndpoint,
          address _delegate
      ) OFT(_name, _symbol, _lzEndpoint, _delegate) Ownable(_delegate) {}

      // Mint function
      function mint(address to, uint256 amount) external virtual {
          _mint(to, amount);
      }
  }
-
빌드
 pnpm install # Install dependencies
 pnpm compile # Compile contract
.env 구성
- Rename
.env.example -> .env
- Choose your preferred means of setting up your deployer wallet/account:
 MNEMONIC="test test test test test test test test test test test junk"
 or...
 PRIVATE_KEY="0xabc...def"
-
배포
-
layerzero.config.ts 구성
실제 컨트랙트를 연결할 체인들을 구성
본문에서는 amoy를 사용하지 않아 제거했음

-
Contract wire
npx hardhat lz:oapp:wire --oapp-config layerzero.config.ts
- Mint Task 생성 후 실행
-
tasks/mint.ts
  // tasks/mint.ts

  import { task } from 'hardhat/config';
  import { HardhatRuntimeEnvironment } from 'hardhat/types';

  import { Options } from '@layerzerolabs/lz-v2-utilities';

  export default task('mint', 'Mint a token to the destination chain')
    .addParam('amount', 'The amount of tokens to mint')
    .setAction(async (taskArgs, hre: HardhatRuntimeEnvironment) => {
      const { amount } = taskArgs;
      const [signer] = await hre.ethers.getSigners();

      console.log('Minting tokens:');
      console.log('- From:', signer.address);
      console.log('- Amount:', amount);

      const myOFT = await hre.deployments.get('MyOFT');
      const contract = await hre.ethers.getContractAt('MyOFT', myOFT.address, signer);

      // Send the message
      console.log('Sending message...');
      const tx = await contract.mint(signer.address, amount);

      const receipt = await tx.wait();
      console.log('🎉 Tokens minted! Transaction hash:', receipt.transactionHash);
    });
-
hardhat.config.ts 에 추가
  import { EndpointId } from '@layerzerolabs/lz-definitions'
  import "./tasks/mint" // 추가

  // Set your preferred authentication method
-
실행
npx hardhat mint --network sepolia-testnet --amount 10000000000000000000

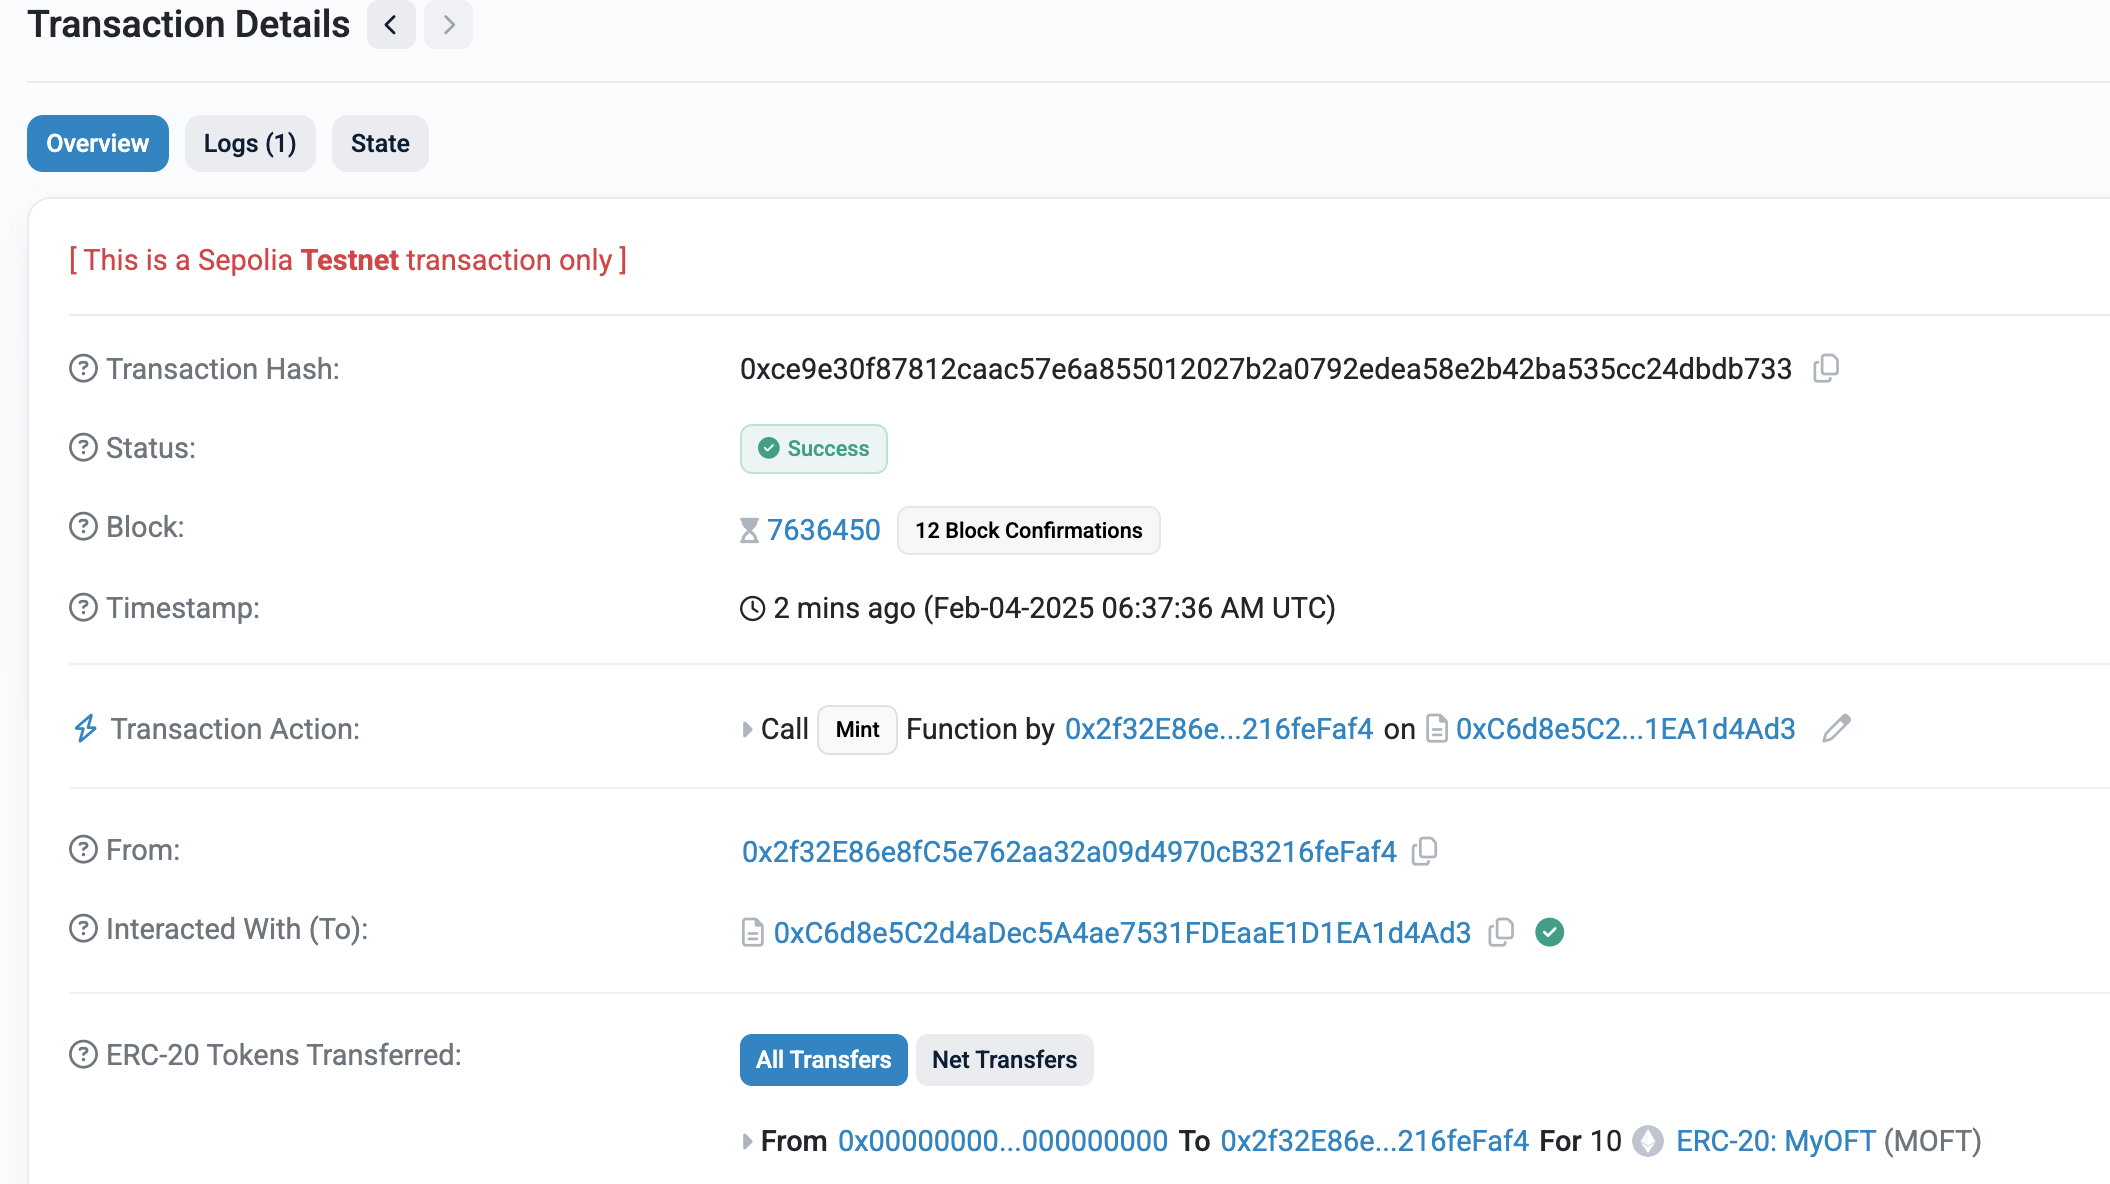
-
sendToken 생성 후 실행
 // tasks/sendToken.ts

 import { task } from 'hardhat/config';
 import { HardhatRuntimeEnvironment } from 'hardhat/types';

 import { Options } from '@layerzerolabs/lz-v2-utilities';

 export default task('sendToken', 'Send a token to the destination chain')
     .addParam('dstNetwork', 'The destination network name (from hardhat.config.ts)')
     .addParam('amount', 'The amount of tokens to send')
     .setAction(async (taskArgs, hre: HardhatRuntimeEnvironment) => {
         const { amount, dstNetwork } = taskArgs;
         const [signer] = await hre.ethers.getSigners();

         const addressAsBytes32 = "0x0000000000000000000000002f32e86e8fc5e762aa32a09d4970cb3216fefaf4";

         // Get destination network's EID
         const dstNetworkConfig = hre.config.networks[dstNetwork];
         const dstEid = dstNetworkConfig.eid;

         // Get current network's EID
         const srcNetworkConfig = hre.config.networks[hre.network.name];
         const srcEid = srcNetworkConfig?.eid;

         console.log('Sending message:');
         console.log('- From:', signer.address);
         console.log('- Source network:', hre.network.name, srcEid ? `(EID: ${srcEid})` : '');
         console.log('- Destination:', dstNetwork || 'unknown network', `(EID: ${dstEid})`);
         console.log('- Amount:', amount);

         const myOFT = await hre.deployments.get('MyOFT');
         const contract = await hre.ethers.getContractAt('MyOFT', myOFT.address, signer);

         // Add executor options with gas limit
         const options = Options.newOptions().addExecutorLzReceiveOption(200000, 0).toBytes();

         // Get quote for the message
         console.log('Getting quote...');
         const sendParam = {
             dstEid: dstEid,
             to: addressAsBytes32,
             amountLD: amount,
             minAmountLD: amount,
             extraOptions: options,
             composeMsg: "0x00",
             oftCmd: "0x00"
         }
         const quotedFee = await contract.quoteSend(sendParam, false);
         console.log('Quoted fee:', hre.ethers.utils.formatEther(quotedFee.nativeFee));

         // Send the message
         console.log('Sending tokens...');
         const tx = await contract.send(sendParam, quotedFee, signer.address, {value: quotedFee.nativeFee});

         const receipt = await tx.wait();
         console.log('🎉 Tokens sent! Transaction hash:', receipt.transactionHash);
         console.log(
             'Check token balance on LayerZero Scan: https://testnet.layerzeroscan.com/tx/' +
             receipt.transactionHash,
         );
     });
 import { EndpointId } from '@layerzerolabs/lz-definitions'
 import "./tasks/mint"
 import "./tasks/sendToken" // 추가
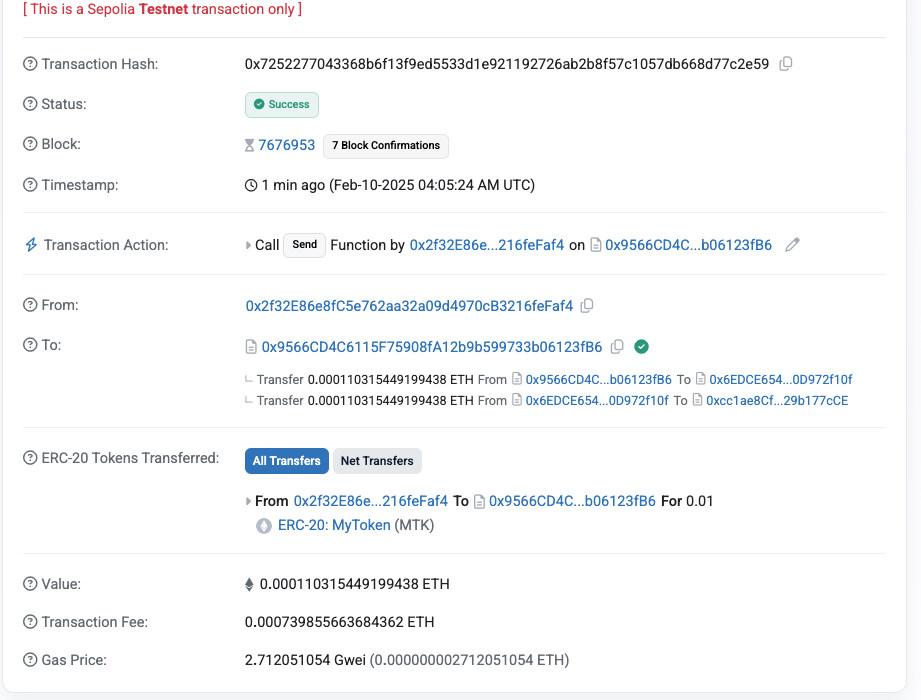
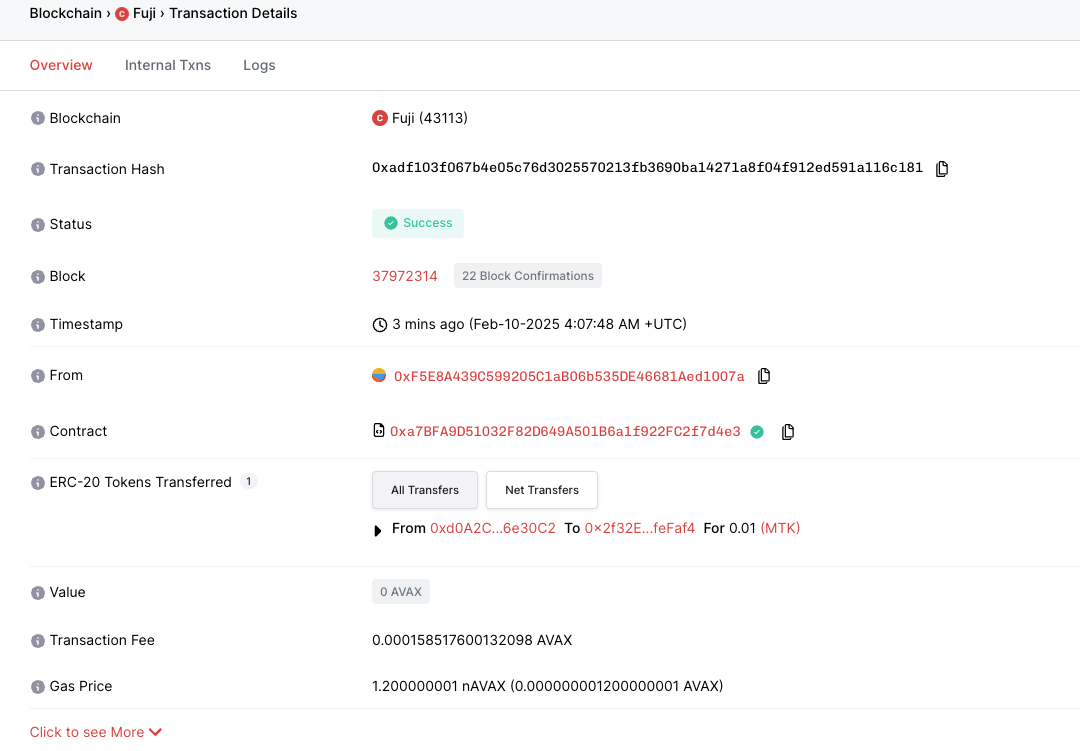
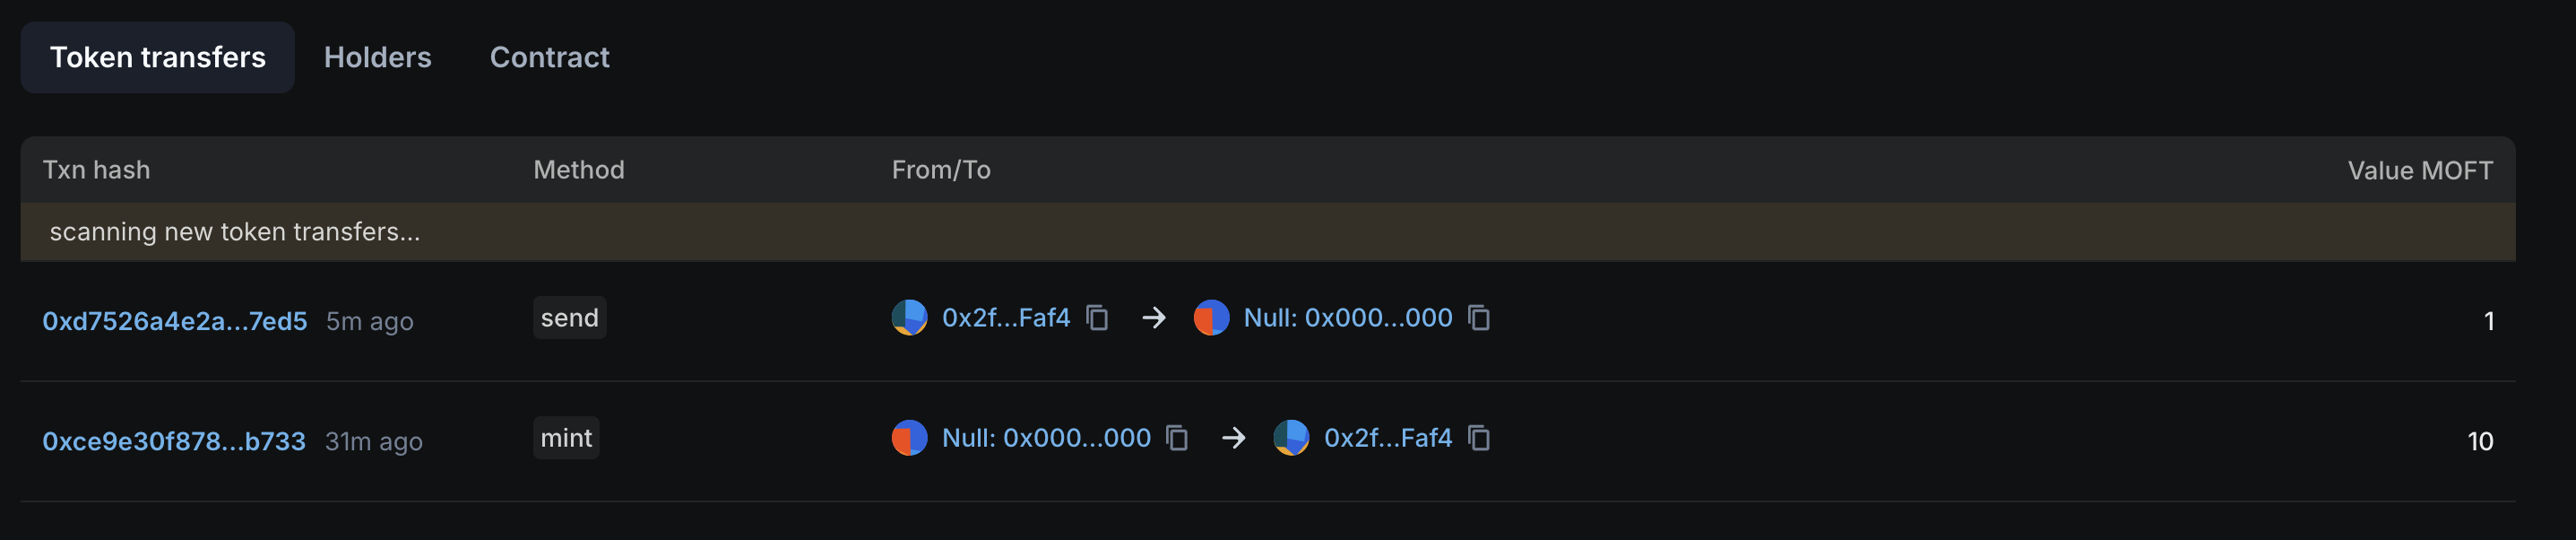
npx hardhat sendToken --network sepolia-testnet --dst-network avalanche-testnet --amount 1000000000000000000
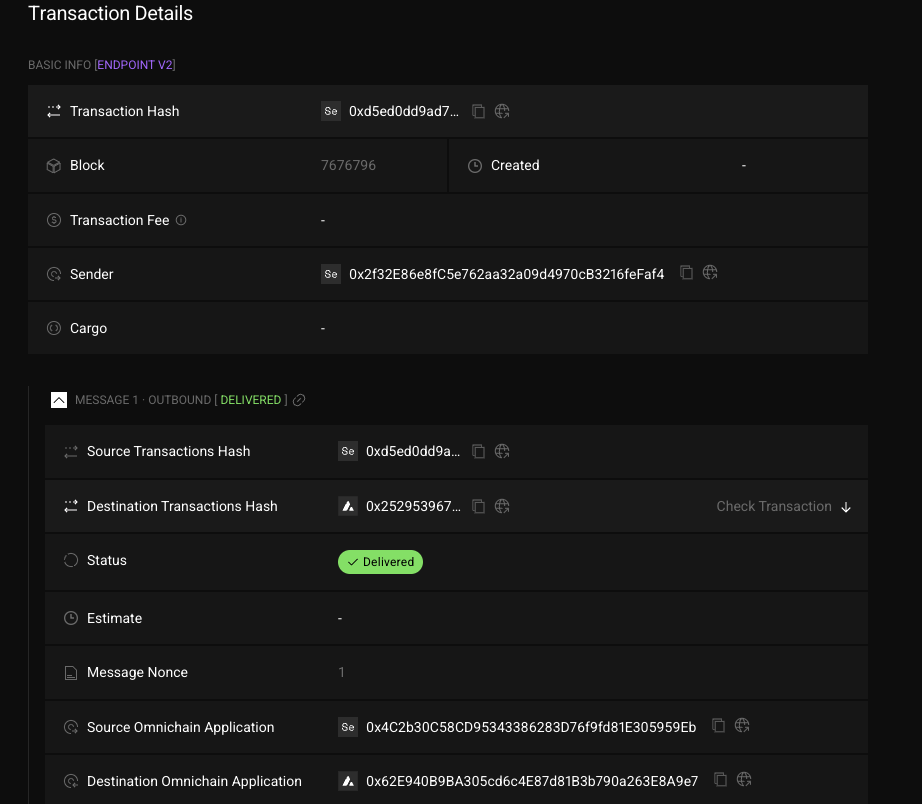
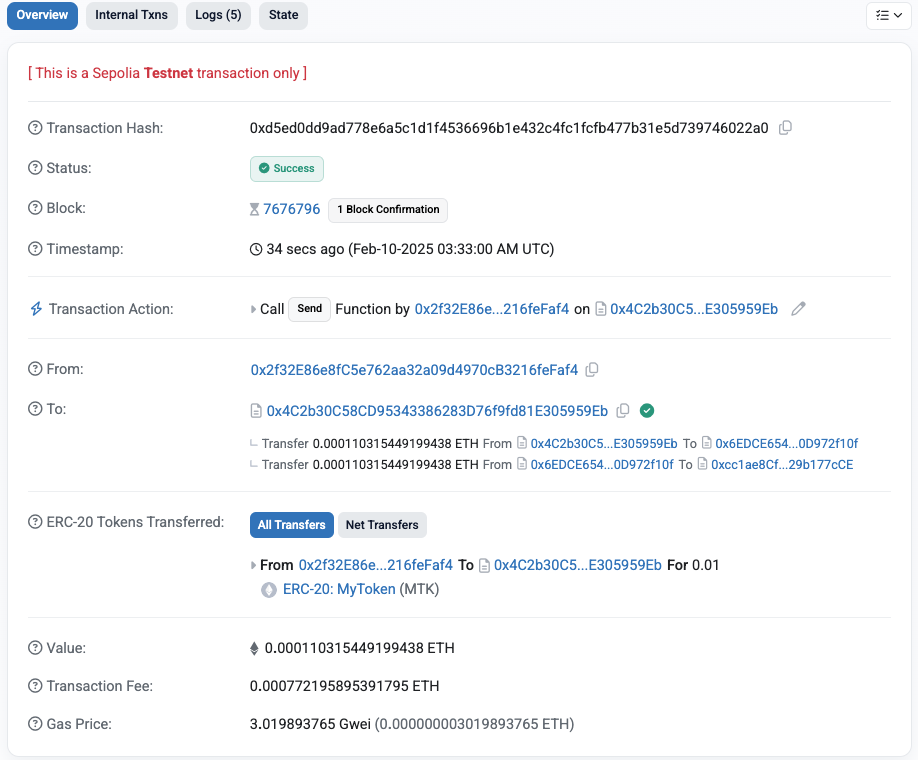
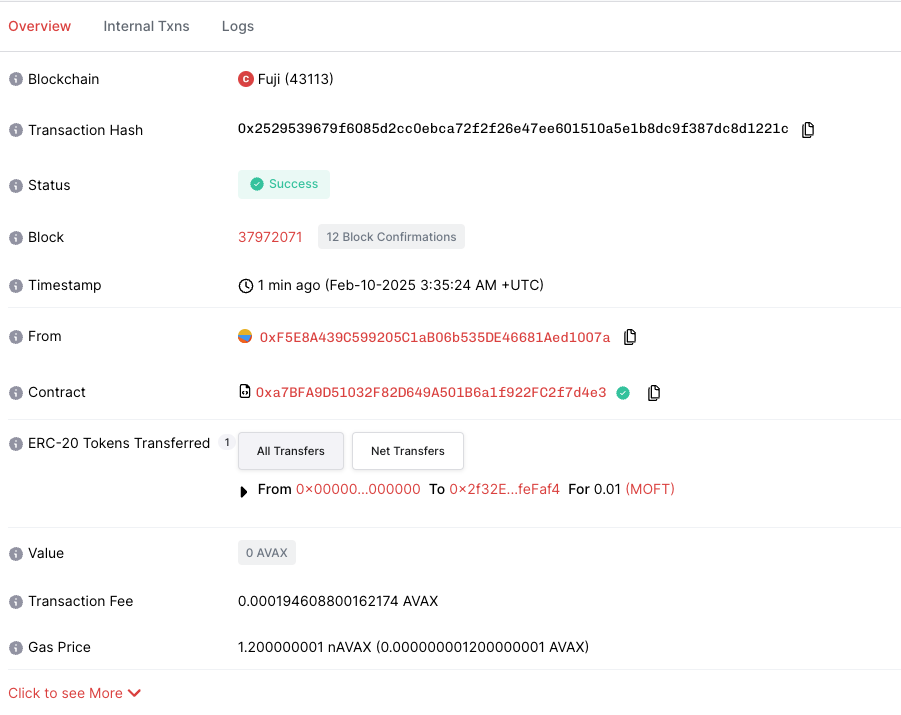
-
아래와 같이 LayerZero Explorer에서도 확인할 수 있음
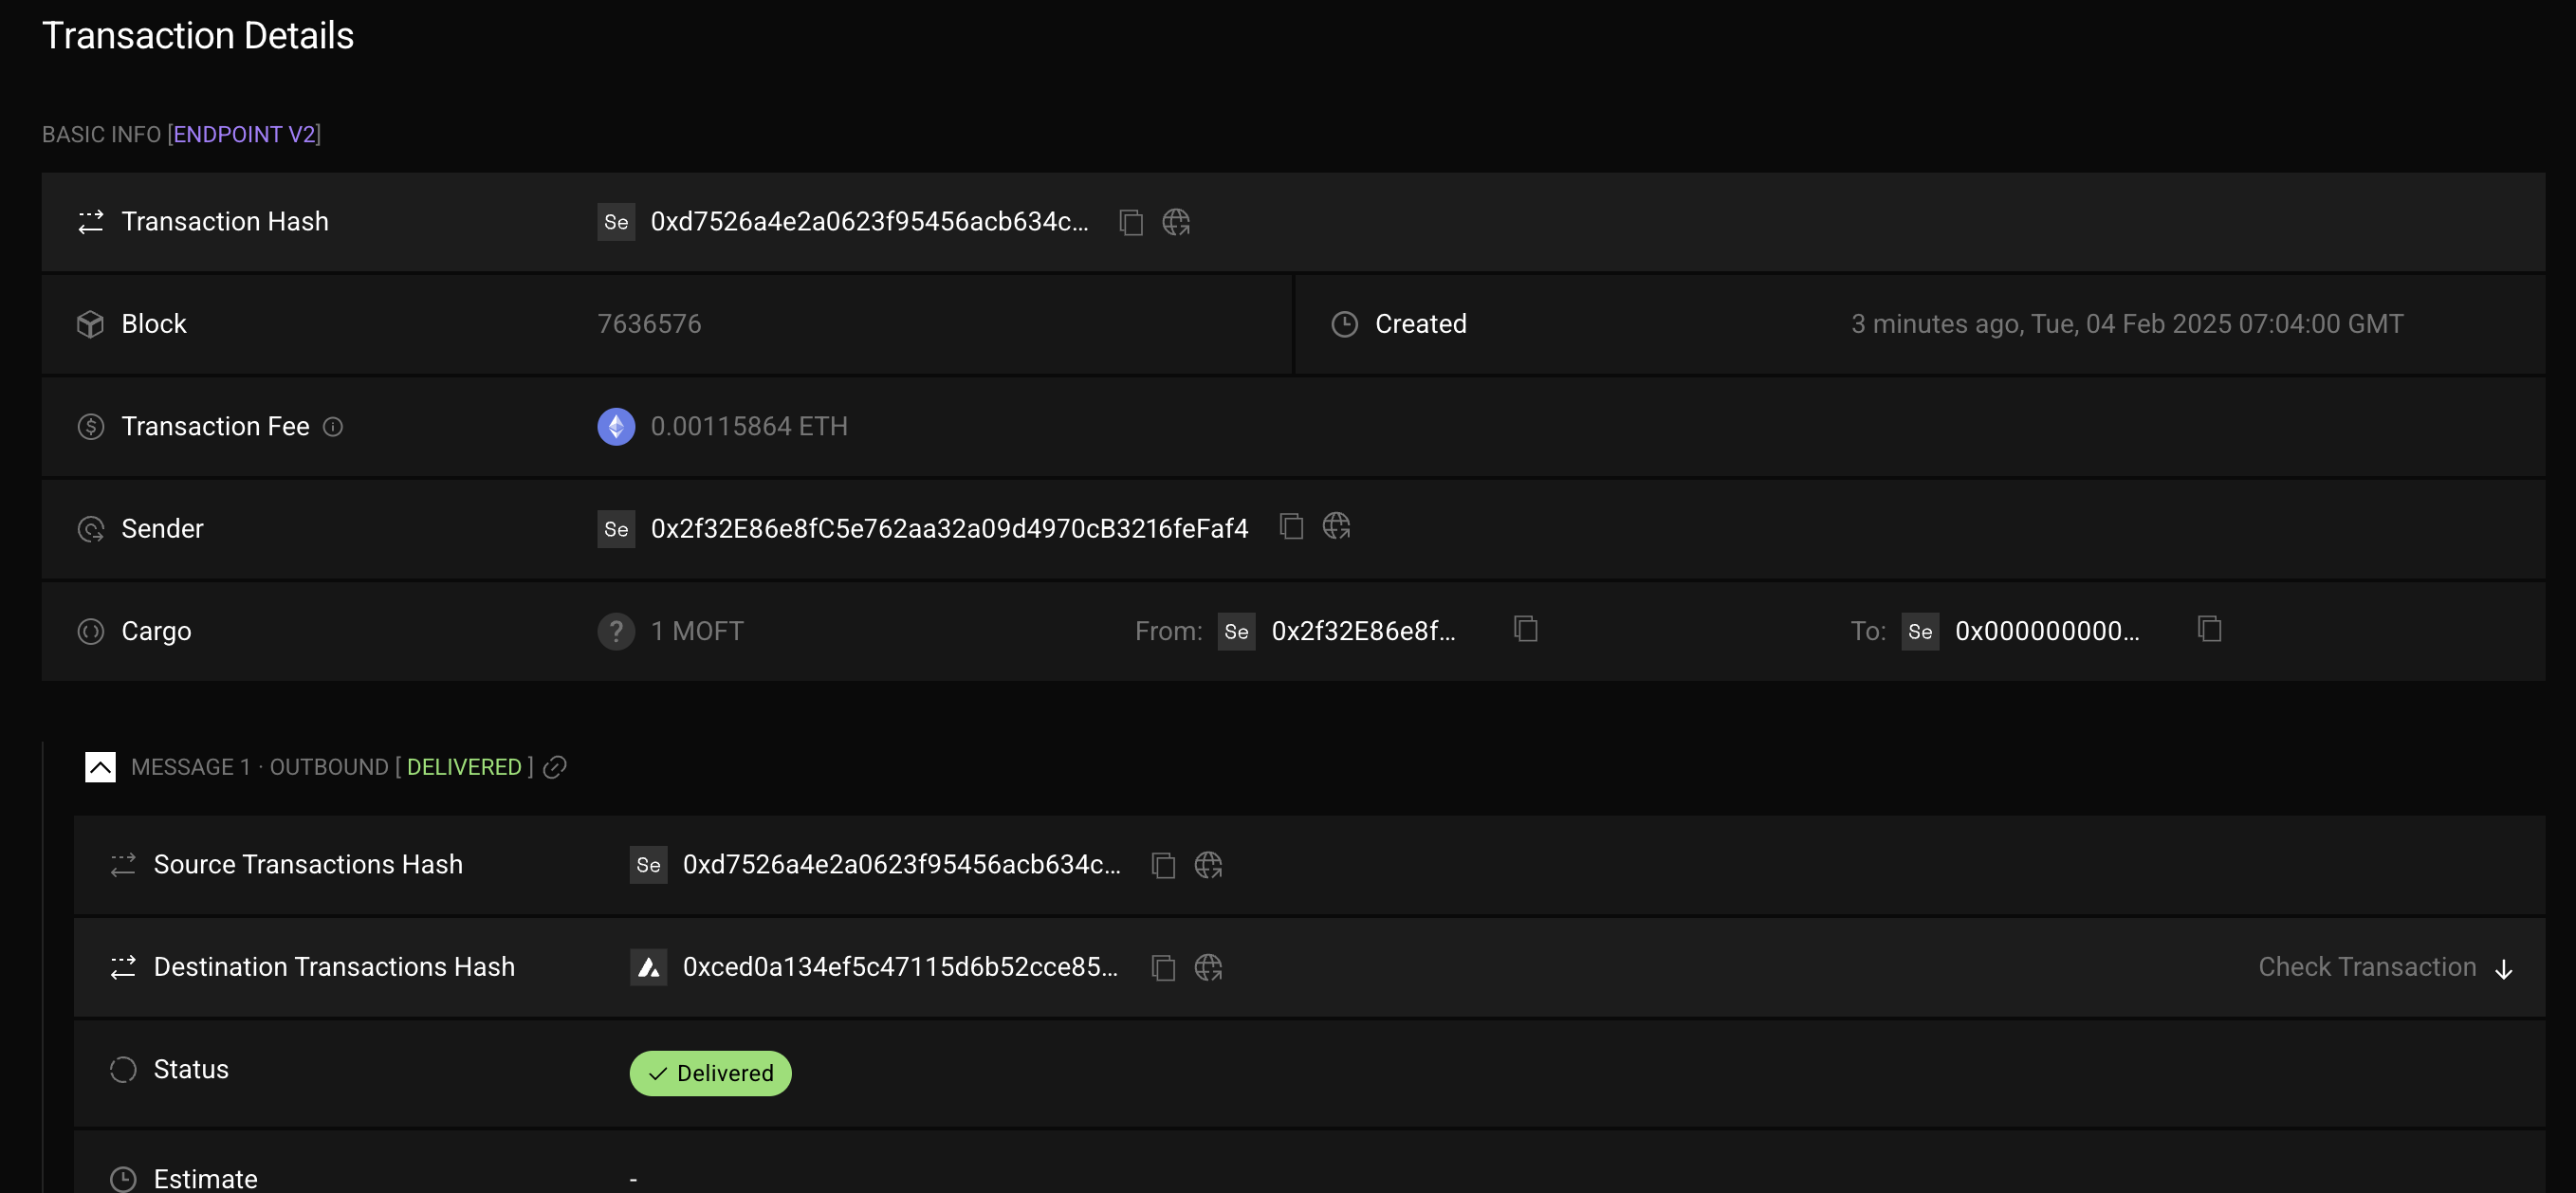
-
실제 Fuji chain에 전송된 것을 확인할 수 있음
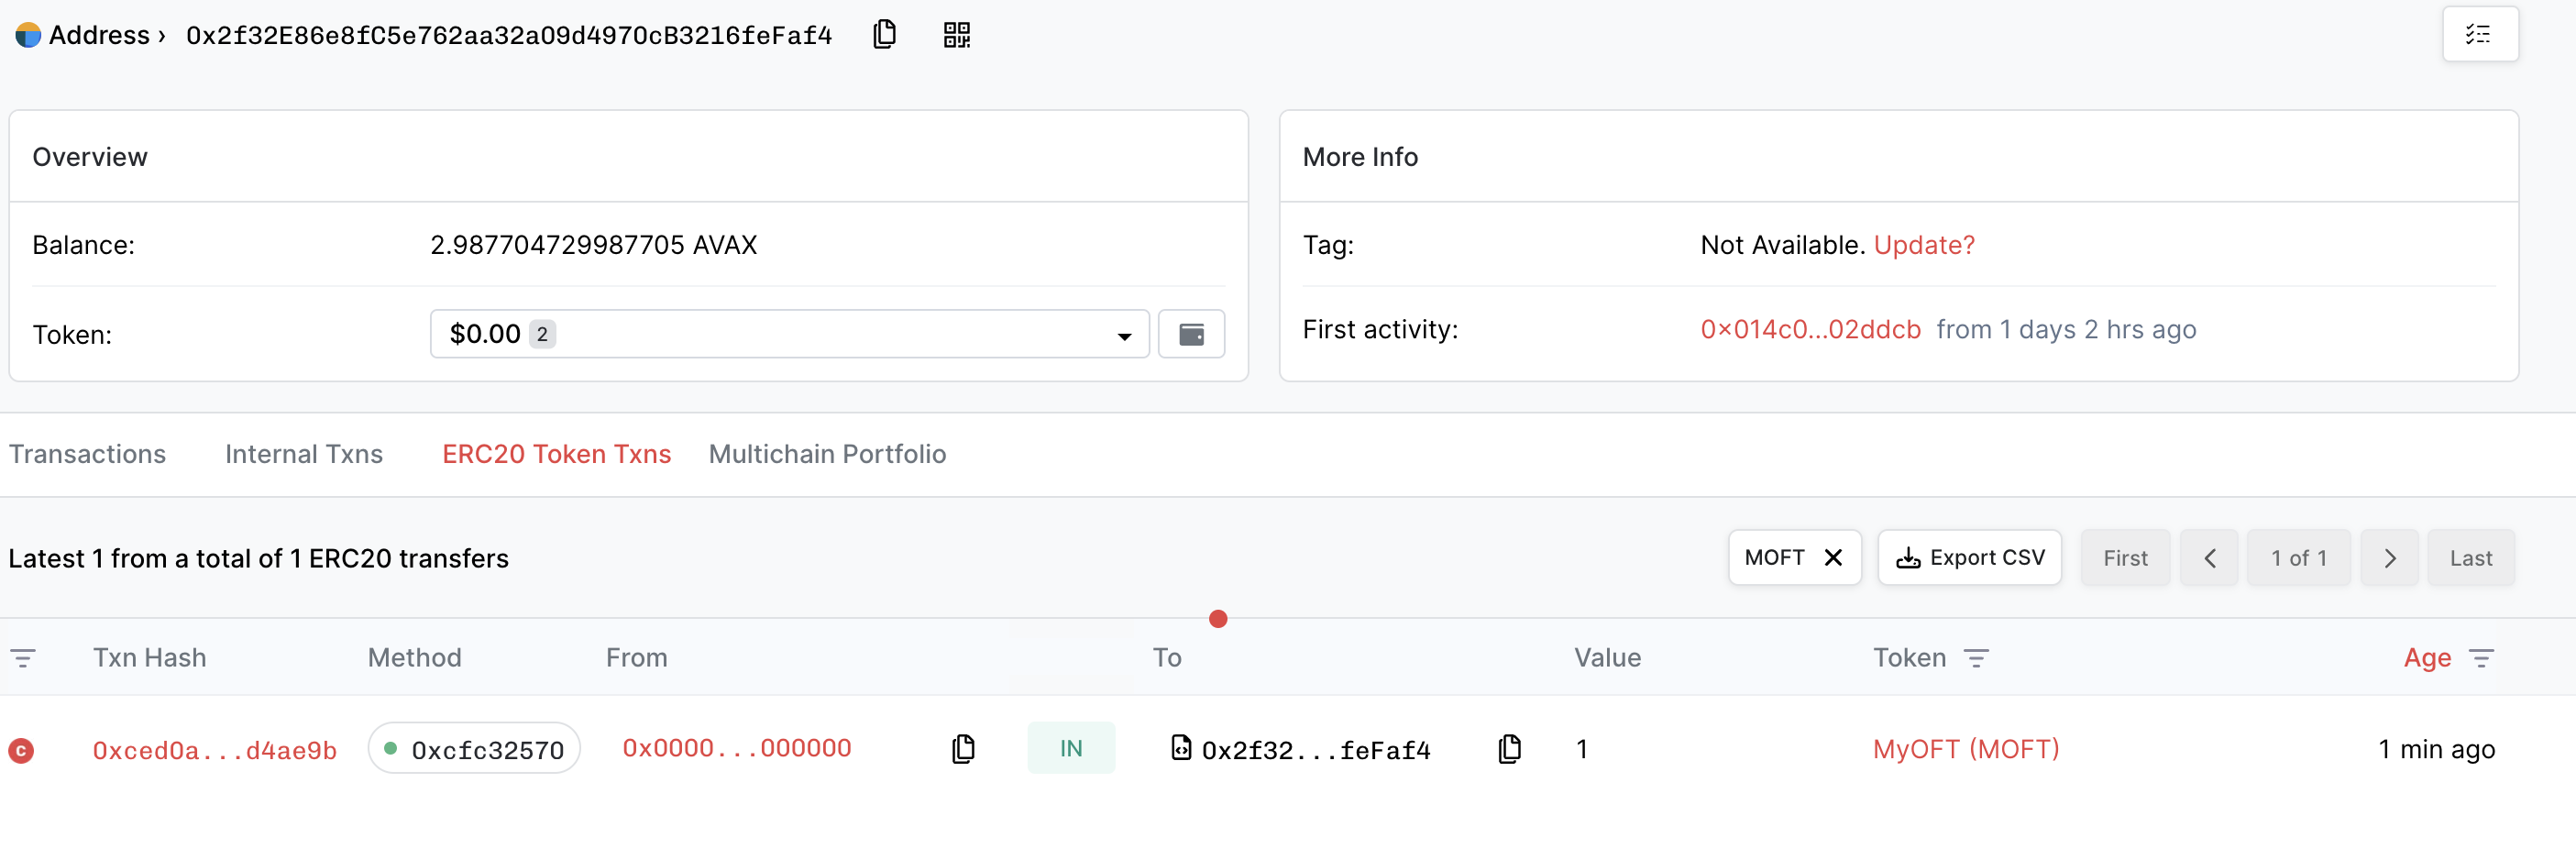
-
Source Chain에서는 send와 함께 Burn 처리됨
TroubleShooting
-
Message Blocked
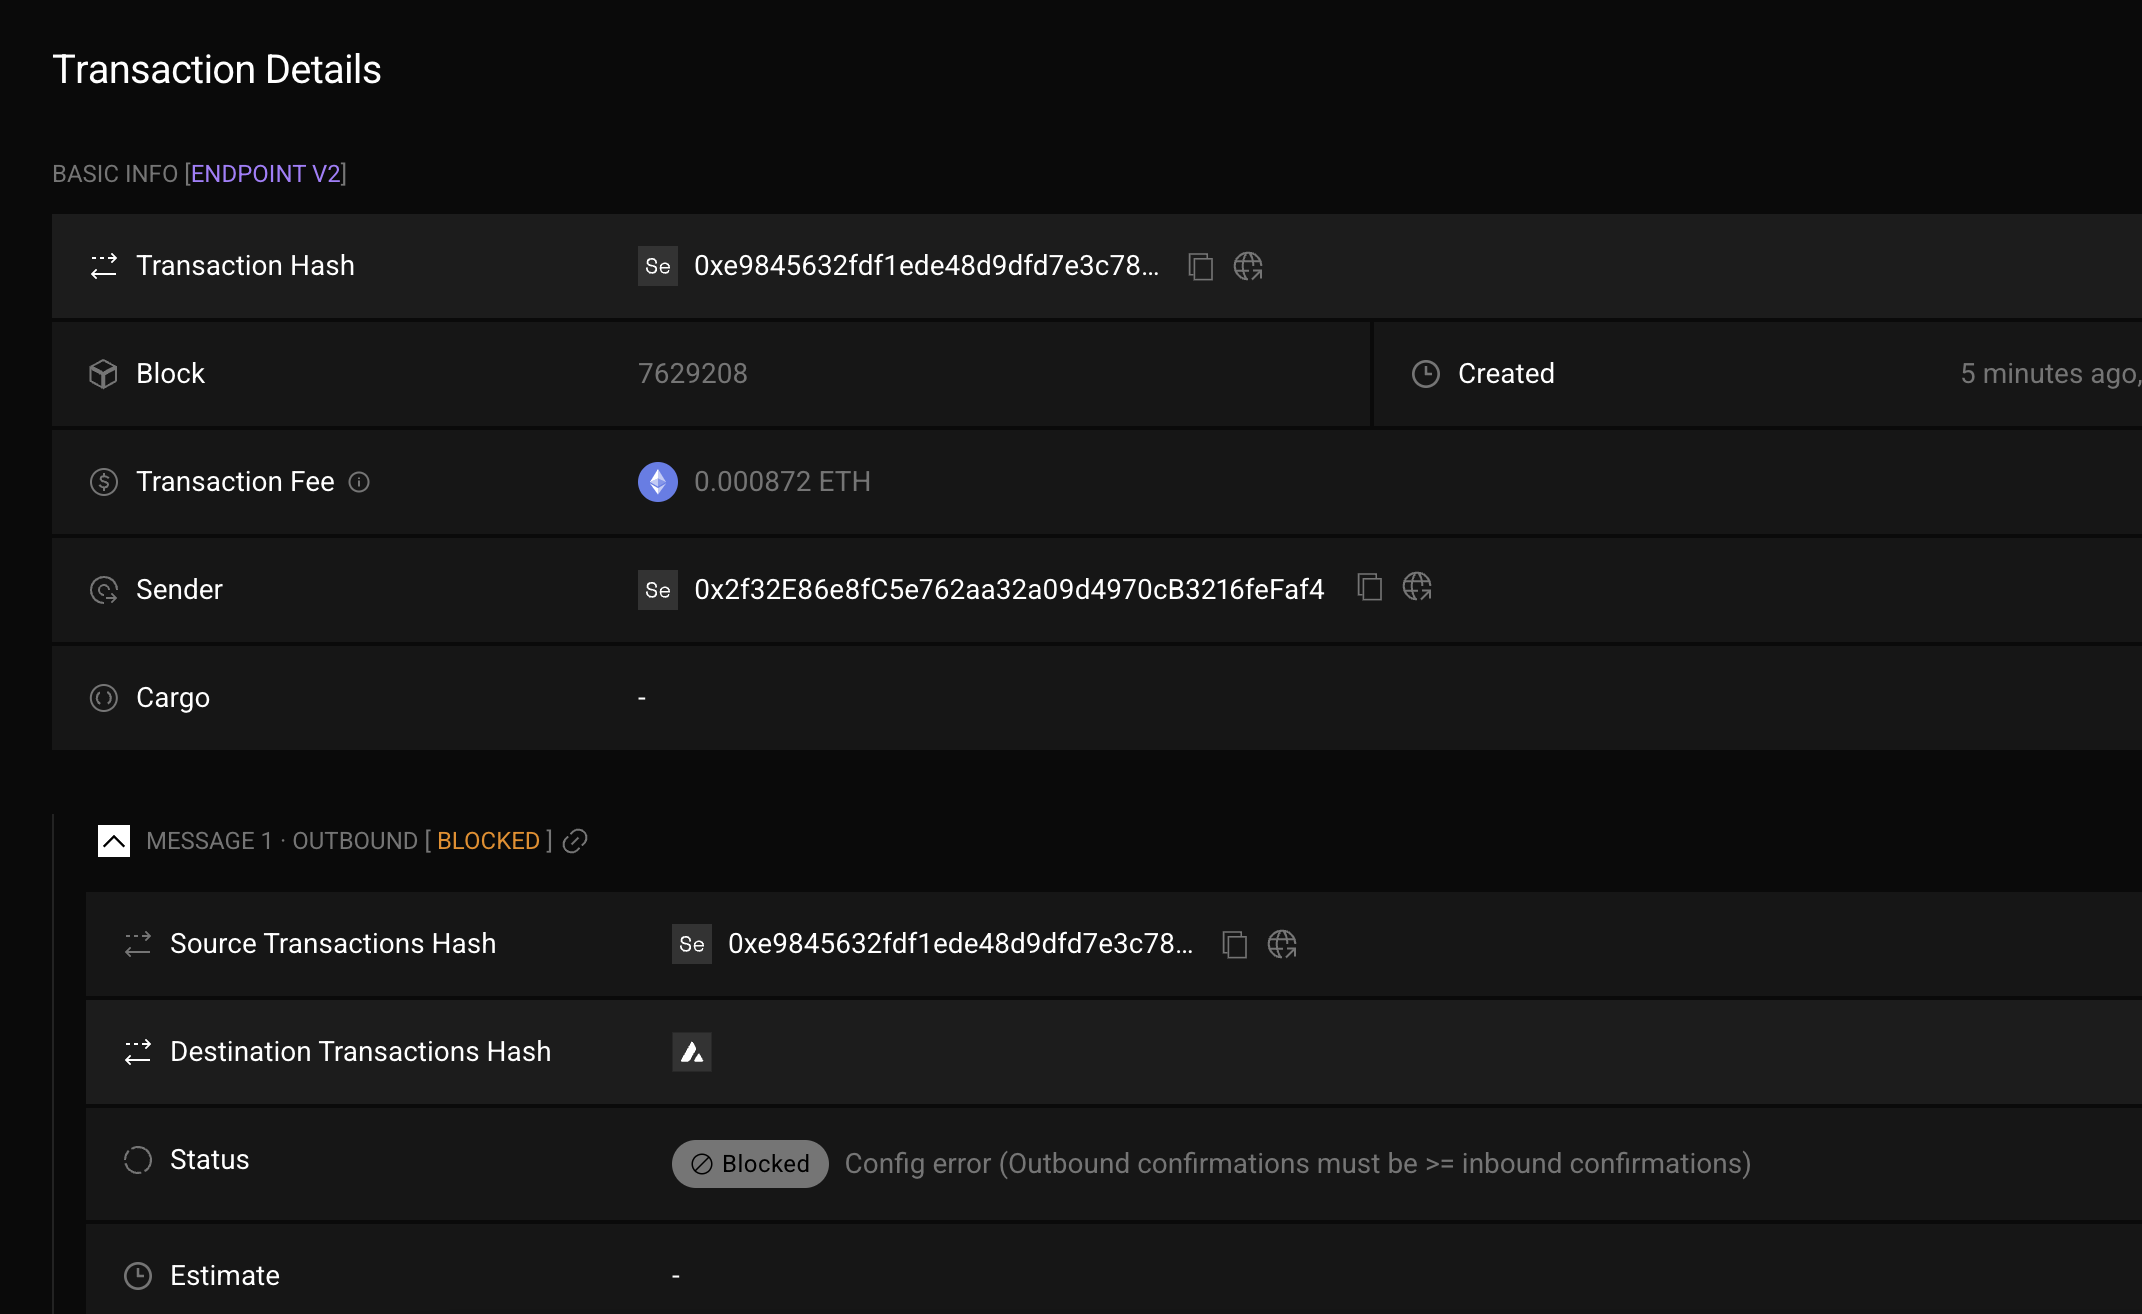
- Config이 잘못되는 경우 Blocked가 되는 경우가 있음
create-lz-oapp 을 사용해서 만드는 프로젝트의 기본설정을 사용했는데 그게 문제가 된 것 같음layerzero.config.ts 의 connections 부분을 수정
      connections: [
          {
              from: fujiContract,
              to: sepoliaContract,
          },
          {
              from: sepoliaContract,
              to: fujiContract,
          }
      ],